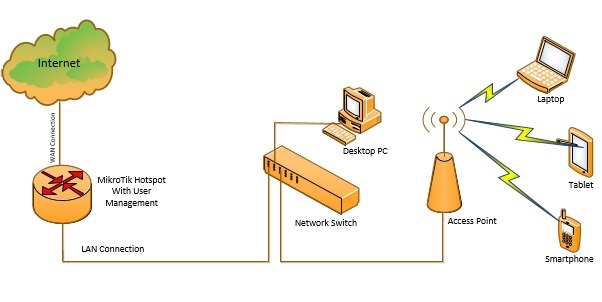
MikroTik Hotspot Configuration Using Winbox
Hotspot is one of the most popular services in MikroTik router. MikroTik Hotspot Gateway is a policy to authorize network clients before to access local network resources as well as public network resources through MikroTik Router. MikroTik Hotspot is also known as MikroTik captive portal because no user can access to network without authentication. In a Hotspot network, the user can login or authenticate using almost any web browser, so there is no need to install any additional software to client end. As Hotspot login prompt is a web page, Hotspot service can effectively be used as an advertising medium of your company as well as your partner company. So, MikroTik Hotspot service can popularly be used in a place where people stayed for a few time such as Hotel and Restaurant, Railway Station or Airport, School or University Campus and so on. Even any ISP network or any official network may also be run with MikroTik Hotspot for authenticating network clients/users. MikroTik Hotspot has a lot of features which helps to customize your network as your demand. Among these, a few frequently used features of MikroTik Hotspot are mentioned below.
MikroTik Hotspot Gateway Features
- Hotspot user management with local database or RADIUS Server.
- Multiple user authentication methods both in local database and RADIUS Server.
- Walled Garden system which helps to access some webpages without authentication.
- Trial user login without authentication with some conditions.
- Profile base advertising facility.
- Advertising partner company as well as own company within fixed time interval.
- Highly customizable login page where you can put company advertisement as well as partner advertisement.
- IP binding on a MAC address to provide fixed IP address to any device.
- Bypass known devices without authentication
- Able to store authorization credentials to cookie to avoid frequent login prompt.
These are some important features of MikroTik Hotspot Gateway. You may find more features about MikroTik Hotspot on MikroTik Hotspot Introduction Wiki Page. If you have enough time, visit the wiki page and learn more about MikroTik Hotspot. In my previous article I discussed how to configure MikroTik RouterOS elaboratelhow to configure MikroTik RouterOS elaborately. In this article, I will show how to configure and customize Hotspot Server in MikroTik Router so that you can easily run Hotspot service in your network smoothly.
Hotspot Configuration in MikroTik Router
MikroTik Hotspot configuration is not so difficult task. If you follow some easy steps, Hotspot will be configured perfectly. Complete Hotspot configuration can be divided into the following four steps.
- MikroTik router basic configuration
- MikroTik Hotspot server configuration
- Hotspot user profile configuration
- Hotspot user creation
Step 1: MikroTik Router Basic Configuration
MikroTik basic configuration includes assigning WAN, LAN, Gateway and DNS IP Address and NAT configuration. In Hotspot configuration, we do not need to configure NAT because it will automatically be configured while configuring Hotspot Server. So, we will assign WAN, LAN, Gateway and DNS IP Address in basic RouterOS configuration. For Hotspot configuration, I am using the following IP information. This information must be changed according to your ISP and network information.
- WAN IP: 192.168.30.2/30
- LAN Gateway IP: 172.22.22.1/24
- Gateway: 192.168.30.1
- DNS IP: 8.8.8.8 and 8.8.4.4 (Public DNS)
The following steps will show how to assign these information in MikroTik RouterOS using Winbox.
- Login to MikroTik Router using Winbox with full permission user credentials.
- Go to IP > Addresses menu item from Winbox. Address List window will appear. Click on PLUS SIGN (+). New Address window will appear. Now put WAN IP (192.168.30.1/30) in Address input field and choose MikroTik WAN interface from Interface drop-down menu and then click Apply and OK button
- Click on PLUS SIGN (+) again and put LAN Gateway IP (172.22.22.1/24) in Address input field and choose LAN interface from Interface drop-down menu and then click Apply and OK button
- Now go to IP > Routes. Route List window will appear. Click on PLUS SIGN (+) to add gateway address. In New Route window, put Gateway address (192.168.30.1) in Gateway input field and then click Apply and OK button.
- Now go to IP > DNS menu. DNS Settings window will appear. Put DNS server IP in Servers input field and if you wish to add secondary DNS IP, click on add new value button located after Servers input field and put secondary DNS server IP in new arrival input box. Now click on Allow Remote Requests check box so that the MikroTik Router acts as a DNS Server for Hotspot user. This option is necessary because your MikroTik router will be primary DNS server for your Hotspot user.
Basic MikroTik Router configuration has been completed. we will start Hotspot Server Configuration in MikroTik Router.
Step 2: MikroTik Hotspot Server Configuration
After completing MikroTik Router basic configuration, we will now setup Hotspot Server in our MikroTik Router. The following steps will show how to setup Hotspot in MikroTik Router.
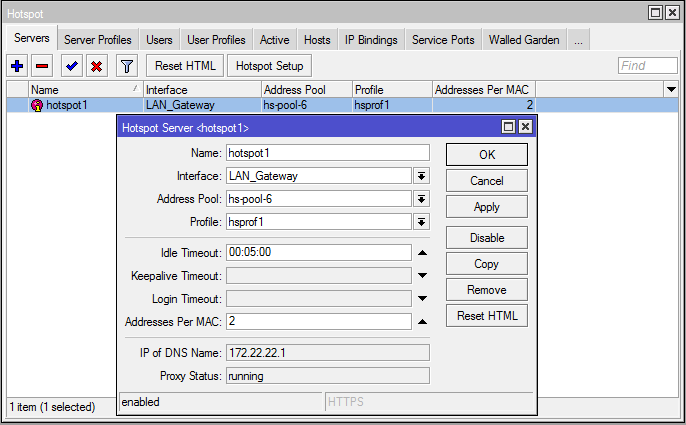
- Go to IP > Hotspot menu item from Winbox. Hotspot window will appear.
- Click on Hotspot Setup button. Hotspot Setup window will appear now.
- Choose LAN interface from Hotspot Interface drop-down menu. If you have bridge interface created before and want to setup Hotspot Server on bridge interface, choose the bridge interface from drop-down menu. Now click
Next button. - By default LAN Gateway IP will be assigned Local Address of Network input field. Make sure Masquerade Network checkbox is checked. Click Next button.
- Choose address pool for Hotspot Server from where IP address will be assigned to clients. Normally, it will show network IP range without gateway IP. We can change default range as we wish or can keep the default range. Click Next button.
- If you have SSL certificate, you can import by choosing import other certificate option. But Select none as we do not have any SSL certificate now. Click Next button.
- If you have SMTP server, you can put SMTP Server address in IP Address of SMTP Server input box. As we have no SMTP Server, keep it blank. Click Next button.
- DNS servers that we have provided in basic configuration will automatically be assigned in DNS Servers input field. So, nothing to do just click Next button.
- Now it is time to put DNS name and this is a mandatory field. DNS name will be used to get Hotspot login page. So, put a standard DNS name such as systemzone.mk or systemzone.net etc. and click Next button.
- Now put a local Hotspot User. By default it is admin. We can keep this user or change as our wish. Also put password in Password field for the User. Click Next button.
- Hotspot Server setup has been completed and you will get a successful message now.
MikroTik Hotspot Server Configuration has been completed. In the next step, we are going to create Hotspot user profile so that we can make user group and apply different facility to different user.
Step 3: Hotspot User Profile Configuration
After completing Hotspot Server configuration, we need to create and configure user profile. By creating different user profiles, we can make different user groups and can provide different facilities to different users such as we can assign fixed range’s IP to any profile users, we can assign fixed bandwidth to these users and we can also run different advertisement to different profile users.
The following steps will show how to create Hotspot user profiles in MikroTik Router.
- Go to IP > Hotspot. Hotspot window will appear.
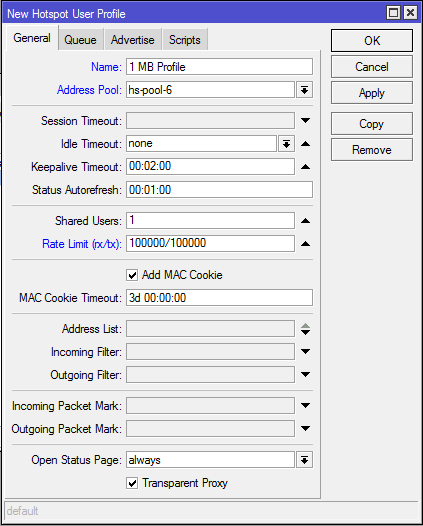
- Click on User Profiles tab. A default profile is present there but we do nothing to this default profile at this time rather we will create a new one. Click on PLUS SIGN (+). New Hotspot User Profile window will appear.
- In New Hotspot User Profile window, put a meaningful profile name (1 MB Profile) in Name input box and choose IP pool, from where IP address will be assigned to the users, from Address Pool drop-down menu.
- To assign bandwidth, put your targeted upload and download speed as bits per second in Rate Limit input box. For example, if we want to assign 1Mbps speed, write as 100000/100000.
- By default Add MAC Cookie checkbox will be enabled. If we keep Add MAC Cookie enabled, the MAC address will be kept in Cookie once successful login. So, a user does not require to login frequently. Default Cookie expire time is 3 days. If you want to extend cookie time, put the value in MAC Cookie Timeout field. MAC Cookie will be maintained by Hotspot Server but not with browser.
- Now click Apply and OK button.
We have successfully created a Hotspot user profile. Similarly, we can create as many user profiles as we need and can provide different facilities to different users.
Step 4: Hotspot User Creation
After creating user profiles, we need to create users and assign them to any profile so that they can get facility as their demand. The following steps will show how to create Hotspot user in MikroTik Router.
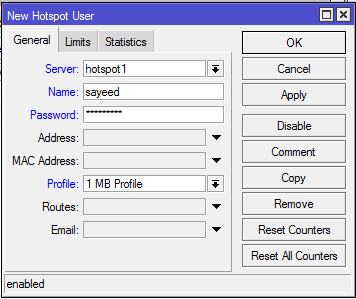
- Click on Users tab and you will find a user is already present there which we have created while installing Hotspot Server. Now we will create a new user. So, click on PLUS SIGN (+). New Hotspot User window will appear.
- In New Hotspot User window, select Hotspot server from Server drop-down menu.
- Put user name in Name input field and password in Password input field.
- Now choose user profile from Profile drop-down menu.
- It is possible to assign fixed IP address to any user. If you want to assign fixed IP address, put it in Address input field. You can also put client MAC address. If you put client MAC address in MAC Address input field, the user cannot login without this device.
- Now click Apply and OK button
A Hotspot user has been created successfully. Similarly, we can create as many users as we want and assign them to different profile to provide different facility.
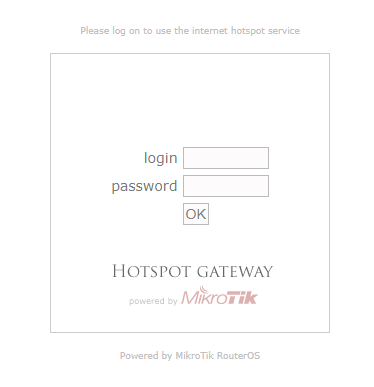
All the necessary steps to run a Hotspot service and to authenticate any user have been completed. Now it is time to test our Hotspot Server. For this, connect any IP device to your network. After connecting, a dynamic IP will be assigned to your device from DHCP Server that was created while installing Hotspot Server. Now open any web browser and try to visit any web page. You can see the login page of your Hotspot Server. If you do not get login page for any cause, type your DNS name that was provided while installing Hotspot Server. Now you can see your Hotspot login page. Put username and password and then click OK button. You are now able to visit any web page if you provide correct username and password.
All the necessary steps to configure Hotspot in MikroTik Router has been explained above. However, if you face any confusion, watch the following video tutorial about MikroTik Hotspot Configuration Using Winbox carefully. I hope it will reduce your confusion.
MikroTik Hotspot basic configuration has been explained in this article. I hope you will now be able to configure a Hotspot Service with MikroTik Router. However, if you face any problem to configure Hotspot Server with MikroTik Router, feel free to discuss in comment or contact me from Contact page. I will try my best to stay with you.
Why not a Cup of COFFEE if the solution?

I heard mikrotik hot-spot can be hacked easily. People can know which IP and mac is existing network by ‘angry IP scanner’and they can make change in there own device and get access. There is also browser called as “mortor” which can bypass security. Is there any solution? How can I secure hot-spot?
I cannot find “mortor” browser. Please give any link on this browser. Secondly, knowing MAC and IP, you cannot login hotspot. You must have username and password to get internet through hotspot. Brother configure your hotspot and try to hack. if you are successful, you will know how to make secure your hotspot and also share your knowledge with me. Thanks.
Sir,
I still have problem trying to input firewall rule on my router, it’s a bit difficult for me to do
Can you teach me on how that is done?
please tell me details on skype: sezan10
hi can you do configuration hotspot for mikrotik rb750?
It is same for all router version bro. Try to do according to this steps. Hope you will get result.
Thanks for the tutorial, how about when i want a hotspot for wifi users.. I can’ seem to make it work, where users will connect to the wifi and automatically redirect to the captive portal.. Please help
contact with me by email bro.
Hi good night, I seeking to set up. A hot spot system using ur device, I would like to know a few things
1. Would the Access point be able to run with out a pc after setting up the hotspot
2. Does this device offer voucher based access, free trial login and payment gateway such as paypal.
3. Can I use the SXT2 or which device would u recommend and how many device I would need
I am trying to cover a community where the AP wI’ll be face the community. E.g the AP in the center facing community and it has degrees to left and right.
hi Sayeed
im so interested with your tutorial,
im just wondering in WAN IP since my internet service provider is WIRELESS (LTE cellular connection)
everytime i reboot my modem or disconnect it will change WAN IP how to solved about my problem with WAN IP
No problem, you can use your mikrotik as a DHCP client for your WAN configuration.
Please guide me Build a wifi system with user authentication.
Mikrotik CCR1009-7G-1C-1S + router and Openmesh A60 accesspoint.
Why do I get
Hi there,
Error 400: Bad Request, Error page on the browser, wont allow me to login or login page doesn’t comes up.
I tried few times with my mikrotik routerboard(hap) , internet is working, everything is working apart from this hotspot configuration.
what can cause this issue?
Please fix.
sir,
i have mikrotik RB750gr3 New Model i want making public hotspot , but our ISP is not giving IP only give me a user name and password internet is working, please can you make me hotspot
IMO contact :+977-9807688505
They are giving you a pppoe username and password. For WAN configuration, you make your mikrotik as a PPPoE client.
Good work sayeed, I need a tutorial link to be a super mikrotik master.
Thanks
keep with system zone. Hope you will be. However, you can see document from mikrotik.com.
good work , i have follow along but my hotspot user’s internet is unstable when i disable the hotspot my start working and when enable the hotspot the internet becomes unstable again. ping say time out
Please follow my article step by step with another Router Board or RouterOS.
please help me
Hi jason,
Please tell me your problem. Hope I can be your friend.
What Microtik model do you recommend for a 50 user local Hotspot
you should first calculate bandwidth not user. If you need to maintain larger bandwidth, use CCR or you can use RB.
Brother, I have not yet use any mikrotik wireless AP. So, I cannot give you any better suggestion. You can find device spec from mikrot
ik site and can choose. But in my office I use mikrotik routerboard for controlling user and bandwidth and for AP I use ubnt AP with bridge mode enabled.
Nice work sir,
Pls If i use mikrotik as my dns server, what DNS Name would i used when creating hotspot.
Thank you
Hello
I would like to customize my homepage hotspot with the photos of a hotel but I can not do it, could you help me please?
How to customize login page is described here https://systemzone.net/mikrotik-hotspot-customization You just need to change html code and that is so simple. if further assistance is required, please contact with me.
generally we receives splash page when we are trying to connect with ap or hotspot environment, where is splash page is hosted and what is process behind this , please tell me sir
Please follow instructions carefully. If you have problem, contact on me sky from contact page with image. I will check and give you suggestion if possible.