MikroTik Hotspot Setup with Radius Server (User Manager)
Hotspot is one of the most popular services in MikroTik Router. It is popularly used in Hotel and Restaurant, Railway Station or Airport, School or University Campus and so on. Even ISP network and office network also use MikroTik Hotspot for authenticating network clients/users. Hotspot user can be managed with Hotspot’s local user database or with a Radius Server. Radius Server gives facility to manage Hotspot user’s bandwidth and accounting easily and centrally. So, Hotspot setup with Radius Server can be a wise decision. MikroTik User Manager Radius Server is a centralized user authentication and accounting application that gives the ISP or network administrator ability to manage PPP users, Hotspot users and login users from one server throughout a large network. It also has an awesome user bandwidth package management feature. So, network configuration with MikroTik Hotspot and MikroTik User Manager Radius Server will be a smart decision. For this, in this article I will discuss how to configure a smart network with MikroTik Hotspot and MikroTik User Manager Radius Server.
Article Purpose
The purpose of this article is to get ability to configure a Hotel and Restaurant network, Railway Station or Airport network, School or University Campus network, ISP network or Office network with MikroTik Hotspot and MikroTik User Manager Radius Server.
Network Diagram
For the configuration of this article I am going to establish a network like below network diagram.
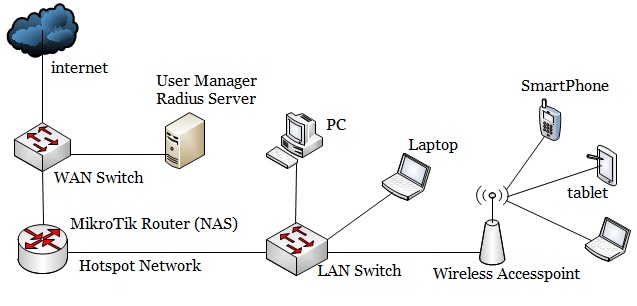
This is a simple and basic network diagram. In a real situation, your network might be larger than this network but the basic diagram will remain same. In this network, the WAN Distribution Switch is connected to internet gateway. MikroTik Router’s (NAS) WAN interface and MikroTik User Manager Radius Server is connected to this WAN Distribution Switch. Hotspot users will be connected to NAS Router through LAN Switch and will get internet access.
Core Devices and IP Information
To setup a Hotspot network according to above network diagram, I have installed and completed initial configuration of MikroTik User Manager Radius Server Package in a dedicated physical server where MikroTik RouterOS is running. I have also a physical MikroTik RouterOS (MikroTik RouterBOARD 1100AHX2) which is the NAS (Network Access Server) RouterOS in this network. IP information that I am using for this network configuration are given below.
- Radius Server IP: 192.168.110.10/28
- MikroTik RouterOS (NAS) WAN IP: 192.168.110.2/28
- LAN IP Block: 192.168.10.0/24
- Hotspot Server IP: 192.168.10.1
This IP information is just for my RND purpose. So, change this information according to your network requirements.
MikroTik Hotspot Configuration with MikroTik User Manager Radius Server
We are now going to start our Hotspot network configuration with User Manager Radius Server according to the above network diagram. The complete configuration can be divided into two parts.
- Part 1: MikroTik RouterOS Configuration (NAS Router)
- Part 2: MikroTik User Manager Radius Server Configuration
Part 1: MikroTik RouterOS Configuration (NAS Router)
In the first part, we will configure our MikroTik RouterOS (NAS) so that it can turn into a Hotspot Server and can communicate with Radius Server to authenticate users. Complete configuration can be divided into below topics.
- Basic MikroTik RouterOS Configuration
- Hotspot Configuration in MikroTik RouterOS
- Radius Client Configuration in MikroTik RouterOS
Basic MikroTik RouterOS Configuration
MikroTik Router basic configuration includes WAN IP Assign, DNS IP Assign, Default Gateway Configuration and NAT Configuration. The following steps will show how to perform these topics in your MikroTik RouterOS.
- Login to your MikroTik Router using Winbox with full permission user such as admin user.
- Go to IP > Addresses menu item. Address List window will appear. Click on PLUS SIGN (+). New Address window will appear.
- Put RouterOS WAN IP (RouterOS WAN IP: 192.168.110.2/28) in Address input field and choose WAN interface from Interface dropdown menu and then click Apply and OK button.
- Now go to IP > DNS. DNS Settings window will appear. Put your DNS server IP (Public DNS IP: 8.8.8.8 or 8.8.4.4) in Servers input field and then click Apply and OK button.
- Go to IP > Routes. Route List window will appear. Click on PLUS SIGN (+). New Route window will appear. Click on Gateway input box and put your internet gateway IP (in this network: 192.168.110.1) in this input field. Click on Apply and OK button.
MikroTik Router basic configuration has been completed. Now we will configure Hotspot Server in our NAS RouterOS.
Hotspot Configuration in MikroTik RouterOS
After completing MikroTik Router basic configuration, we will now setup Hotspot Server in our MikroTik RouterOS. The following steps will show how to setup Hotspot Server in your MikroTik RouterOS.
- Go to IP > Hotspot menu item. Hotspot window will appear.
- Click on Hotspot Setup button from this window. Hotspot Setup will appear now.
- Choose your LAN interface on which you want to setup Hotspot Server from Hotspot Interface drop-down menu. Now click Next button.
- Put your LAN address (in this case: 192.168.10.1/24) in Local Address of Network input box. Also check the Masquerade Network checkbox is checked and then click Next button.
- Now it is time to choose address pool for your Hotspot network from where IP address will be assigned to clients. Normally, it will show your network IP range without gateway IP. You can change default IP range as your wish or can keep the default range. Click Next button now.
- If you have SSL certificate, you can import by choosing import other certificate option or select none if you do not have any SSL certificate. Now click Next button.
- If you have SMTP server, you can put your SMTP server address in IP Address of SMTP Server input box or you can keep blank if you do not want to use SMTP server. Click Next button.
- Now it is option to setup DNS configuration. DNS servers that you have provided in basic configuration will automatically be selected here. So, nothing to do, just click Next button now.
- Now it is time to put DNS name which is a mandatory field. DNS name will be used to get Hotspot login page. So, put a standard DNS name such as systemzone.mk or systemzone.hotspot etc. and click Next button.
- Now put a local Hotspot user. By default it is admin. You can keep this user or change as your wish. Also put password in Password for the User input box. Click Next button.
- Hotspot server setup will be completed and you will get a successful message now.
- Click on Servers tab and you will find a new server has been created. Click on it and change your automated created server name if you wish and then find what the server profile is from Profile dropdown menu.
- Now click on Server Profiles tab and you will find your Hotspot Server profile here. Click on it and under General tab, change your server profile name if you wish and then Click on RADIUS tab and click on Use RADIUS checkbox and Accounting checkbox and then click Apply and OK button.
MikroTik Hotspot server configuration has been completed. In the next step, we will configure Radius client in our MikroTik RouterOS.
Radius Client Configuration in MikroTik RouterOS
The following steps will show you how to configure Radius client in MikroTik RouterOS.
- Click on Radius menu item from left menu bar. Radius window will appear now.
- Click on PLUS SIGN (+). New Radius Server window will appear now.
- Click on hotspot checkbox from Service panel.
- Put Radius Server IP address (in this article: 192.168.110.10) in Address input field.
- Provide a password in Shared Secret input field. This password is important and has to provide when client router will be configured in User Manager Radius Server.
- Click Apply and OK button.
- Now click on Incoming button and Radius Incoming window will appear.
- Click on Accept checkbox and put 1700 in Port input box and then click Apply and OK button.
Radius client configuration has been completed. Now MikroTik RouterOS is able to communicate with Radius Server to authenticate Hotspot users.
Part 2: MikroTik User Manager Radius Server Configuration
MikroTik User Manager Radius Server installation and initial configuration has been discussed in my previous article. If you don’t have enough introduction with User Manager Radius Server installation and initial configuration, first spend some time to study that article and complete your Radius Server installation and initial configuration and then continue my below section. In this section, I will do below topics in our Radius Server for Hotspot user authentication.
- Add Client Router (NAS) in Radius Server Router list
- User Profile Configuration in Radius Server
- Add User in Radius Server
Add Client Router (NAS) in Radius Server Router list
The following steps will show you how to add client router in User Manager Radius Server.
- Login to User Manager Radius Server web interface with customer or subscriber credentials using https://radius-server-ip-address/userman (for this configuration: https://192.168.110.10/userman) URL.
- Click on Routers button from left button panel and then click on Add > New menu item from top menu bar. Router Details window will appear now.
- In Main panel, put a meaningful name for your client router in Name input field. Also choose owner from Owner dropdown menu.
- Put your client router IP address (RouterOS IP: 192.168.110.2) in IP address input field.
- Now put shared secret password that you have provided at Radius client configuration in MikroTik RouterOS Shared secret input field.
- In Radius incoming panel, click on CoA support check box and put 1700 in CoA port input box.
- Click on Add button to add this router in Radius Server Router list.
MikroTik RouterOS (NAS) has been added in User Manager Radius Server as a client router. Now User Manager will reply any query that will ask by our NAS RouterOS.
User Profile Configuration in Radius Server
The following steps will show how to isolate Hotspot users based on their bandwidth usage using Radius Server’s user profile.
- Click on Profiles button from left button panel and then click on Limitations tab.
- Click on Add > New menu item from top menu bar. Limitation details window will appear now.
- In Main panel, put your package name what you want in Name input field. As I am creating my first 512kbps package, I am providing 512kbps Package in name field. Also choose owner from Owner dropdown menu.
- In Rate limits panel, put your bandwidth limitation parameter. For a 512kbps package, I am providing below information.
Parameter name Rx Tx Rate limit 512k 512k Burst rate 1M 1M Burst threshold 512k 512k Burst time 60 60 Min rate 32k 32k - Also choose priority from Priority dropdown menu. For my configuration I am choosing 8 that is the lowest priority.
- In Constraints panel, put IP Pool name that you will find at IP > Pool window in your NAS RouterOS.
- Click Save button to save this limitation package.
- Similarly, create 1Mbps or 2Mbps package limitations that you want. Just change Rate limits parameter according to your package requirements.
- Now click on Profiles tab and click on PLUS SIGN (+). Create profile window will appear now. Put profile name what you want in Name input field. For my configuration, I am providing 512kbps users as name. Click on Create button.
- First profile will be created and shown in Profiles dropdown menu.
- At the bottom of this profile, you will find Unlimited profile that mean there is no limitation for this profile. So, click on Add new limitation Profile part window will appear now.
- You will find your limitation packages that you have created in Limits panel. Click on your desired package (512kbps package for 512kbps users) and click on Add button to add this limitation for this profile.
- Similarly, create more user profiles as you wish and assign limitation on your created profiles.
Radius user profile has been created successfully. In the next section, we will add user in our Radius Server.
Add User in User Manager Radius Server
The following steps will show how to add users in User Manager Radius Server.
- Click on Users button from left button panel. Now click on Add > One menu item from top menu bar. User details window will appear.
- In Main panel, put client’s username and password that will be used to connect to Hotspot Server. Also choose owner from Owner dropdown menu.
- Choose your desired profile package for this user from Assign profile dropdown menu and then click on Add button to add this user.
You can add as many users as you want and can assign bandwidth package according to their demand following the above steps carefully.
Our Hotspot Server is ready to authenticate users via User Manager Radius Server. Now it is time to test our Hotspot server. For this, connect any IP device to your network. After connecting, a dynamic IP will be assigned to your device from DHCP server that was created while installing Hotspot server. Usually, Hotspot uses DHCP server to assign IP address and other related information that are necessary to get login page. Now open any web browser and try to visit any web page. You can see the login page of your Hotspot server. If you do not get login page for any cause, type your DNS name that was provided while installing Hotspot server. Now you can see your Hotspot login page like below image.
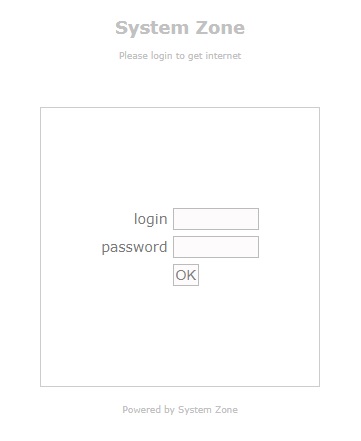
Put Radius username and password and then click OK button. You are now able to visit any webpage if you provide correct username and password.
I hope, you will be able to configure a Hotspot network with MikroTik User Manager Radius Server if you follow the above steps properly. However, if you face any confusion, watch my video tutorial about MikroTik Hotspot Configuration with User Manager Radius Server. I hope, it will reduce your any confusion.
MikroTik Hotspot Configuration with User Manager Radius Server has been explained in this article. I hope you are now able to setup a Hotspot Server with Radius Server in your network. However, if you face any confusion, feel free to discuss in comment or contact with me from Contact page. I will try my best to stay with you.
Why not a Cup of COFFEE if the solution?

Thanks a lot