MikroTik L2TP/IPsec VPN Configuration (Connecting Remote Client)
VPN (Virtual Private Network) is a technology that provides a secure and encrypted tunnel across a public network and using this VPN tunnel a private network user can send and receive data to any remote private network as if his/her network device was directly connected to that private network.
MikroTik L2TP server is one of the most popular VPN services. It provides a secure and encrypted tunnel across public network for transporting IP traffic using PPP. L2TP/IPsec is more secure than MikroTik PPTP VPN server. MikroTik L2TP Server can be applied in two methods.
- Connecting remote workstation/client: In this method, a L2TP client supported operating system such as Windows can communicate with MikroTik L2TP server through L2TP tunnel whenever required and can access remote private network as if it was directly connected to the remote private network.
- Site-to-Site L2TP: This method is also known as VPN between routers. In this method, a L2TP client supported router always establishes a L2TP tunnel with MikroTik L2TP Server. So, private networks of these routers can communicate to each other as if they were directly connected to the same router.
The goal of this article is to connect a remote client operating system using L2TP Tunnel across public network. So, in this article I will only show how to configure L2TP/IPsec VPN Server in MikroTik Router for connecting a remote workstation/client.
Network Diagram
To configure a L2TP Tunnel for connecting a remote workstation/client in MikroTik Router, I am following a network like below diagram.
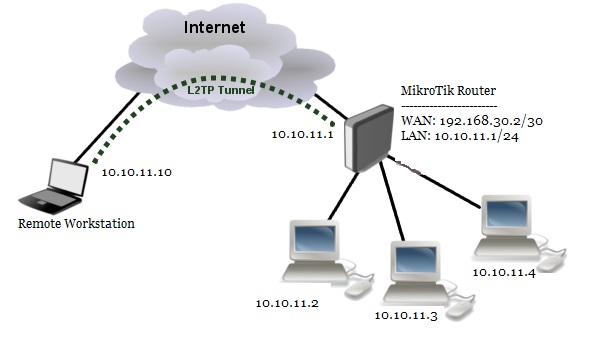
In this network, MikroTik Router is connected to internet through ether1 interface having IP address 192.168.30.2/30. In your real network, this IP address should replace with public IP address. MikroTik Router’s ether2 interface is connected to local network having IP network 10.10.11.0/24. We will configure L2TP/IPsec server in this router and after L2TP configuration the router will create a virtual interface (L2TP Tunnel) across public network whose IP address will be 10.10.11.1. On the other hand, a remote laptop (workstation/client) is connected to internet and wants to connect to our L2TP/IPsec server for accessing local network resources. We will configure L2TP/IPsec client in this laptop and after establishing a L2TP Tunnel across public network, this laptop will get a MikroTik Router’s local IP 10.10.11.10 and will be able to access MikroTik Router’s private network.
MikroTik L2TP/IPsec VPN Configuration
MikroTik L2TP can be used just as any other tunneling protocol but the L2TP standard says that the most secure way to encrypt data is using L2TP over IPsec. So if your router supports, it will be better to use L2TP Server over IPsec. L2TP/IPsec requires some extra configuration both in L2TP Server and L2TP client. Complete L2TP/IPsec VPN configuration can be divided into four steps.
- MikroTik Router basic configuration
- Enabling L2TP Server
- Creating PPP Secrets for L2TP Server
- Enabling proxy-arp on LAN interface
Step 1: MikroTik Router Basic Configuration
In the first step, we will assign WAN, LAN and DNS IP and perform NAT and Route configuration. The following steps will show how to do these topics in your RouterOS.
- Login to MikroTik RouterOS using winbox and go to IP > Addresses. In Address List window, click on PLUS SIGN (+). In New Address window, put WAN IP address (192.168.30.2/30) in Address input field and choose WAN interface (ether1) from Interface dropdown menu and click on Apply and OK button. Click on PLUS SIGN again and put LAN IP (10.10.11.1/24) in Address input field and choose LAN interface (ether2) from Interface dropdown menu and click on Apply and OK button.
- Go to IP > DNS and put DNS servers IP (8.8.8.8 or 8.8.4.4) in Servers input field and click on Apply and OK button.
- Go to IP > Firewall and click on NAT tab and then click on PLUS SIGN (+). Under General tab, choose srcnat from Chain dropdown menu and click on Action tab and then choose masquerade from Action dropdown menu. Click on Apply and OK button.
- Go to IP > Routes and click on PLUS SIGN (+). In New Route window, click on Gateway input field and put WAN Gateway address (192.168.30.1) in Gateway input field and click on Apply and OK button.
Basic RouterOS configuration has been completed. Now it is time to enable L2TP server in our MikroTik Router.
Step 2: Enabling L2TP Server
We will now enable L2TP Server in our MikroTik Router. The following steps will show how to enable L2TP Server in MikroTik RouterOS.
- Click on PPP menu item from winbox and then click on Interface tab.
- Click on L2TP Server button. L2TP Server window will appear.
- Check Enabled checkbox and also check pap and chap checkbox under Authentication panel.
- If your router support L2TP/IPsec and want to use L2TP over IPsec, click on Use IPsec checkbox and put security key that will be required at the time of L2TP client configuration, in IPsec Secret input field.
- Click on Apply and OK button.
L2TP Server is now running in our MikroTik Router. The next step is to configure L2TP user who will be authenticated to connect to L2TP Server for establishing a L2TP Tunnel.
Step 3: Creating PPP Secrets for L2TP Server
We will now create PPP Secrets (username and password) that will be required to connect to our L2TP Server. The following steps will show how to create PPP Secrets in your MikroTik Router.
- Click on PPP menu item from winbox and then click on Secrets tab.
- Click on PLUS SIGN (+). New PPP Secret window will appear.
- Put username (For example: sayeed) in Name input and password in Password input field. This username and password will be required at the time of L2TP client configuration.
- Put the gateway IP (10.10.11.1) for the remote client in Local Address input field and put a LAN IP (10.10.11.10) that will be assigned for the remote client when this user will be connected, in Remote Address input field.
- Click on Apply and OK button.
PPP user who will be connected from remote client machine has been created. At this point, if the user gets connected from the remote client machine and try to ping any workstation from the remote machine, the ping will time out because the remote client is unable to get ARPs from workstations. The solution is to set up proxy-arp on the LAN interface.
Step 4: Enabling proxy-arp on LAN Interface
The following steps will show how to enable proxy-arp on your LAN interface.
- Click on Interfacesmenu item and then click on interface tab.
- Click twice on your LAN interface (ether2). Interface property window will appear.
- Under General tab, choose proxy-arp from ARP dropdown menu.
- Click Apply and OK button.
After enabling proxy-arp, the remote client can successfully reach all workstations in the local network behind the router.
L2TP/IPsec Client Configuration
Almost all Operating Systems including Windows support L2TP/IPsec client. In this article, I will show how to configure L2TP client in Windows 7 operating system. All other Windows versions follow almost the same procedure.
- Go to Control Panel and choose View Items by Small icons and then click on the Network and Sharing Center item.
- From Network and Sharing Center window, click on Setup a new connection or network
- From Setup a New Connection or Network window, choose Connect to a workplace connection option and click on Next button.
- Connect to a Workplace window will ask: How do you want to connect? Click on Use my Internet connection (VPN)
- Now provide MikroTik Router’s WAN IP in Internet address input field and provide a name of your VPN in Destination name input field and then click on Create button. Your VPN network adapter will be created.
- Again go to Network and Sharing Center window and click on Change adapter settings Your newly created VPN adapter will be found here.
- Do this step if you enable L2TP over IPsec: Click mouse right button on your newly created VPN and then choose Properties In properties window, click on options tab and then uncheck Include Windows logon domain from Dialing options area. Now click on Security tab and choose L2TP/IPsec option from Type of VPN dropdown menu. Click on Advanced settings button and click on Use preshared key for authentication radio button and provide IPsec password that was provided at the time of L2TP server configuration, in Key input field and then click on OK button. Choose Maximum strength encryption from Data encryption dropdown menu and finally check only MS-CHAP v2 from Allow these protocols panel and then click on OK button.
- Click mouse right button again and click Connect
- Now provide L2TP user’s username and password in Username and Password input field respectively and then click Connect button.
If everything is OK, you will be able to connect to your L2TP server and a L2TP Tunnel will be created between MikroTik Router and your remote client. Now try to ping and hope there will be no problem to get ping reply.
If you use other operating system than Windows, please search in Google how to create L2TP/IPsec client at that specific operating system. I hope you will a get solution.
If you face any confusion to follow above steps properly, watch the following video about MikroTik L2TP/IPsec VPN Configuration carefully. I hope it will reduce your confusion.
MikroTik L2TP/IPsec VPN Configuration for Connecting a Remote Client has been discussed in this article. I hope you will be able to configure L2TP/IPsec VPN in your MikroTik Router if you follow the above steps properly. However, if you face any confusion, feel free to discuss in comment or contact with me from Contact page. I will try my best to stay with you.
Why not a Cup of COFFEE if the solution?

Hi Sayeed,
how can I connect more remote subnets (if I use a mikrotik client router) or more remote workstation by using the same Mikrotik VPN Server with static public IP ?
My scope is to access at one remote client network by using my remote workstation. Both client are connected at VPN server with different sub network. Both client have not static public IP but only access to internet.
Thanks
You can add as many remote clients as you want by adding more PPP profile and PPP secrets. In this article I have added only one remote client but you can create more clients with similar process and they can connect to your VPN Server.
VPN Server requires static public IP but client does not require public IP just need internet access.
Thanks sayeed, This article is very usefull.