MikroTik OpenVPN Setup with Windows Client
VPN (Virtual Private Network) technology provides a secure and encrypted tunnel across a public network. So, a private network user can send and receive data to any remote private network through VPN tunnel as if his/her network device was directly connected to that private network.
MikroTik OpenVPN Server provides a secure and encrypted tunnel across public network for transporting IP traffic using PPP. OpenVPN uses SSL Certificates. So, OpenVPN Tunnel is a trusted tunnel to send and receive data across public network. MikroTik OpenVPN Server can be applied in two methods.
- Connecting remote workstation/client: In this method, OpenVPN client software installed any operating system such as Windows can communicate with MikroTik OpenVPN server through OpenVPN tunnel whenever required and can access remote private network as if it was directly connected to the remote private network.
- Site to Site OpenVPN: This method is also known as VPN between routers. In this method, an OpenVPN client supported router always establishes an OpenVPN tunnel with MikroTik OpenVPN Server. So, private networks of these routers can communicate with each other as if they were directly connected to the same router.
The goal of this article is to connect a remote client using OpenVPN Tunnel across public network. So, in this article I will only show how to configure MikroTik OpenVPN Server for connecting a remote workstation/client (Windows Client).
Network Diagram
To configure a MikroTik OpenVPN Tunnel for connecting a remote workstation/client, I am following a network diagram like below image.
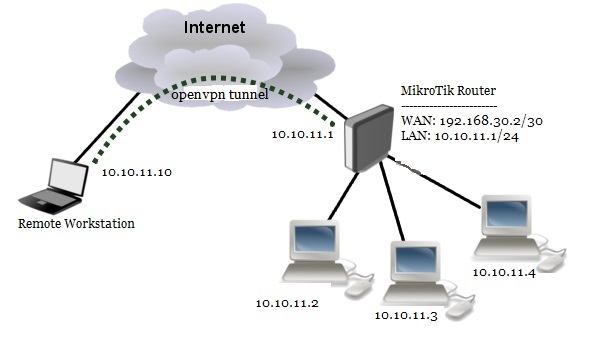
In this network, MikroTik Router (RouterOS v6.38.1) is connected to internet through ether1 interface having IP address 192.168.30.2/30. In your real network, this IP address should be replaced with public IP address. MikroTik Router’s ether2 interface is connected to local network having IP network 10.10.11.0/24. We will configure OpenVPN server in this router and after OpenVPN configuration the router will create a virtual interface (OpenVPN Tunnel) across public network whose IP address will be 10.10.11.1. On the other hand, a remote laptop (workstation/client) is connected to internet and wants to connect to our OpenVPN server for accessing local network resources. We will configure OpenVPN client in this laptop and after establishing an OpenVPN Tunnel across public network, this laptop will get a MikroTik Router’s local IP 10.10.11.10 and will be able to access MikroTik Router’s private network.
MikroTik OpenVPN Server Configuration
We will now start OpenVPN Server configuration. Complete OpenVPN configuration can be divided into two parts.
- Part 1: OpenVPN Server Configuration in MikroTik Router
- Part 2: OpenVPN Client Configuration in Windows OS
Part 1: OpenVPN Server Configuration in MikroTik Router
According to our network diagram, MikroTik Router is our OpenVPN Server. So, we will setup and configure OpenVPN Server in MikroTik Router. Complete MikroTik RouterOS configuration for OpenVPN Server can be divided into five steps.
- Step 1: MikroTik Router basic configuration
- Step 2: Creating SSL certificate for OpenVPN server and client
- Step 3: OpenVPN Server configuration
- Step 4: PPP Secret creation for OpenVPN client
- Step 5: Enabling Proxy ARP on LAN interface
Step 1: MikroTik Router basic configuration
In MikroTik Router basic configuration, we will assign WAN, LAN and DNS IP and perform NAT and Route configuration. The following steps will show how to do these topics in your RouterOS.
- Login to MikroTik RouterOS using winbox and go to IP > Addresses. In Address List window, click on PLUS SIGN (+). In New Address window, put WAN IP address (192.168.30.2/30) in Address input field and choose WAN interface (ether1) from Interface dropdown menu and click on Apply and OK button. Click on PLUS SIGN again and put LAN IP (10.10.11.1/24) in Address input field and choose LAN interface (ether2) from Interface dropdown menu and click on Apply and OK button.
- Go to IP > DNS and put DNS servers IP (8.8.8.8 or 8.8.4.4) in Servers input field and click on Apply and OK button.
- Go to IP > Firewall and click on NAT tab and then click on PLUS SIGN (+). Under General tab, choose srcnat from Chain dropdown menu and click on Action tab and then choose masquerade from Action dropdown menu. Click on Apply and OK button.
- Go to IP > Routes and click on PLUS SIGN (+). In New Route window, click on Gateway input field and put WAN Gateway address (192.168.30.1) in Gateway input field and click on Apply and OK button.
Basic RouterOS configuration has been completed. Now we will Create SSL certificate for OpenVPN server and client.
Step 2: Creating SSL certificate for OpenVPN Server and Client
OpenVPN server and client configuration requires SSL certificate because OpenVPN uses SSL certificate for secure communication. MikroTik RouterOS version 6 gives ability to create, store and manage certificates in certificate store. So, we will create required OpenVPN certificate from our RouterOS. OpenVPN server and client configuration requires three types of certificates:
- CA (Certification Authority) certificate
- Server certificate and
- Client certificate
Creating CA certificate
The following steps will show how to create CA certificate in MikroTik RouterOS.
- Go to System > Certificates menu item from winbox and click on Certificates tab and then click on PLUS SIGN (+). New Certificate window will appear.
- Put your CA certificate name (for example: ca) in Name input field. Also put a certificate common name (for example: ca) in Common Name input field.
- You will find some optional fields in General tab. You can fill if you wish. All fields are self-defined.
- Click on Key Usage tab and uncheck all checkboxes except crl sign and key cert. sign
- Click on Apply button and then click on Sign button. Sign window will appear now.
- Your newly created certificate template will appear in certificate dropdown menu. Select your newly created certificate template if it is not selected.
- Put MikroTik Router’s WAN IP address (192.168.30.2) in CA CRL Host input field.
- Click on Sign button. Your Sign certificate will be created within few seconds.
- Click on OK button to close New Certificate window.
- If newly created CA certificate does not show T flag or Trusted property shows no value, double click on your CA certificate and click on Trusted checkbox located at the bottom of General tab and then click on Apply and OK button.
CA certificate has been created successfully. Now we will create server certificate.
Creating Server Certificate
The following steps will show how to create server certificate in MikroTik RouterOS.
- Click on PLUS SIGN (+) again. New Certificate window will appear.
- Put your server certificate name (for example: server) in Name input field. Also put a certificate common name (for example: server) in Common Name input field.
- If you have put any optional field for CA certificate, put them here also.
- Click on Key Usage tab and uncheck all checkboxes except digital signature, key encipherment and tls server
- Click on Apply button and then click on Sign button. Sign window will appear now.
- Your newly server created certificate template will appear in certificate dropdown menu. Select your newly created certificate template if it is not selected.
- Also select CA certificate from CA dropdown menu.
- Click on Sign button. Your Sign certificate will be created within few seconds.
- Click on OK button to close New Certificate window.
- If newly created server certificate does not show T flag or Trusted property shows no value, double click on your server certificate and click on Trusted checkbox located at the bottom of General tab and then click on Apply and OK button.
Server certificate has been created successfully. Now we will create client certificate.
Creating Client Certificate
The following steps will show how to create client certificate in MikroTik RouterOS.
- Click on PLUS SIGN (+) again. New Certificate window will appear.
- Put your client certificate name (for example: client) in Name input field. Also put a certificate common name (for example: client) in Common Name input field.
- If you have put any optional field for CA certificate, put them here also.
- Click on Key Usage tab and uncheck all checkboxes except tls client
- Click on Apply button and then click on Sign button. Sign window will appear now.
- Your newly created client certificate template will appear in certificate dropdown menu. Select your newly created certificate template if it is not selected.
- Also select CA certificate from CA dropdown menu.
- Click on Sign button. Your Sign certificate will be created within few seconds.
- Click on OK button to close New Certificate window.
- Client certificate does not require T flag.
Client certificate has been created successfully. Now we will export CA and Client certificates so that OpenVPN client can use this certificate.
Exporting CA and Client Certificates
OpenVPN server will use server certificate from MikroTik RouterOS certificate store. But client certificate has to supply to the OpenVPN client. So, we need to export client certificate as well as CA certificate from RouterOS certificate store. The following steps will show how to export CA certificate and client certificate from MikroTik certificate store.
- Click twice on your CA certificate and then click on Export button from right button panel. Export window will appear.
- Choose your CA certificate from Certificate dropdown menu.
- Click on Export button now. Your CA certificate will be exported and Export window will be closed. Your exported CA certificate will be stored in File List.
- Again, click on Export button from right button panel and choose your client certificate from Certificate dropdown menu.
- Put a password in Export Passphrase input field. The password must be at least 8 characters and this password has to provide when OpenVPN client will be connected.
- Click on Export button now. Your client certificate and key file will be exported in File List.
- Now click on Files menu from winbox left menu panel. You will find two certificate file (.crt) and one key (.key) are exported here.
- Drag and Drop these three files in a folder on your Desktop. We will use these files when OpenVPN client will be configured.
Creating SSL certificate for OpenVPN server and client has been completed. Now we will configure our OpenVPN Server in MikroTik Router.
Step 3: OpenVPN Server Configuration in MikroTik Router
After creating SSL certificate, we are now eligible to enable OpenVPN Server in MikroTik Router. The following steps will show how to enable OpenVPN Server in your MikroTik Router with proper configuration.
- Click on PPP menu item from winbox and then click on Interface tab.
- Click on OVPN Server button. OVPN Server window will appear.
- Click on Enabled checkbox.
- From Certificate dropdown menu, choose server certificate that we created before. Also click on Require Client Certificate checkbox.
- From Auth. Panel, uncheck all checkboxes except sha1.
- From Cipher panel, uncheck all checkboxes except aes 256.
- Now click on Apply and OK button.
OpenVPN Server is now running in MikroTik Router. Now we will create OpenVPN user who will be connected to this server.
Step 4: PPP Secret creation for OpenVPN client
After OpenVPN Server setup, we need to create OpenVPN user who will be connected to OpenVPN Server. OpenVPN Server uses PPP user for authentication. So, we will now create PPP secret (username and password) for OpenVPN client. The following steps will show how to create PPP secret in MikroTik Router.
- Click on PPP menu item from winbox and then click on Secrets tab.
- Click on PLUS SIGN (+). New PPP Secret window will appear.
- Put username (For example: sayeed) in Name input and password in Password input field. This username and password will be required at the time of OpenVPN client configuration.
- Choose ovpn from Service dropdown menu.
- Put the gateway IP (10.10.11.1) in Local Address input field and put a LAN IP (10.10.11.10) that will be assigned in client workstation when this user will be connected, in Remote Address input field.
- Click on Apply and OK button.
PPP user who will be connected from remote client machine has been created. At this point, if the user gets connected from the remote client machine and try to ping any workstation from the remote machine, the ping will time out because the remote client is unable to get ARPs from workstations. The solution is to set up proxy-arp on the LAN interface.
Step 4: Enabling Proxy ARP on LAN Interface
The following steps will show how to enable proxy-arp on the LAN interface.
- Click on Interfacesmenu item from winbox and then click on interface tab.
- Click twice on your LAN interface (ether2). Interface property window will appear.
- Under General tab, choose proxy-arp from ARP dropdown menu.
- Click Apply and OK button.
After enabling proxy-arp, the remote client can successfully reach all workstations in the local network behind the router.
MikroTik OpenVPN Server is now completely ready to accept OpenVPN client. So, we will now configure OpenVPN client in Windows Operating System.
Part 2: OpenVPN Client configuration in Windows OS
OpenVPN.net provides OpenVPN client software for all the operating systems. You can visit to download page and download your OpenVPN client that is matched with your system requirement. I am using Windows 7, 64-bit operating system. So, I have downloaded Installer (64-bit), Windows Vista and later package. At the time of this article, the OpenVPN client version was 2.3.18.
After downloading, install OpenVPN client in your operating system following the instruction. Installation process is as simple as installing other software in Windows operating system.
After OpenVPN client installation, go to configuration file location (by default: C:\Program Files\OpenVPN\config or C:\Program Files (x86)\OpenVPN\config depending on your operating system) and follow my below steps to configure OpenVPN client.
- Create a file having (.ovpn) extension (for example: client.ovpn) and copy and paste below property and its value in this file and then save your file.
#Template client.ovpnclient
dev tun
proto tcp-client
remote 192.168.30.2
port 1194
nobind
persist-key
persist-tun
tls-client
remote-cert-tls server
ca ca.crt
cert client.crt
key client.key
verb 4
mute 10
cipher AES-256-CBC
auth SHA1
auth-user-pass secret
auth-nocache
Here, change remote IP Address according to your MikroTik WAN IP.
- Now copy and paste your exported CA and Client certificate files that you saved in your Desktop by dragging and dropping from MikroTik File List, in this location and rename CA file as ca.crt, client certificate file as client.crt and key file as client.key because we have used these names in our configuration file.
- Create another file named secret (because we have put auth-user-pass file is secret) without any extension and put OpenVPN PPP username at first line and password in second line and then save this file.
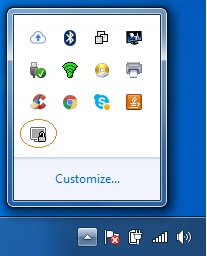
- Now run OpenVPN client software. You will find a new icon in your Taskbar or System tray like below image.
- Click mouse right button on this icon and then click Connect option. OpenVPN Connection window will appear and it will ask to put your client certificate password that you have entered at the time of client certificate exportation.
If you put correct password and if everything is OK, your OpenVPN client will be connected and an OpenVPN tunnel will be created between OpenVPN client and server.To check your configuration, do a ping request to any remote network workstation or server. If everything is OK, your ping request will be success.
If you face any confusion to follow above steps properly, watch my video about MikroTik OpenVPN Server Configuration with Windows Client carefully. I hope it will reduce your any confusion.
MikroTik OpenVPN Server configuration with Windows Client has been explained in this article. I hope you will be able to configure your OpenVPN Server and Client if you follow the explanation carefully. However, if you face any confusion to follow above steps properly, feel free to discuss in comment or contact with me from Contact page. I will try my best to stay with you.
Why not a Cup of COFFEE if the solution?

Follow my video instruction, hope no issue will occur. If any issue occur, please describe here.
Follow my video. Hope you will be success.