MikroTik PPPoE Setup with Radius Server Prepaid Billing System
MikroTik PPPoE Server is popularly used in ISP Companies to maintain user connection. Along with MikroTik PPPoE Service it is a better idea to make a prepaid billing system with Radius Server. MikroTik User Manager Radius Server is a user authentication and accounting application that gives the ISP Company ability to manage PPPoE user’s connection with proper bandwidth management as well as their prepaid billing system with scratch card. So, any ISP Company can turn a smart network system with MikroTik PPPoE Service and User Manager prepaid billing system. This article is designed to show how to setup an ISP network with MikroTik PPPoE Server and User Manager prepaid billing system.
Purpose of this Article
The purpose of this article is to setup an ISP network which will have
- MikroTik PPPoE Server for user connection.
- MikroTik User Manager Radius Server for user authentication and bandwidth package management.
- User Manager prepaid billing system with scratch card.
Network Diagram
For the configuration of this article I am going to establish a network like below network diagram.
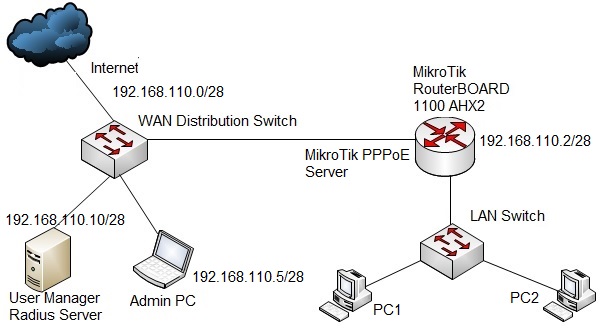
This is a simple and basic network diagram. In a real situation, your network may be larger than this network but the basic diagram will remain same. In this network, the WAN Distribution Switch is connected to internet gateway. MikroTik Router’s WAN interface, MikroTik User Manager Radius Server and our Admin PC is also connected to this WAN Distribution Switch. PPPoE users will be connected to core MikroTik Router through LAN Switch and will get internet access.
Core Devices and IP Information
To setup an ISP network according to above network diagram, I have installed and completed initial configuration of MikroTik User Manager Radius Server Package in a dedicated physical server where MikroTik RouterOS is running. I have also a physical MikroTik RouterOS (MikroTik RouterBOARD 1100AHX2) which is the core router in this network. IP information that I am using for this network configuration are given below.
- Radius Server IP: 192.168.110.10/28
- MikroTik RouterOS WAN IP: 192.168.110.2/28
- Admin PC IP: 192.168.110.5/28
- LAN IP Blocks: 192.168.10.0/24, 192.168.20.0/24 and 192.168.30.0/24
- PPPoE Server IP: 192.168.10.1
This IP information is just for my RND purpose. Change this information according to your network requirements.
ISP Setup with MikroTik PPPoE Server and User Manager Radius Server
We are now going to start our ISP network configuration according to above network diagram. Complete configuration to build an ISP network with MikroTik PPPoE Server and User Manager Radius Server prepaid billing system can be divided into two parts.
- Part 1: MikroTik Router Configuration (Core Router)
- Part 2: MikroTik User Manager Radius Server Configuration
Part 1: MikroTik Router Configuration (Core Router)
In this part, we will configure our core MikroTik Router so that it can turn a PPPoE Server and can communicate with Radius Server to authenticate users. Complete configuration can be divided into below topics.
- Basic MikroTik RouterOS Configuration
- PPPoE Server Configuration
- Radius Client Configuration
Basic MikroTik RouterOS Configuration
MikroTik Router basic configuration includes WAN IP Assign, DNS IP Assign, Default Gateway Configuration and NAT Configuration. The following steps will show how to perform these topics in your MikroTik RouterOS.
- Login to your MikroTik Router using Winbox with full permission user such as admin user.
- Go to IP > Addresses menu item. Address List window will appear. Click on PLUS SIGN (+) to add a new IP address. New Address window will appear.
- Put RouterOS WAN IP (RouterOS WAN IP: 192.168.110.2/28) in Address input field and choose WAN interface from Interface dropdown menu and then click Apply and OK
- Now go to IP > DNS. DNS Settings window will appear. Put your DNS server IP (Public DNS IP: 8.8.8.8 or 8.8.4.4) in Servers input field and then click Apply and OK
- Go to IP > Routes. Route List window will appear. Click on PLUS SIGN (+). New Route window will appear. Click on Gateway input box and put your internet gateway IP (in this network: 192.168.110.1) in this input field. Click on Apply and OK
- Go to IP > Firewall and click on NAT Now click on PLUS SIGN (+). New NAT Rule window will appear. Under General tab, choose srcnat from Chain dropdown menu. Put your first LAN IP block (for LAN 1 network: 192.168.10.0/24) in Src. Address input box. Under Action tab choose masquerade from Action dropdown menu. Click on Apply and OK button. Similarly create two more rules for 192.168.20.0/24 and 192.168.30.0/24 IP Blocks.
- Now go to IP > Pool. IP Pool window will appear. Under Pools tab click on PLUS SIGN (+). New IP Pool window will appear. Put an IP Pool name in Name input field. For this configuration I am providing first–ip-pool. This IP Pool name is important and has to provide when User Manager Profile limitation will be configured. Put IP ranges for first-ip-pool users in Addresses input field. For this configuration I am providing 192.168.10.2-192.168.10.254. Click Apply and OK
- First IP Pool has been created. Similarly create two more IP Pools for 192.168.20.0/24 and 192.168.30.0/24 IP block.
MikroTik Router basic configuration has been completed. Now we will configure PPPoE Server in our MikroTik RouterOS.
PPPoE Server Configuration in MikroTik RouterOS
After completing basic RouterOS configuration, we will now configure PPPoE server in our MikroTik RouterOS. The following steps will show you how to configure PPPoE server in MikroTik Router.
- Click on PPP menu item from Winbox left menu bar. PPP window will appear now.
- Click on Interface tab and then click on PLUS SIGN (+) dropdown menu. Choose PPPoE Server or PPPoE Server Binding dropdown menu option. New Interface window will appear. Under General tab, put PPPoE Server Interface name what you want or you can keep default name. Click Apply and OK
- Click on PPPoE Servers tab and then click on PLUS SIGN (+). New PPPoE Serivce window will appear.
- Put your PPPoE Server name in Service Name input box and then choose interface on which you want to setup PPPoE Server (in this article I am selecting ether2) from Interface dropdown menu. Click Apply and OK
- Click on Profiles tab and then double click on default Click on Local Address input field and put PPPoE Server’s IP Address (in this article: 192.168.10.1) in this text field. Click Apply and OK button.
- Now click on Secrets tab and then click on PPP Authentication and Accounting PPP Authentication and Accounting window will appear. Click on Use Radius check box and then click on Apply and OK button.
PPPoE Server that will use Radius Server for user authentication has been configured. Now we will configure Radius Client so that MikroTik RouterOS can be able to authenticate users from Radius Server.
Radius Client Configuration in MikroTik RouterOS
The following steps will show you how to configure Radius client in MikroTik RouterOS.
- Click on Radius menu item from left menu bar. Radius window will appear now.
- Click on PLUS SIGN (+). New Radius Server window will appear now.
- Click on ppp checkbox from Service
- Put Radius Server IP address (in this article: 192.168.110.10) in Address input field.
- Provide a password in Shared Secret input field. This password is important and has to provide when client router will be configured in User Manager Radius Server.
- Click Apply and OK
- Now click on Incoming Radius Incoming window will appear.
- Click on Accept checkbox and put 1700 in Port input box and then click Apply and OK
Radius client configuration has been completed. Now MikroTik RouterOS is able to communicate with Radius Server to authenticate PPPoE users.
Part 2: MikroTik User Manager Radius Server Configuration
MikroTik User Manager Radius Server installation and initial configuration has been discussed in my previous article. If you don’t have enough introduction with User Manager Radius Server installation and initial configuration, first spend some time to study that article and complete your Radius Server installation and initial configuration and then continue my below section. In this section, I will complete below topics in our Radius Server for PPPoE user authentication.
- Add client router in Radius Server Router list
- User profile configuration in Radius Server
- Create Voucher Template
- Add user in Radius Server
- How to access Radius user page
Add Client Router in Radius Server Router list
The following steps will show you how to add client router in User Manager Radius Server.
- Login to User Manager Radius Server web interface with customer or subscriber credentials using https://radius-server-ip-address/userman (for this configuration: https://192.168.110.10/userman) URL.
- Click on Routers button from left button panel and then click on Add > New menu item from top menu bar. Router Details window will appear now.
- In Main panel, put a meaningful name for your client router in Name input field. Also choose owner from Owner dropdown menu.
- Put your client router IP address (RouterOS IP: 192.168.110.2) in IP address input field.
- Now put shared secret password that you have provided at Radius client configuration in MikroTik RouterOS Shared secret input field.
- In Radius incoming panel, click on CoA support check box and put 1700 in CoA port input box.
- Click on Add button to add this router in Radius Server Router list.
MikroTik RouterOS has been added in User Manager Radius Server as a client router. Now User Manager will reply any query that will ask by our MikroTik RouterOS.
User Profile Configuration in Radius Server
Normally ISP Company maintains different bandwidth packages for their users. These bandwidth packages can easily be maintained with Radius Server user profile. So, we will now create three bandwidth packages (512kbps package, 1Mbps package and 2Mbps package) in User Manager Radius Server for our ISP users. The following steps will show how to create different ISP bandwidth packages in User Manager Radius Server.
- Click on Profiles button from left button panel and then click on Limitations
- Click on Add > New menu item from top menu bar. Limitation details window will appear now.
- In Main panel, put your package name what you want in Name input field. As I am creating my first 512kbps package, I am providing 512kbps Package in name field. Also choose owner from Owner dropdown menu.
- In Rate limits panel, put your bandwidth limitation parameter. For a 512kbps package, I am providing below information.
Parameter name Rx Tx Rate limit 512k 512k Burst rate 1M 1M Burst threshold 512k 512k Burst time 60 60 Min rate 32k 32k Also choose priority from Priority dropdown menu. For my configuration I am choosing 8 that mean lowest priority.
- In Constraints panel, put IP Pool name that you have provided for 512kbps Package at basic MikroTik Router configuration (I provided: first–ip-pool) in IP pool input box.
- Click Save button to save this limitation package.
- Similarly, create 1Mbps and 2Mbps package limitations. Just change Rate limits parameter according to your package requirements.
- Now click on Profiles tab and click on PLUS SIGN (+). Create profile window will appear now. Put profile name what you want in Name input field. For my configuration, I am providing 512kbps users as name. Click on Create
- First profile will be created and shown in Profiles dropdown menu.
- Select your package from Profiles dropdown menu and then put your package validity value in Validity input box. For example, if you want 30 days validity, put 4w2d in Validity input field.
- Choose package starting time At first logon from Starts dropdown menu.
- Put price of this package in Price input box.
- Keep Shared users value 1 so that only one user can login at a time with a username and password.
- Click Save profile button to save your information.
- At the bottom of this profile, you will find Unlimited profile that mean there is no limitation for this profile. So, click on Add new limitation Profile part window will appear now.
- You will find your limitation packages that you have created in Limits Click on your desired package (512kbps package for 512kbps users) and click on Add button to add this limitation for this profile.
First profile has been created successfully. Similarly create 1Mbps and 2Mbps user profile and then follow below section to create scratch card or voucher template.
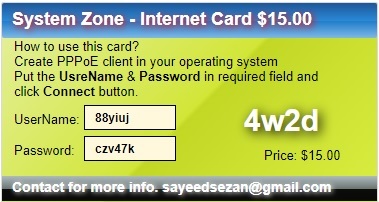
Create Voucher Template
Now we are going to create scratch card template so that after creating users we can print scratch card according to this template. The following steps will show how to create scratch card or voucher template in User Manager Radius Server.
- Click on Settings button from left button panel and then click on Templates
- Now choose Vouchers from Name dropdown menu.
- In Header textarea, put below HTML and CSS code.
<!DOCTYPE html PUBLIC "-//W3C//DTD XHTML 1.0 Transitional//EN" "https://www.w3.org/TR/xhtml1/DTD/xhtml1-transitional.dtd"> <html xmlns="https://www.w3.org/1999/xhtml"> <head> <title>Vouchers</title> <style> @media print { .noprint { display: none; } .pagebreak { page-break-after: always; } } body { font-family: 'Lucida Grande', 'Helvetica Neue', Helvetica, Arial, sans-serif; padding: 100px; font-size: 13px; } div.box { background: rgb(230,240,163); /* Old browsers */ background: -moz-linear-gradient(-45deg, rgba(230,240,163,1) 0%, rgba(210,230,56,1) 50%, rgba(195,216,37,1) 51%, rgba(219,240,67,1) 100%); /* FF3.6+ */ background: -webkit-gradient(linear, left top, right bottom, color-stop(0%,rgba(230,240,163,1)), color-stop(50%,rgba(210,230,56,1)), color-stop(51%,rgba(195,216,37,1)), color-stop(100%,rgba(219,240,67,1))); /* Chrome,Safari4+ */ background: -webkit-linear-gradient(-45deg, rgba(230,240,163,1) 0%,rgba(210,230,56,1) 50%,rgba(195,216,37,1) 51%,rgba(219,240,67,1) 100%); /* Chrome10+,Safari5.1+ */ background: -o-linear-gradient(-45deg, rgba(230,240,163,1) 0%,rgba(210,230,56,1) 50%,rgba(195,216,37,1) 51%,rgba(219,240,67,1) 100%); /* Opera 11.10+ */ background: -ms-linear-gradient(-45deg, rgba(230,240,163,1) 0%,rgba(210,230,56,1) 50%,rgba(195,216,37,1) 51%,rgba(219,240,67,1) 100%); /* IE10+ */ background: linear-gradient(135deg, rgba(230,240,163,1) 0%,rgba(210,230,56,1) 50%,rgba(195,216,37,1) 51%,rgba(219,240,67,1) 100%); /* W3C */ filter: progid:DXImageTransform.Microsoft.gradient( startColorstr='#e6f0a3', endColorstr='#dbf043',GradientType=1 ); /* IE6-9 fallback on horizontal gradient */ width: 3.6in; height: 2.1in; padding: 0 17px 18px 12px; margin: 10px 0; border: solid 1px #D9D9D9; border-radius: 10px; -webkit-border-radius: 2px; -moz-border-radius: 2px; } div.box h2 { background: rgb(30,87,153); /* Old browsers */ background: -moz-linear-gradient(top, rgba(30,87,153,1) 0%, rgba(41,137,216,1) 50%, rgba(32,124,202,1) 51%, rgba(125,185,232,1) 100%); /* FF3.6+ */ background: -webkit-gradient(linear, left top, left bottom, color-stop(0%,rgba(30,87,153,1)), color-stop(50%,rgba(41,137,216,1)), color-stop(51%,rgba(32,124,202,1)), color-stop(100%,rgba(125,185,232,1))); /* Chrome,Safari4+ */ background: -webkit-linear-gradient(top, rgba(30,87,153,1) 0%,rgba(41,137,216,1) 50%,rgba(32,124,202,1) 51%,rgba(125,185,232,1) 100%); /* Chrome10+,Safari5.1+ */ background: -o-linear-gradient(top, rgba(30,87,153,1) 0%,rgba(41,137,216,1) 50%,rgba(32,124,202,1) 51%,rgba(125,185,232,1) 100%); /* Opera 11.10+ */ background: -ms-linear-gradient(top, rgba(30,87,153,1) 0%,rgba(41,137,216,1) 50%,rgba(32,124,202,1) 51%,rgba(125,185,232,1) 100%); /* IE10+ */ background: linear-gradient(to bottom, rgba(30,87,153,1) 0%,rgba(41,137,216,1) 50%,rgba(32,124,202,1) 51%,rgba(125,185,232,1) 100%); /* W3C */ filter: progid:DXImageTransform.Microsoft.gradient( startColorstr='#1e5799', endColorstr='#7db9e8',GradientType=0 ); /* IE6-9 */ margin: 0 -17px 1px -12px; padding: 15px 0px 0 10px; height: 20px; border-top-left-radius: 10px; border-top-right-radius: 10px; -webkit-border-radius: 2px; -moz-border-radius: 2px; font: bold 18px/0.2 Arial; color: #fff; text-shadow: red 0.1em 0.1em 0.6em} div.box h3 { background-color: #FFF8DC; border-color: #000; border-style:solid; border-width:1px; margin: -35px 0 0 70px; padding: 12px 50px 3px 10px; height: 8px; width: 30px; font: bold 12px/0 Arial; color: #000; } div.box h4 { background: rgb(174,188,191); /* Old browsers */ background: -moz-linear-gradient(top, rgba(174,188,191,1) 0%, rgba(110,119,116,1) 50%, rgba(10,14,10,1) 51%, rgba(10,8,9,1) 100%); /* FF3.6+ */ background: -webkit-gradient(linear, left top, left bottom, color-stop(0%,rgba(174,188,191,1)), color-stop(50%,rgba(110,119,116,1)), color-stop(51%,rgba(10,14,10,1)), color-stop(100%,rgba(10,8,9,1))); /* Chrome,Safari4+ */ background: -webkit-linear-gradient(top, rgba(174,188,191,1) 0%,rgba(110,119,116,1) 50%,rgba(10,14,10,1) 51%,rgba(10,8,9,1) 100%); /* Chrome10+,Safari5.1+ */ background: -o-linear-gradient(top, rgba(174,188,191,1) 0%,rgba(110,119,116,1) 50%,rgba(10,14,10,1) 51%,rgba(10,8,9,1) 100%); /* Opera 11.10+ */ background: -ms-linear-gradient(top, rgba(174,188,191,1) 0%,rgba(110,119,116,1) 50%,rgba(10,14,10,1) 51%,rgba(10,8,9,1) 100%); /* IE10+ */ background: linear-gradient(to bottom, rgba(174,188,191,1) 0%,rgba(110,119,116,1) 50%,rgba(10,14,10,1) 51%,rgba(10,8,9,1) 100%); /* W3C */ filter: progid:DXImageTransform.Microsoft.gradient( startColorstr='#aebcbf', endColorstr='#0a0809',GradientType=0 ); /* IE6-9 */ margin: 0px -17px 0px -12px; padding: 10px 10px 5px 10px; height: 10px; font: bold 14px/0.2 Arial; color: #fff; text-shadow: white 0.1em 0.1em 0.6em } .txtbox { background-color: transparent; width: 330px; } </style> </head> <body> - In Row textarea, put below HTML and CSS code.
<div class="box"> <h2>System Zone - Internet Card $%u_moneyPaid%</h2> <div class="txtbox"> How to use this card? <br> Create PPPoE client in your operating system <br> Put the <b>UsreName</b> & <b>Password</b> in required field and click <b>Connect </b> button.</b> </br> </div> <p align="left"> UserName: <h3>%u_username%</h3> </p> <p align="left"> Password: <h3>%u_password%</h3></p> <h5 style="margin-top: -70px; margin-left: 230px; font: bold 30px Arial; color: #fff; text-shadow: black 0.1em 0.1em 0.6em;">%u_timeLeft%</h5> <p style="margin-top: -40px; margin-left: 250px;"> Price: $%u_moneyPaid%</p> <h4>Contact for more info. sayeedsezan@gmail.com</h4> </div> - Click Save button to save this voucher template.
You can change this card design if you have a little HTML and CSS idea. Card text can also be changed without having knowledge on HTML and CSS. In Row textarea, you just change card text according to your requirement.
Add User in User Manager Radius Server
The following steps will show how to add users in User Manager Radius Server.
- Click on Users button from left button panel. Now click on Add > Batch menu item from top menu bar. User details window will appear.
- In Main panel, choose owner from Owner dropdown menu and provide number of users you want to create at a time. You can also provide username prefix as well as username and password length in this panel.
- Choose your desired profile package for these users from Assign profile dropdown menu and then click on Add button to add these users. All the created users will be available in Users
- Now click on all the users checkbox for whom you want to create scratch card.
- Click on Generate menu and then choose Vouchers Vouchers window will appear.
- Now click on Generate button and you will find your entire scratch cards in a HTML page like below image.
Now sell these cards to your nearest shop and get auto revenue. Your users just need to create or configure PPPoE client in their operating system and then provide printed username and password to connect your PPPoE Server. If everything is OK, your user will be connected to your network according to your desired time period.
How to Access Radius User Page
Radius Server offers a user page where user can login their profile page and can show their account status as well as can change their account information and password. The following steps will show how to access Radius user page.
- Type https://radius_server_ip_address/user to get user login page if you have only one subscriber or customer in your Radius Server. But if you have more than one customer or subscribe, you have to type https://radius_server_ip_address/user/public_id where public_id is Public ID of the customer or subscriber. This Public ID must provide when customer or subscriber is created.
- Type username and password of your desired user in Login and Password input field and then hit login button.
- Now user can show his account status, profile, sessions and payment option from this page. Also he can change his password from Settings
How to Create or Configure PPPoE Client
In an ISP network, PPPoE client is mainly configured in a wireless router or in a PC. In a wireless router PPPoE client is already configured and you just need to provide username and password to connect to a PPPoE Server. Most of the ISP users generally use windows operating system. So, in this article I am going to show how to configure PPPoE client in Windows 7 Operating System. All other versions of windows operating system follow almost the same procedure. So, you will not face any difficulty, I think. However, if you feel any problem to configure PPPoE client of any operating platform, I recommend you to do Google and learn how to configure PPPoE client of that specific operating platform.
Steps to Create PPPoE Dial Up Connection in Windows 7
Microsoft PC dialer is used to connect remote PPPoE server in window 7 to get access to internet. So, you have to configure Microsoft PC dialer in windows 7 PC to get access to internet through your MikroTik router. The following steps will show you how to create PPPoE dial up connection in windows 7 operating system with built in PPPoE wizard.
- Connect an Ethernet cable to windows 7 PC from your network switch.
- Open Network and Sharing Centerfrom Control Panel.
- Now click on Setup a new connection or networklink under Change your networking settings area. Set Up a Connection or Network window will appear.
- In this window, click on Connect to the internetoption and click on Next Connect to the Internet window will appear.
- Click on Broadband (PPPoE)option from this window and put username and password that you have created in User Manager Radius Server. Optionally, you can change connection name from Connection name input field and you can also click on Remember this password option otherwise you have to provide password every time you start your PC. Now click on Connect If you provide correct username and password, The connection to the Internet is ready to use message will be shown. Now click on Close button. A dialer will be created in your windows 7 PC and you can enter your credential anytime to connect Internet with this dialer.
You are now connected to the internet with PPPoE dialer. Browse any site. I hope, you will be success to browse any site now.
I hope, you will be able to setup an ISP with MikroTik PPPoE Server and User Manager Radius Server prepaid billing system if you follow the above steps properly. However, if you face any difficulty to do above steps properly, follow my video tutorial about MikroTik PPPoE Server Configuration with User Manager prepaid billing system. I hope, it will reduce your any confusion.
MikroTik PPPoE Server Configuration with User Manager Radius Server Prepaid Billing System has been discussed in this article. I hope you will be able to setup your ISP with MikroTik PPPoE Server and User Manager Radius Server prepaid billing system. However, if you face any problem to configure your PPPoE Server and User Manager Radius Server with prepaid billing system, feel free to discuss in comment or contact with me from Contact page. I will try my best to stay with you.
Why not a Cup of COFFEE if the solution?

Thank to you I am so happy to you .Please give me your mobile number because I want always connect with you.