How to Configure MikroTik RouterOS v7 First Time
MikroTik RouterOS v7 (both Long-term and Stable) has been released with new features. So, it is usual that if you buy a new MikroTik Router, it will be RouterOS v7. RouterOS v7 has some changes. So, if you are an old RouterOS user, you may face some new features those were not in the previous version. But there is no need to be heisted because there is a correlation between the old and the new versions. So, you can absorb it so easily.
On the other hand, if you get MikroTik RouterOS v7 first time and trying to configure it first time, go through this article. Because, this article is designed to show how to configure a MikroTik RouterOS v7 first time using Winbox software.
Prerequisites
Before going to start RouterOS v7 configuration, you should have the following prerequisites.
- Basic knowledge on IP Addressing and Networking.
- A MikroTik RouterBOARD or MikroTik RouterOS installed on a PC or CHR that is running on a hypervisor.
- Winbox Software.
- PC with Windows Operating System installed and RJ45 cables.
Configuring MikroTik RouterOS v7 following 4 Easy Steps
MikroTik RouterOS v7 can easily be configured following the below 4 steps properly.
- Assigning WAN and LAN IP addresses
- Gateway configuration
- DNS configuration and
- NATing configuration
To configure MikroTik RouterOS, we will follow the following simple network where first interface of a MikroTik RouterBOARD is connected to an ISP network and the second interface is connected to a LAN switch where LAN PCs or devices will be connected.
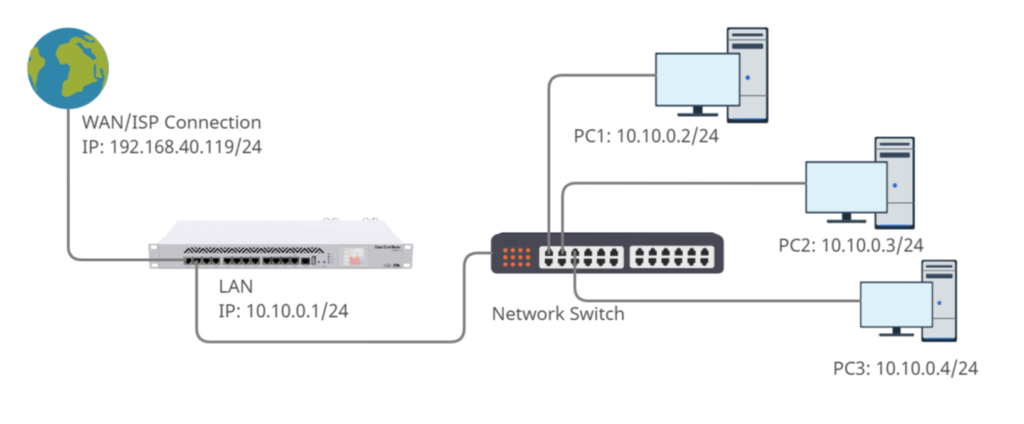
According to the above network diagram, we have the following information.
- WAN IP: 192.168.20.119/24 (This IP will be provided by your ISP)
- Default Gateway: 192.168.40.1 (This will also be provided by your ISP)
- LAN IP Block: 10.10.0.0/24 (You can assign according to your network requirement. As 10.10.0.1/24 has been assigned on MikroTik interface, it will be the default gateway of LAN devices.)
- DNS IP: We will use Google DNS IP 8.8.8.8 and 8.8.4.4 but you can use any DNS Server provided by your ISP or you can use your own DNS Server.
That’s enough for the basic configuration of RouterOS v7. So, let’s start the configuration.
Step 1: Assigning WAN and LAN IP Addresses
The first step to configure a MikroTik RouterOS is to assign WAN and LAN IP addresses in WAN and LAN interface accordingly. The following steps will show how to assign WAN and LAN IP addresses in a new MikroTik RouterOS v7.
- At first download latest Winbox from this link or collect latest Winbox from any source.
- Connect your PC with MikroTik Router with a RJ45 cable. You can connect any interface of the MikroTik Router.
- Open Winbox software in your operating system and click on Neighbors tab. Connected Ethernet’s MAC will appear in this tab. If you don’t find MAC Address, click on Refresh button. MAC address will appear soon. Click on the appeared MAC address and the selected MAC address will be appeared in Connect To input box.
- The default username is admin and password is blank of MikroTik RouterOS. So, type admin in the login input box and password field keep blank and then click on Connect button. Winbox graphical user interface (GUI) will appear now.
- Click on Remove Configuration button if prompted or from Winbox go to System > Reset Configuration and check No Default Configuration and then click on Reset Configuration button to reset RouterOS.
- The RouterOS will now be rebooted. So, after reboot login again. Now you will find a zero configuration RouterOS.
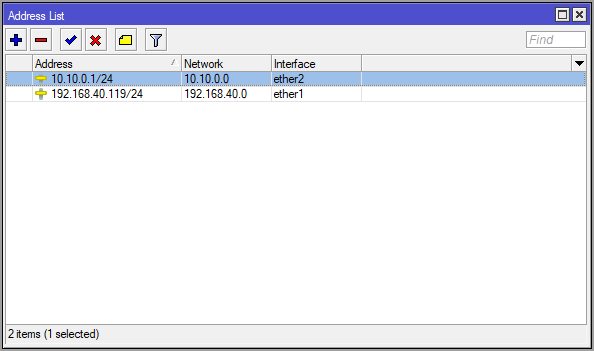
- Go to IP > Addresses menu item. Address List window will appear now. Click on PLUS SIGN (+). New Address window will appear. Put your WAN IP address (according to the diagram: 192.168.40.119/24) which has been provided by your ISP in Address input box and then select WAN interface (in this article: ether1) from the Interface drop-down menu and click Apply and then OK button.
- Click PLUS SIGN (+) again and put LAN Gateway IP address (in this article: 10.10.0.1/24) in Address input box and choose LAN interface (in this article: ether2) from Interface drop-down menu and click Apply and OK button.
After assigning WAN and LAN IP addresses, Address List window will look like the following image.
If you want to use command, open the New Terminal from Winbox menu item and then run the following command.
/ip address add address=10.10.0.1/24 interface=ether2
Note: Don’t forget to change the IP addresses according to your network information.
Step 2: Router Default Gateway Configuration
After assigning WAN and LAN IP address, we will now set MikroTik default gateway so that router can communicate with internet. The following steps will show how to assign default gateway in MikroTik RouterOS.
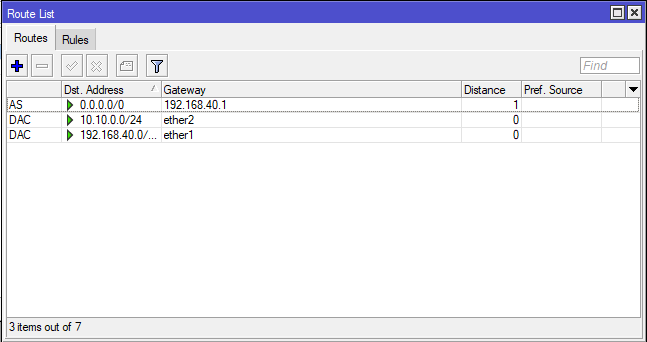
- From Winbox, go to IP > Routes menu item. Route List window will appear now. You can see two dynamic routes are already added in this Route List.
- Click on PLUS SIGN (+). New Route window will appear. Now put gateway address (according to the diagram: 192.168.40.1) which has been provided by your ISP in Gateway input field.
- Now click Apply and OK button.
After setting the default gateway, the Route List window looks like the following image.
The following command can be run to setup default gateway shortly.
Step 3: DNS Configuration
DNS configuration is an optional configuration but without assigning DNS Server IP, RouterOS cannot resolve domain to IP address. So, it is recommending setup DNS Server IP in MikroTik RouterOS.
It is also possible to turn MikroTik RouterOS as caching DNS Server so that LAN user can resolve DNS directly from RouterOS which will save time and bandwidth usage. If you wish to turn RouterOS as DNS Server, follow my article how to turn MikroTik RouterOS as caching DNS Server.
The following steps will show how to assign DNS Server in MikroTik RouterOS.
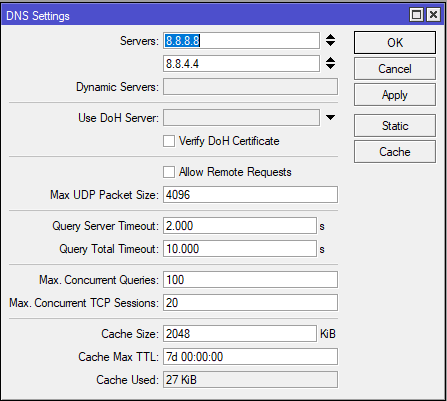
- Go to IP > DNS menu item. DNS Settings window will appear. In this window, put DNS server address that you have got from ISP Company or you can put Google public DNS IP (8.8.8.8) in Servers input box.
- You can put multiple DNS server IPs by clicking add new value button (drop down button) located after the Servers input box and putting the DNS Server IP in input box.
- Click Apply and OK button.
After assigning DNS Server IP, the DNS settings window will look like the following image.
Run the following command to assign DNS Server IP from terminal.
Step 4: NATing Configuration
We will now configure NATing to masquerade LAN users IP addresses. Without NATing configuration, LAN devices cannot access internet because LAN IP block is not familiar in public area.
The following steps will show how to configure NATing in MikroTik RouterOS.
- From Winbox, go to IP > Firewall menu item and click on NAT tab and then click on PLUS SIGN (+). New NAT Rule window will appear.
- From General tab, choose srcnat from Chain drop down menu.
- From Action tab, choose masquerade from Action drop down menu and then click Apply and OK button.
After configuring NATing in MikroTik RouterOS, the NAT Firewall window will look like the following image.
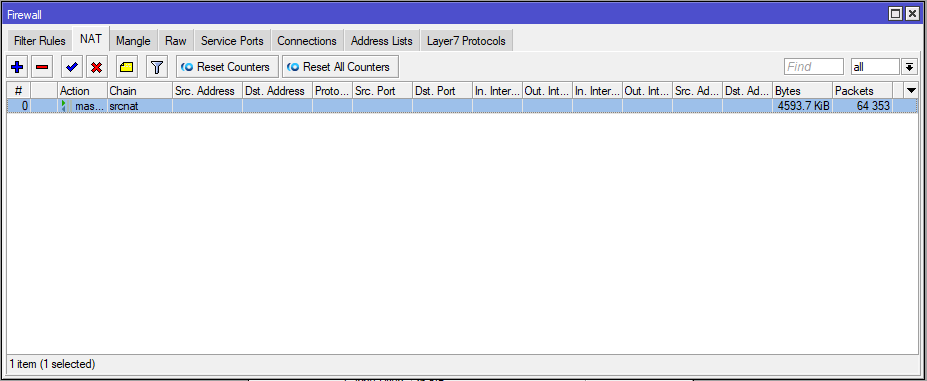
Run the following command to configure NATing from command prompt.
MikroTik Router is now ready. Connect a switch to MikroTik LAN interface with RJ45 cable and connect all PCs to this switch. Also connect ISP cable to WAN interface. Now assign IP to all your LAN PC according to your LAN IP network series. If you face any problem to set IP address in windows PC, follow the article about how to assign static IP address in windows operating system which will guide you the proper steps to assign IP address in any windows PC. Now browse any website or ping google.com from your LAN PC. If your ISP is OK, you will now be able to browse any website successfully.
Known Security Issue
The above section has described the basic configuration of a MikroTik RouterOS but the configuration has a security issue: if anyone comes to your network and know the LAN IP block and assign IP address in his/her device, he/she will be able to access internet without your knowledge because there is no blocking here.
For this, we will create a firewall rule that will block all incoming IP addresses except our allowed IPs. The following steps will show how to block all IP addresses except allowed IPs with firewall rule.
- From Winbox, go to IP > Firewall menu item. Firewall window will appear.
- Click on Filter Rules tab and then click on PLUS SIGN (+). New Firewall Rule window will appear.
- Under General tab, choose forward from Chain dropdown menu and choose your LAN interface (in this article: ether2) from In. Interface dropdown menu.
- Click on Advanced tab and write allowed_IP or whatever text you want in Sr. Address List input box. Also click the negation check box before the input box to negate the rule logic.
- Click on Action tab and choose drop from Action dropdown menu.
- Click Apply and OK button.
After creating firewall rule, the Filter Rules tab will look like the following image.

You can run the following command to create the firewall rule.
Allow IP from Address List
Now if anyone assigns LAN block IP, cannot get internet access until you allow them from RouterOS. To allow any IP for internet access, do the following steps.
- From Winbox, go to IP > Firewall menu item. Firewall window will appear,
- Click on Address List tab and then click on PLUS SIGN (+). New Firewall Address List window will appear.
- Choose the Src. Address List that you provided in Firewall rule creation from Name dropdown menu.
- Put the IP that that you want to allow from Address input box.
- Click Apply and OK button.
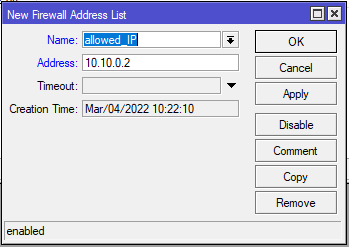
Now the assigned IP will be able to access internet through your MikroTik RouterOS.
You can create address list entry with the following command also.
More on MikroTik RouterOS…
MikroTik Router basic configuration is not so enough to maintain a real network. If you need to maintain an office network, it will be better to use MikroTik DHCP Server. Managing DHCP Server with Radius Server will provide you more faster and smart solution.
Again, if you want to maintain an ISP network, MikroTik PPPoE Server is a better solution. MikroTik PPPoE Server with Radius Server will provide you a prepaid billing system also.
If you plan to maintain a Hotel, Airport, Railway, Restaurant network or any ISP network with WiFi solution, MikroTik Hotspot Server is your best friend. Using Radius Server with Hotspot, you can manage Bandwidth with Prepaid Billing System as well as Data Limit with Prepaid Billing System.
In addition, if you find bandwidth management solution with MikroTik Router, MikroTik Bandwidth Management with Simple Queue will be enough helpful. But it will be better to Manage ISP Bandwidth with MikroTik PCQ.
Sometimes, you may need load balancing and link redundancy solution. Then, go through MikroTik Load Balancing and Link Redundancy with ECMP.
If you face any confusion to follow the above steps, watch the following video that will show how to configure RouterOS 7 step by step.
How to configure MikroTik RouterOS v7 first time using Winbox has been discussed in this article. A known security issue has also been discussed. I hope, you will now be able to configure MikroTik RouterOS v7 without any hassle. However, if you face any confusion, feel free to discuss in comment or contact me from Contact page. I will try my best to stay with you.
Why not a Cup of COFFEE if the solution?

