Mikrotik Router Basic Configuration Using Winbox
MikroTik is one of the most popular routers. MikroTik Router has a lot of networking services that help to build a stable and smooth network so easily. It is said that any ISP Company or any Enterprise Office cannot go a single day without MikroTik Router. So, system administrators who are not using MikroTik Router yet, they will soon start using MikroTik Router, I think.
As a system administrator, I am also using MikroTik Router about 5 years in my network and really I have got a very stable and smooth network. MikroTik Router is mainly famous for bandwidth control service and packet filtering functionalities as well as cheap price. MikroTik Router is also favorite to any system administrator because of having graphical user interface (GUI) software named Winbox which helps to manage MikroTik Router so easily.
As the usage of MikroTik Router is growing rapidly, this article is designed to show the basic configuration of a MikroTik Router from very beginning using Winbox software so that a new MikroTik Router user can easily configure his/her router from very starting and can operate his network smoothly.
MikroTik RouterOS V7
MikroTik RouterOS v7 (both Long-term and Stable) has been released with new features. So, it is usual that if you buy a new MikroTik Router, it will be RouterOS v7. RouterOS v7 has some changes. So, if you are an old RouterOS user, you may face some new features those were not in the previous version. But there is no need to be heisted because there is a correlation between the old and the new versions. So, you can absorb it so easily.
Prerequisites to Configure a MikroTik Router
Before going to start RouterOS v7 configuration, you should have the following prerequisites.
- Basic knowledge on IP Addressing and Networking.
- A MikroTik RouterBOARD or MikroTik RouterOS installed on a PC or CHR that is running on a hypervisor.
- Winbox Software.
- PC with Windows Operating System installed and RJ45 cables.
If you have the above requirements properly, you are now ready to start MikroTik router basic configuration. The rest of this article will show the step by step guide to configure a MikroTik Router from very beginning.
Configuring MikroTik RouterOS v7 following 4 Easy Steps
MikroTik RouterOS v7 can easily be configured following the below 4 steps properly.
- Assigning WAN and LAN IP addresses
- Gateway configuration
- DNS configuration and
- NATing configuration
To configure MikroTik RouterOS, we will follow the following simple network where first interface of a MikroTik RouterBOARD is connected to an ISP network and the second interface is connected to a LAN switch where LAN PCs or devices will be connected.
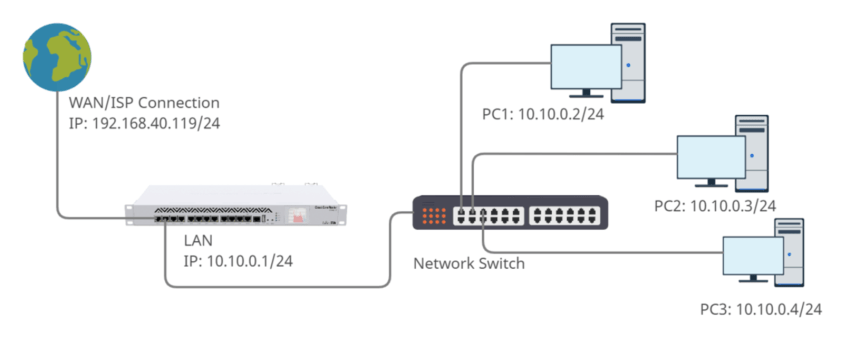
Diagram on MikroTik RouterOS v7 Basic Configuration
MikroTik RouterOS v7 Basic Configuration
According to the above network diagram, we have the following information.
- WAN IP: 192.168.40.119/24 (This IP will be provided by your ISP)
- Default Gateway: 192.168.40.1 (This will also be provided by your ISP)
- LAN IP Block: 10.10.0.0/24 (You can assign according to your network requirement. As 10.10.0.1/24 has been assigned on MikroTik interface, it will be the default gateway of LAN devices.)
- DNS IP: We will use Google DNS IP 8.8.8.8 and 8.8.4.4 but you can use any DNS Server provided by your ISP or you can use your own DNS Server.
That’s enough for the basic configuration of RouterOS v7. So, let’s start the configuration.
Step 1: Assigning WAN and LAN IP Addresses
The first step to configure a MikroTik RouterOS is to assign WAN and LAN IP addresses in WAN and LAN interface accordingly. The following steps will show how to assign WAN and LAN IP addresses in a new MikroTik RouterOS v7.
- At first download latest Winbox from this link or collect latest Winbox from any source.
- Connect your PC with MikroTik Router with a RJ45 cable. You can connect any interface of the MikroTik Router.
- Open Winbox software in your operating system and click on Neighbors tab. Connected Ethernet’s MAC will appear in this tab. If you don’t find MAC Address, click on Refresh button. MAC address will appear soon. Click on the appeared MAC address and the selected MAC address will be appeared in Connect To input box.
- The default username is admin and password is blank of MikroTik RouterOS. So, type admin in the login input box and password field keep blank and then click on Connect button. Winbox graphical user interface (GUI) will appear now.
- Click on Remove Configuration button if prompted or from Winbox go to System > Reset Configuration and check No Default Configuration and then click on Reset Configuration button to reset RouterOS.
- The RouterOS will now be rebooted. So, after reboot login again. Now you will find a zero configuration RouterOS.
- Go to IP > Addresses menu item. Address List window will appear now. Click on PLUS SIGN (+). New Address window will appear. Put your WAN IP address (according to the diagram: 192.168.40.119/24) which has been provided by your ISP in Address input box and then select WAN interface (in this article: ether1) from the Interface drop-down menu and click Apply and then OK button.
- Click PLUS SIGN (+) again and put LAN Gateway IP address (in this article: 10.10.0.1/24) in Address input box and choose LAN interface (in this article: ether2) from Interface drop-down menu and click Apply and OK button.
After assigning WAN and LAN IP addresses, Address List window will look like the following image.

Assigning-WAN-and-LAN-IP-Addresses
If you want to use command, open the New Terminal from Winbox menu item and then run the following command.
/ip address add address=10.10.0.1/24 interface=ether2
Note: Don’t forget to change the IP addresses according to your network information.
Step 2: Router Default Gateway Configuration
After assigning WAN and LAN IP address, we will now set MikroTik default gateway so that router can communicate with internet. The following steps will show how to assign default gateway in MikroTik RouterOS.
- From Winbox, go to IP > Routes menu item. Route List window will appear now. You can see two dynamic routes are already added in this Route List.
- Click on PLUS SIGN (+). New Route window will appear. Now put gateway address (according to the diagram: 192.168.40.1) which has been provided by your ISP in Gateway input field.
- Now click Apply and OK button.
After setting the default gateway, the Route List window looks like the following image.

Setting up the default gateway of MikroTik RouterOS
The following command can be run to setup default gateway shortly.
/ip route add gateway=192.168.40.1
Step 3: DNS Configuration
DNS configuration is an optional configuration but without assigning DNS Server IP, RouterOS cannot resolve domain to IP address. So, it is recommending setup DNS Server IP in MikroTik RouterOS.
It is also possible to turn MikroTik RouterOS as caching DNS Server so that LAN user can resolve DNS directly from RouterOS which will save time and bandwidth usage. If you wish to turn RouterOS as DNS Server, follow my article how to turn MikroTik RouterOS as caching DNS Server.
The following steps will show how to assign DNS Server in MikroTik RouterOS.
- Go to IP > DNS menu item. DNS Settings window will appear. In this window, put DNS server address that you have got from ISP Company or you can put Google public DNS IP (8.8.8.8) in Servers input box.
- You can put multiple DNS server IPs by clicking add new value button (drop down button) located after the Servers input box and putting the DNS Server IP in input box.
- Click Apply and OK button.
After assigning DNS Server IP, the DNS settings window will look like the following image.

DNS Settings in MikroTIk RouterOS v7
Run the following command to assign DNS Server IP from terminal.
/ip dns set servers=8.8.8.8,8.8.4.4
Step 4: NATing Configuration
We will now configure NATing to masquerade LAN users IP addresses. Without NATing configuration, LAN devices cannot access internet because LAN IP block is not familiar in public area.
The following steps will show how to configure NATing in MikroTik RouterOS.
- From Winbox, go to IP > Firewall menu item and click on NAT tab and then click on PLUS SIGN (+). New NAT Rule window will appear.
- From General tab, choose srcnat from Chain drop down menu.
- From Action tab, choose masquerade from Action drop down menu and then click Apply and OK button.
After configuring NATing in MikroTik RouterOS, the NAT Firewall window will look like the following image.

NATing Configuration in MikroTik RouterOS
Run the following command to configure NATing from command prompt.
/ip firewall nat add action=masquerade chain=srcnat
MikroTik Router is now ready. Connect a switch to MikroTik LAN interface with RJ45 cable and connect all PCs to this switch. Also connect ISP cable to WAN interface. Now assign IP to all your LAN PC according to your LAN IP network series. If you face any problem to set IP address in windows PC, follow the article about how to assign static IP address in windows operating system which will guide you the proper steps to assign IP address in any windows PC. Now browse any website or ping google.com from your LAN PC. If your ISP is OK, you will now be able to browse any website successfully.
Known Security Issue
The above section has described the basic configuration of a MikroTik RouterOS but the configuration has a security issue: if anyone comes to your network and know the LAN IP block and assign IP address in his/her device, he/she will be able to access internet without your knowledge because there is no blocking here.
For this, we will create a firewall rule that will block all incoming IP addresses except our allowed IPs. The following steps will show how to block all IP addresses except allowed IPs with firewall rule.
- From Winbox, go to IP > Firewall menu item. Firewall window will appear.
- Click on Filter Rules tab and then click on PLUS SIGN (+). New Firewall Rule window will appear.
- Under General tab, choose forward from Chain dropdown menu and choose your LAN interface (in this article: ether2) from In. Interface dropdown menu.
- Click on Advanced tab and write allowed_IP or whatever text you want in Sr. Address List input box. Also click the negation check box before the input box to negate the rule logic.
- Click on Action tab and choose drop from Action dropdown menu.
- Click Apply and OK button.
After creating firewall rule, the Filter Rules tab will look like the following image.

FIrewall Rule to disallow unwanted IP
You can run the following command to create the firewall rule.
/ip firewall filter add action=drop chain=forward in-interface=ether2 src-address-list=!allowed_IP
Allow IP from Address List
Now if anyone assigns LAN block IP, cannot get internet access until you allow them from RouterOS. To allow any IP for internet access, do the following steps.
- From Winbox, go to IP > Firewall menu item. Firewall window will appear,
- Click on Address List tab and then click on PLUS SIGN (+). New Firewall Address List window will appear.
- Choose the Src. Address List that you provided in Firewall rule creation from Name dropdown menu.
- Put the IP that that you want to allow from Address input box.
- Click Apply and OK button.

Creating Firewall Address List Entry
Now the assigned IP will be able to access internet through your MikroTik RouterOS.
You can create address list entry with the following command also.
/ip firewall address-list add address=10.10.0.2 list=allowed_IP
More on MikroTik RouterOS…
MikroTik Router basic configuration is not so enough to maintain a real network. If you need to maintain an office network, it will be better to use MikroTik DHCP Server. Managing DHCP Server with Radius Server will provide you more faster and smart solution.
Again, if you want to maintain an ISP network, MikroTik PPPoE Server is a better solution. MikroTik PPPoE Server with Radius Server will provide you a prepaid billing system also.
If you plan to maintain a Hotel, Airport, Railway, Restaurant network or any ISP network with WiFi solution, MikroTik Hotspot Server is your best friend. Using Radius Server with Hotspot, you can manage Bandwidth with Prepaid Billing System as well as Data Limit with Prepaid Billing System.
In addition, if you find bandwidth management solution with MikroTik Router, MikroTik Bandwidth Management with Simple Queue will be enough helpful. But it will be better to Manage ISP Bandwidth with MikroTik PCQ.
Sometimes, you may need load balancing and link redundancy solution. Then, go through MikroTik Load Balancing and Link Redundancy with ECMP.
If you face any confusion to follow the above steps, watch the following video that will show how to configure RouterOS 7 step by step.
How to configure MikroTik RouterOS v7 first time using Winbox has been discussed in this article. A known security issue has also been discussed. I hope, you will now be able to configure MikroTik RouterOS v7 without any hassle. However, if you face any confusion, feel free to discuss in comment or contact me from Contact page. I will try my best to stay with you.
Why not a Cup of COFFEE if the solution?

I’ve liked the explanation, but I got a problem with my DHCP it is not distributing the ip’s into my network.
I need your help, please!
Please follow my article about DHCP Server configuration. I think, it will you properly.
How to make wifi as password authentiation.
Hi raju,
Thanks for visiting my website. If you want to secure your mikrotik wifi with password, go to security profile and then set WPA2 Pre-Shared Key. I hope, it will solve your problem.
My ISP say that their systems using a dynamic IP address. Will the router handle a dynamic IP address to access the internet?
Hii..I want to configure Router to use to different WAN connections from different ISP and route half traffic to both. Is this possible with Mikrotik Router ?? If yes, how ??
Obviously, it is possible with MikroTik router. Follow my article about MikroTik Load Balancing over Multiple Gateways. I hope, it will help you.
Bro how can I setup an hotspot on my mikrotik router Rb2011
As far I know, your router support hotspot. Bro, do Google for hotspot configuration or wait until I prepare an article about hotspot configuration. Thanks.
Whenever I reach your firewall step, winbox disconnects and would just DC again after few seconds if I reconnect. I had the router manually reset several times and start from scratch then it just happens again on firewall step.
You should connect your PC and MikroTik router with RJ45 cable and disconnect other networking device. If more than one router or winbox is open in your network, sometimes it might happen.
I want to learn mikrotik
You are welcome. Read my article about Mikrotik Router and start learning. If you face any problem, contact with me by email.
I really like you video tutorials.
I have a wonder for basic mikrotik configuration.
The first step is to put WAN IP address from ISP and then we put our LAN network address or LAN default gateway?
Because in your topic of basic configuration you put LAN Gateway address: 192.168.10.1/24 but in the topic PPPOe configuration you put LAN network address: 172.16.0.0/24.
Can you confirm about that?
Thanks in advance,
Hi Makara,
Thanks for your comment and query. Actually, it was a typing mistake. LAN Gateway will be 172.16.0.1/24. In video tutorial about PPPoE server configuration, I think, it was assigned properly.
Ok. Thanks for your confirmation.
Youtube video link doesn’t work. Video is unavailable. Please resolve this.
Hi Riazul Islam,
Thanks for visiting my site. I don’t get any issue. However, if you face any issue, please visit my Channel… https://www.youtube.com/channel/UCPuODXhUdLR3NGTaZ-lbqBg
Video is available in this channel.
Hi Sir,
Thank you for the guide. I’m new in this product. Do you have an article on how to configure the firewall? I would like to know on how to block/allow certain websites.
Hi James,
Thanks for your comment. I have not yet made any article about firewall rule but I hope, I will make it soon. So, keep tune with my website…
Hi Sayeed,
Thank you. I’m really looking forward on that. Thanks mate.
I have a question. This DNS server firewall, that will make your router not to be used as dns request for outisde connections. where excactly will someone place the firewall where you blocked/dropped tcp and udp ports. Will the firewall command come before other firewall rules or after all other firewall rules. I have hotspot running on my lan. How do I go about it.
Thanks
Hi Sapanda,
This firewall rule only block 53 port tcp or udp request that is coming from your public users. Also the public interface (ether1) has been selected. So, your LAN user will not be affected by this rule because this rule will be applied only those requests which are coming public interface (ether1). You don’t need ordering the firewall rule. You can place this rule any position in your firewall window.
Pls help!!!!!!
I’ve struggle to force all user traffic through Yandex DNS numbers. Even afer adjusting primary and secondary dns as well as the NAT & Firewall, of my RB950g Mikrotik router, I am still getting no filtering. What exactly may be wrong? I have spent 3 months trying out everything on google, including video tutorials.
Can I simply mail my mikrotik config bckp file to you to check? My office insists I solve the problem and get the internet filtered off inappropriate contents.
Hi Jim,
Thanks for visiting my web site. It will be better if you mail me your requirements elaborately. Now I am giving you some points about your problem.
1. DNS is just used for resolving domain name. If you want to force all your user will get DNS solution from a specific DNS server, you should use DHCP server to assign DNS IP dynamically to a client. However, if any user manually put DNS IP, he/she will not get DNS solution from your server.
2. If you want to filter any unwanted content, you should use firewall rule with Layer7 Protocol.
3. Why do you want to force all your user to use Yanddex DNS? is it beneficial for you?
Dear,
I wants to configure my Mikrotik 450 Router to use to different WAN connections from different ISP . One ISP-IP for Browsing and other ISP-IP for Youtube. how i configure my router with bandwidth control for LAN.
Thanks,
Mukul
You have to apply PBR(Policy Based Routing) for youtube. Create a prerouting mangle rule to mark connection for youtube and then create routing for this connection to your desired ISP. Browsing ISP configuration will be normal basic configuration. Check my tutorial to create PBR in MikroTik router.
Dear,
Thanks for your reply. i want to know , example- i took one ip from ISP 5Mbps for browsing and other ip from ISP 30 Mbps for youtube. PBR is 1Mb, 2Mb, 3Mb, 5Mb etc. 1Mb/2Mb/3Mb/5Mb is 128/256/384/640kb for browsing and 872/1744/2616/4360kb for youtube. How i configure the router?
Thanks,
Mukul
Greetings!
sir i was wondering about the mikrotik OS. do i need to install it in every pc its connected to mikrotik or just the pc you are going to use to config the mikrotik?
you are such a good man sir for sharing this knowledge, practically it may cost me if i would approach someone that could do this, i also wondering if you are an indian sir? Indians really are awesome people, whenever i need help for my school works, indian tutorials in youtube and sites really present always to teach me. ty sir. i would really like to learn more from you sir!
Hi Nacua,
Thanks for visiting my website. You are always welcome to learn from mine and my website. Bro, you don’t need to install Mikrotik OS in every PC but only the which you want to turn into Mikrotik router. If you face any problem about Mikrotik router, don’t be heisted to knock me.
Hi sayeed,
while configuring the wan the ip which we give is private or public ip..
Please revert
Thanks
S.Srikanth
Normally the WAN IP is provided by your ISP and they will give you public IP. Your ISP provided IP have to be assigned on WAN interface and it can be public or private depended on your ISP policy.
Thanks it was great to learn more on mikrotek … i require one help … plz elaborate it how i can do it . I have a mikrotek router board and isp have provided me one Wan IP with 252 subnet like this 111.XXX.XXX.10 , SUbnet : 255.255.255.252 Gateway : 111.XXX.XXX.11 and Lan IP as 111..xxx.xxx.30/29 so i shall be able to have 6 Ips as lan ips . Now i require these Lan Ips to be public IPs as the person which will connect from my mikrotek router requires public ip and ISP have provided me 111..xxx.xxx.30/29 as public ip pool . Please give the setp by setp configuration of configuring this ip pool as public ip in the lan segement of the router so that person have a public ip on his pc and publically ping able .
Thanks in Advance
Faheem
Hi Faheem,
Thanks for visiting my website. Your network is too small to make subnet. Without subnetting you cannot use your ISP subnet as your LAN network. If you want, you can provide them direct connection as like you have connected your mikrotik router. Another suggestion, you can increase your subnet from ISP and then make subnet to use as your LAN network.
You are awesome. So I have been using Mikrotik for a while but about two weeks ago something broke. My access points all have ip 0.0.0.0 and I cannot winbox into them. I have tried everything including MAC, Telnet, TelMac etc. Nothing seems to work. I could reset the APs but they are too high up and cannot touch the reset button. Is there a way of reseting them to default without touching the AP?
Bro, I have no idea about MikroTik AP. Please discuss your problem in MikroTik Forum.
Your are Awesome and your lectures are helpful for me .i have a querry .. i want to block my https sites like facebook ,youtube through mikrotik ,please help me in this issue .
I will soon publish an article about blocking website. If you need urgently, please contact with me on Skype.
I configured my mikrotik and had issues, my ISP gives me 10MB, but browsing through my Mikrotik, i can only access 2-3MB max, speed test directly to my ISP shows 9.8MB download and upload but through the Mikrotik, I only get 3MB download and 7.9MB upload. what settings did I miss? Need help
Thanks
Have you applied any Queues rule? if not, tell me your MikroTik model. You can contact with me on skype: sezan10
RouterBoard 1100 (1100Hx2) and 1100AHx2, that is the model of my mikrotik. I just sent you a skype request @docaustyne
thanks
hi, i am new in my office…. I am the IT Officer in here.. I cannot use wifi in my mobile…. it shows connected but no internet…. I know the password correctly ….. but…….???????? pls help
Check your mobile dhcp IP address and its internet accessibility.
I love your training. Keep it up sir Sayeed Abu. God bless you
Hi Md. Abu Sayeed,
I visit your website and YouTube, I have subscribe you channel, and I am very impress,
Recently I joined my office as system administrator and here I see MikroTik Router RB49AH, and I am not having any knowledge of MikroTik Router hence please suggest me which your article/video I have to read/watch step by step, and how can I contact for any help.
Thank & Regard
Suresh
Follow all my article about MikroTik Router. If you need more help, contact me with mail.
Hi Sayeed,
is it possible to have two different VPN configuration on the same Mikrotik, because I have a situation where already VPN is configured and want to configure another VPN for another?
Yes bro, Just configure as DHCP client.
Mikrotik RB941-2nD-TC hAP Lite SOHO Router
Can I ask you a question sir this router is good for the gaming online?? For 5 computer??
And it easy to config?
I don’t have idea how to config..
Plz answer sir.. Thanks
It is enough if you have enough bandwidth.
you can follow this article for configuration.
Thanks brother
please how can i configure a port on the mikrotik router as a WAN interface
If you assign your WAN IP on an interface, the interface or the physical port will be your WAN interface.
If you need more query, please describe more elaborately.
Try ECMP load balancing method.
Hi,
Thanks so much for this wonderful article. I followed your instruction on my new mikrotik router. It worked perfectly well except that i can only connect to internet if i enter a static IP and DNS.
I will like to know how to allow my users to connect to the internet with dynamic IP(assigns IP automatically).
Thanks
Follow my article MikroTik DHCP Server Configuration.
Hey Sayeed,
this is exactly what i’ve been looking for. awesome guide. mikrotik is not very intuitive in manuals. i’m glad to found this site. thank you very much, and keep the good work on. regards
Hi Sayeed, thank you for such easy to follow tutorial. I just bought a 1100AHx4 today and hope to configure it to certain need. I’ll likely need to contact you for more complex setups like load balancing, mangle rules, queues, packet markers, multiple dns servers etc. assuming I can first complete the basic configuration described here. I got your Skype id from one of your reply above, please accept my request from saidul-hassan. Better yet could you share your email address so I could email you details of my setup need. Thank you!
you will find my contact from my Contact page. thanks.
Thanks