

A Proxy Server is usually placed between users and the internet so that the proxy server can track the activities of any user. Formerly, a proxy server was mainly used for caching the static content of any web server because the internet speed was too slow. So, users would get high speed for browsing as if they were browsing a local server. But nowadays the internet bandwidth has increased. So, the proxy server is usually not used for web caching today rather than it is popularly used as ACL (Access Control List) server. MikroTik RouterOS can perform as a HTTP proxy server. As a proxy server MikroTik Router has the following features.
- Regular HTTP Proxy Server: MikroTik Router can perform as a regular HTTP proxy server where a user can specify the proxy for him with his/her browser.
- Transparent proxy server: MikroTik RouterOS can also perform as a transparent proxy server where users do not know about the proxy being enabled and there is no extra configuration to the user’s browser.
- Access Control List: It can do access list by source, destination, URL and requested method (HTTP firewall).
- Cache access list: MikroTik can specify which object have to cache and which is not.
- Direct Access List: To specify which resources should be accessed directly and which through another proxy server.
- Logging facility: MikroTik Router can store information about proxy operation or it can send logging information to another syslog server.
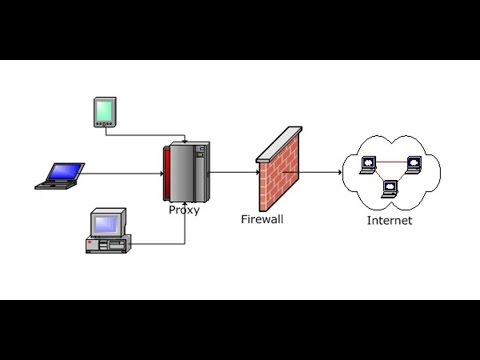
A proxy server may look like below diagram where users must go through the proxy server for accessing internet. So, users activity can easily track with this proxy server.


Web Proxy Server Configuration with MikroTik
In this article, we will know how to turn our MikroTik router as a proxy server. For configuring a complete proxy server with MikroTik router, we have to perform below 4 steps.
- MikroTik Router Basic Configuration
- Web Proxy Configuration
- Transparent Web Proxy Configuration
- Blocking Open Proxy
Devices and IP information those are using in this article for configuring a web proxy are given below.
- MikroTik Router v5.20
- WAN IP: 192.168.30.2/30
- LAN IP: 192.168.20.0/24
Step 1: MikroTik Router Basic Configuration
First we need to do MikroTik Router basic configuration (IP, Route, NAT and DNS configuration) before configuring a web proxy server. If you have a MikroTik Routerboard, follow my article about MikroTik Router Basic Configuration using Winbox and complete basic configuration. If you plan to install MikroTik OS in a PC, follow my article about Install MikroTik OS on PC and complete MikroTik Router Basic Configuration and then continue the rest of this article for configuring a web proxy server with MikroTik Router.
Step 2: Web Proxy Configuration
After completing MikroTik router basic configuration, we will now enable proxy service so that our MikroTik Router acts as a proxy server. So, follow my below steps to enable proxy service in your MikroTik router.
- Go to IP > Web Proxy menu. Web Proxy Settings window will appear.
- Click on enabled checkbox and put your WAN IP address (in this article 192.168.30.2) which will be used as proxy server address in Address input box or you can leave it blank. If you left it blank all interface IP will be used as proxy server IP Address. Optionally you can change Port number or you can leave it to the default port 8080.
- If you plan to do a caching proxy server, choose Max. Cache Size to unlimited and click on Cache on Disk checkbox. But in this case, MikroTik Router must have enough storage to cache web content. If you have a Routerboard, you have to add an additional hard disk or you can plan to install MikroTik OS on a PC for getting extra storage.
- Now click Apply and then OK button.
- Alternatively, you can do this cmd: > ip proxy> set enabled=yes port=8080 src-address=192.168.30.2
Now your MikroTik Router will turn into a regular proxy server. If you set manually this IP and Port in your browser’s proxy settings, your browser will use MikroTik Router as a proxy server. But you rarely want a regular proxy server. So, you need to turn MikroTik Router into a transparent proxy server. For this, a firewall rule should apply that I will show now.
Step 3: Transparent Web Proxy Configuration
Now we will turn our MikroTik proxy server into a transparent proxy server. For this, we should apply a destination NAT rule that will redirect all 80 port (HTTP) requests to 8080 port (Proxy Server Port) so that users cannot know about proxy server and there will be no extra configuration to the user end. To apply NAT rule in your MikroTik router, follow my below steps carefully.
- Go to IP > Firewall and click on NAT tab and then click PLUS SIGN (+) to add new NAT rule.
- In General tab, choose Chain = dstnat, Protocol = 6 (tcp) and Port = 80.
- In Action tab, choose Action = redirect and To Port = 8080.
- Now click Apply and OK button.
- Alternatively, you can do this cmd: > ip firewall nat add chain=dstnat protocol=tcp dst-port=80 action=redirect to-ports=8080
Transparent web proxy configuration has been completed. Now your MikroTik proxy server can be used as both transparent web proxy and normal web proxy at a time. In transparent mode it is possible to use it as standard web proxy too.
Step 4: Blocking Open Proxy
Now MikroTik Router is a Proxy server which can be accessed from anywhere and that is the problem. Thousands of hackers on the internet looking such kind of proxy server to do criminal or unwanted activity. So, we must block internet user to access our proxy. For this do the below steps carefully.
- Go to IP > Firewall and open Filter Rules tab and then click on PLUS SIGN (+) to add new firewall rule.
- In General tab, choose Chain = input, Address = 0.0.0.0/0, Protocol = 6 (tcp), Dst. Port = 8080, In Interface = ether1 (WAN Interface Name).
- In Action tab, choose Action = drop.
- Alternatively, you can do this cmd: > ip firewall filter add chain=input src-address=0.0.0.0/0 protocol=tcp dst-port=8080 in-interface=”ether1 WAN” action=drop
Now proxy server is safe from doing unwanted activity by the public internet users or hackers.
Transparent web proxy in MikroTik router has been shown in above steps. If you face any confusion to follow above steps successfully, please watch my below video tutorial about MikroTik Transparent Web Proxy Configuration. I hope, it will reduce your any confusion.
Proxy Based Firewall/ACL
MikroTik proxy based firewall or ACL works as the same way as the firewall rule works. ACL is implemented from top to bottom. First matching rule takes decision of what to do with this connection. Connections can be matched by its source address, destination address, destination port, sub-string of requested URL or request method. If none of these parameters is specified, every connection will match this rule.
If connection is matched by a rule, action property of this rule specifies whether connection will be allowed or deny. If connection does not match any rule, it will be allowed.
We have configured a transparent proxy server with MikroTik Router in our previous step. Now we will apply some ACL in our proxy server with example.
Block Particular Website with URL
Say, you want to block a website named Facebook which URL is [https://www.facebook.com]. So, do the below steps to block Facebook URL by proxy server.
- Go to IP > Web Proxy and click on Access button from right side button panel. Web Proxy Access window will appear. Now click on PLUS SIGN (+) to add new access rule. New Web Proxy Rule window will appear.
- In this window, type facebook.com in Dst. Host input field and choose deny from Action drop-down menu.
- Click Apply and OK button.
- Alternatively, you can do this cmd: > ip proxy access add dst-host=www.facebook.com action=deny
This rule will block Facebook for all users. We can also block a site for a specific IP block users. For this just mention IP block in Src. Address input field or do the below cmd:
ip proxy access add src-address=192.168.20.0/24 dst-host=www.facebook.com action=deny
Where 192.168.20.0/24 is a LAN IP block who cannot access Facebook.
Note: MikroTik Web Proxy cannot track HTTPS connection. So, it cannot block [https://www.facebook.com].
Block Website with Key Phrase
You can also block website that contains certain keyword in URL. Say, you want to block all the URLs which contain mail keyword in URL. For this, do below steps carefully.
- Go to IP > Web Proxy and click on Access button from right side button panel. Web Proxy Access window will appear now. Now click on PLUS SIGN (+) to add new access rule. New Web Proxy Rule window will appear.
- In this window, type :mail in Dst. Host input box and choose deny from Action drop-down menu.
- Click Apply and then OK button.
- Alternatively, you can do this cmd: > ip proxy access add dst-host=:mail action=deny
This rule will block all the websites those contain key phrase ‘mail’ in URL. Such as, www.gmail.com, www.hotmail.com
Stop Download Specific File Type
You can also stop downloading specific file types like .exe, .flv, .mp4 and so on. For this, do the below steps.
- Go to IP > Web Proxy and click on Access button from right side button panel. Web Proxy Access window will appear now. Now click on PLUS SIGN (+) to add new access rule. New Web Proxy Rule window will appear.
- In this window, Type *.exe in Path input filed and choose deny from Action drop-down menu.
- Click Apply and then OK button.
- Alternatively, do this cmd: ip proxy access add path=*.exe action=deny
These are few examples that can be done with Access List. You can also try applying your own logic or can do googling for finding your own demand.
MikroTik Router web proxy configuration has been discussed step by step in this article. I hope, you are now able to configure web proxy in your MikroTik router and can apply ACL for your network. However, if you face any problem to configure your web proxy server with MikroTik Router, feel free to discuss in comment or contact with me from Contact page. I will try my best to stay with you.