

VPN (Virtual Private Network) is a technology that extends private network across a public network. It enables private network users to send and receive data across public network as if their network devices were directly connected to the private network.
MikroTik Router provides a lot of VPN services. Among them, MikroTik PPTP is the mostly used VPN service. It is a client-server VPN. So, a user can access server, printer, IP phone and any other network devices of any private network across public network using MikroTik PPTP. For example, if you are a system administrator or an employee of an office and you need to access your office server, printer or any network devices while you are outside of your office, MikroTik PPTP will be a better solution for you.
MikroTik PPTP service can be applied in two methods.
- Connecting remote workstations/clients (VPN between routers and PPTP clients, almost all OSs including Windows)
- Site-to-Site PPTP (VPN between routers)
In this article, I will show how to configure MikroTik PPTP service that will be able to connect a remote workstation (any Operating System including Windows) across public network and the remote workstation will be able to get access to local network as if the workstation was directly connected to the local network.
Network Diagram
To configure a MikroTik PPTP service that will connect a remote workstation across public network, I am establishing a network like below diagram.
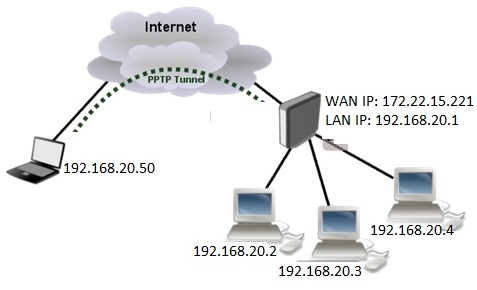
In this diagram, a MikroTik Router (say your office router) is connected to internet through ether1. Workstations are connected to ether2. Laptop is connected to the internet and can reach MikroTik Router’s public IP. After configuring PPTP Tunnel, the laptop will be able to connect to MikroTik local network as if it was directly connected to the local network.
IP Information for this configuration
- MikroTik WAN IP: 172.22.15.221/24 (Must replace with your Public IP provided by your ISP)
- MikroTik LAN Gateway: 192.168.20.1/24
- Local Address for remote client: 192.168.20.1 (MikroTik LAN Interface IP)
- Remote Address: 192.168.20.50 (IP address that will be assigned to remote client)
MiroTik VPN Configuration with PPTP
VPN configuration in MikroTik router with PPTP service can be divided into two parts.
- Part 1: MikroTik router basic configuration
- Part 2: PPTP server configuration
Part 1: MikroTik Router Basic Configuration
In the first part, we will complete MikroTik Router basic configuration. Basic RouterOS configuration includes assigning WAN IP, LAN gateway IP, DNS IP, NAT configuration and default route configuration. The following steps will show how to do these topics in your RouterOS.
- Login to MikroTik RouterOS using winbox and go to IP > Addresses. In Address List window, click on PLUS SIGN (+). In New Address window, put WAN IP address (172.22.15.221/24) in Address input field and choose WAN interface (ether1) from Interface dropdown menu and click on Apply and OK button. Click on PLUS SIGN again and put LAN IP (192.168.20.1/24) in Address input field and choose LAN interface (ether2) from Interface dropdown menu and click on Apply and OK button.
- Go to IP > DNS and put DNS servers IP (8.8.8.8 or 8.8.4.4) in Servers input field and click on Apply and OK button.
- Go to IP > Firewall and click on NAT tab and then click on PLUS SIGN (+). Under General tab, choose srcnat from Chain dropdown menu and click on Action tab and then choose masquerade from Action dropdown menu. Click on Apply and OK button.
- Go to IP > Routes and click on PLUS SIGN (+). In New Route window, click on Gateway input field and put WAN Gateway address (172.22.15.1) in Gateway input field and click on Apply and OK button.
Basic RouterOS configuration has been completed. Now it is time to enable PPTP server in our MikroTik Router.
Part 2: PPTP Server Configuration in MikroTik Router
After completing MikroTik router basic configuration, you need to configure PPTP server in MikroTik Router. Complete PPTP server configuration in MikroTik router can be divided into four steps.
- Enabling PPTP server
- Creating PPP Secrets (Username and Password)
- Enabling proxy-arp on LAN interface.
- Creating PPTP interface
Step 1: Enabling PPTP Server in MikroTik Router
The first step to create PPTP Tunnel in MikroTik Router is to enable PPTP server. The following step will show how to enable PPTP server in your MikroTik Router.
- Go to PPP menu item and click on PPTP Server button from PPP window.
- Now click on enabled checkbox and then click Apply and OK button. PPTP server will be enabled.
- Alternatively, you can do this cmd: > interface pptp-server server> set enabled=yes
- And to show pptp-server status: > interface pptp-server server> print
Step 2: Creating PPP Secrets(username and password)
Now it is time to create a user who will be connected to pptp server. To create username and password, follow the below steps carefully.
- Go to PPP > Secrets and click on PLUS SIGN (+).
- Now put username and password in Name and Password input field. Choose Service=pptp, Profile=default, Local Address= 192.168.20.1 (Router interface IP), Remote Address= 192.168.20.50 (Local IP address that will be assigned to the remote client).
- Click Apply and OK button. A PPTP user that means VPN user will be created now.
- Alternatively, you can do this cmd: > ppp secret> add name=username service=pptp password=123 local-address=192.168.20.1 remote-address=192.168.20.50
- To show secrets from cmd: > ppp secret> print
PPP user who will be connected from remote client machine has been created. At this point, if the user gets connected from the remote client machine and try to ping any workstation from the remote machine, the ping will time out because the remote client is unable to get ARPs from workstations. The solution is to set up proxy-arp on the LAN interface
Step 3: Enabling proxy-arp on LAN interface
The following steps will show how to enable proxy-arp on your LAN interface.
- Click on Interfaces menu item and then click on interface tab.
- Click twice on your LAN interface (ether2). Interface property window will appear.
- Under General tab, choose proxy-arp from ARP dropdown menu.
- Click Apply and OK button.
After enabling proxy-arp, the remote client can successfully reach all workstations in the local network behind the router.
Step 4: Creating PPTP Interface
You can optionally create PPTP interfaces. If you do not create PPTP interface manually, a PPTP interface will be created dynamically when a user will be connected. The following steps will show you how to create a PPTP interface for a specific user manually in MikroTik router.
- Go to PPP > Interface and click on PLUS SIGN (+) and then choose PPTP Server option.
- Put PPTP interface name in the Name field.
- Put username for whom you are creating this interface in User input field.
- Click on Apply and then OK button.
If you need to apply specific filter rule for a specific user, create this PPTP interface otherwise it is always better to allow creating PPTP interface dynamically.
PPTP Server is now ready to accept PPTP client. Now I will show how to create PPTP client in Windows Operating System.
PPTP Client Configuration
Almost all Operating Systems including Windows support PPTP client. In this article, I will show how to configure PPTP client in Windows 7 operating system. All other Windows versions follow almost the same procedure.
- Go to Control Panel and choose View Items by Small icons and then click on the Network and Sharing Center item.
- From Network and Sharing Center window, click on Setup a new connection or network
- From Setup a New Connection or Network window, choose Connect to a workplace connection option and click on Next button.
- Connect to a Workplace window will ask: How do you want to connect? Click on Use my Internet connection (VPN)
- Now provide MikroTik Router’s WAN IP in Internet address input field and provide a name of your VPN in Destination name input field and then click on Create button. Your VPN network adapter will be created.
- Again go to Network and Sharing Center window and click on Change adapter settings link. Your newly created VPN adapter will be found here.
- Click mouse right button and click Connect option.
- Now provide PPTP user’s username and password in Username and Password input field respectively and then click Connect button.
If everything is OK, you will be able to connect to your PPTP server and a PPTP Tunnel will be created between MikroTik Router and your remote client. Now try to ping and hope there will be no problem to get ping reply.
If you use other operating system than Windows, please search in Google how to create PPTP client at that specific operating system. I hope you will a get solution.
If you have any confusion to do above steps properly, please watch my below video carefully about MikroTik VPN configuration with PPTP. I hope, it will remove your any confusion about VPN in MikroTik Router with PPTP service.
MikroTik VPN configuration with PPTP has been discussed in this article. I hope, you are now able to configure a VPN tunnel with MikroTik PPTP. However, if you face any problem to configure a VPN network with MikroTik router, feel free to discuss in comment or contact with me from Contact page. I will try my best to stay with you.