

MikroTik Wireless Router is capable of working as a WiFi Client. So, if any ISP provides WiFi connection for their clients, MikroTik Wireless Router can be used to connect to that ISP SSID by configuring wireless station mode. MikroTik WiFi station mode finds available SSID and connects with permitted SSID. This wireless connection can be used as wireless WAN connection and configuring LAN, multiple devices can get internet over this wireless WAN connection. In my previous article, I discussed how to configure MikroTik Wireless Route as a WiFi AP. In this article, I will discuss how to configure MikroTik Wireless Router as a Wireless Station so that it can be connected to a remote Wireless AP and can get internet over wireless WAN connection.
Network Diagram
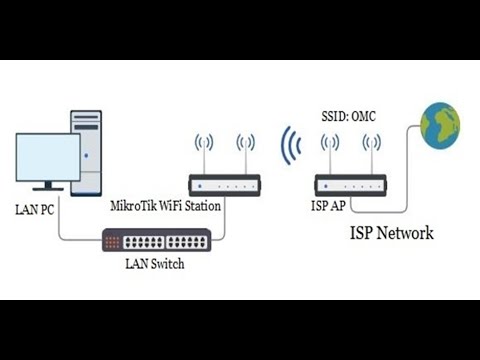
The following network diagram is being followed for this article configuration.


In this network diagram, an ISP network is providing WiFi connection for their clients. ISP SSID is OMC and it is password protected.
A MikroTik Wireless Router will be configured as a WiFi Client so that it can be connected to ISP SSID and can get internet access. This wireless connection will be used as WAN connection for this MikroTik Wireless Router.
A LAN network will also be configured in MikroTik Wireless Router and LAN devices will be able to access internet over the wireless WAN connection.
Wireless Station Mode Configuration in MikroTik Wireless Router
MikroTik WiFi Client can be configured in MikroTik Wireless Router by enabling wireless station mode. Complete station mode configuration with LAN network can be divided into the following four steps.
- DHCP Client configuration on wireless interface
- Wireless Security Profile configuration
- WiFi station configuration on wireless interface
- LAN configuration in MikroTik Wireless Router
Steps 1: DHCP Client Configuration on Wireless Interface
Most of the WiFi APs use DHCP to assign IP address and other network parameters automatically. So, we have to enable DHCP Client on wireless interface so that IP address and other network parameters can be assigned automatically on wireless interface. The following steps will show how to enable DHCP Client on wireless interface.
- From Winbox, go to IP > DHCP Client menu item. DHCP Client window will appear.
- Click on PLUS SIGN (+). New DHCP Client window will appear.
- From DHCP tab, choose wireless interface (wlan1) from Interface dropdown menu.
- Make sure Use Peer DNS and Use Peer NTP checkbox is checked if you want to use ISP DNS and NTP IP addresses.
- Choose yes from Add Default Route drop down menu.
- Click Apply and OK button.


DHCP Client is now enabled on wireless interface. We will now configure Wireless Security Profile where we will assign ISP provided password.
Step 2: Wireless Security Profile Configuration
ISP WiFi AP must be password protected and the password will be provided by ISP. This password has to store in security profile otherwise MikroTik WiFi Client cannot be connected to the ISP SSID. The following steps will show how to store ISP AP password in Wireless Security Profile.
- From Winbox, click on Wireless menu item. Wireless Tables window will appear.
- Click on Security Profiles tab and then click on PLUS SIGN (+). New Security Profile window will appear.
- Put a meaningful profile name (WiFi Profile) in Name input field.
- Choose dynamic keys from Mode drop down menu.
- Check WPA PSK and WPA2 PSK checkbox from Authentication Types panel.
- Now put ISP provided password in WPA Pre-Shared Key and WPA2 Pre-Shared Key password box.
- Click Apply and OK button.


ISP provided password has been stored in Wireless Security Profile. We will now be connect to ISP SSID configuring wireless station mode in MikroTik Wireless Router.
Step 3: WiFi Station Configuration on Wireless Interface
After creating Security Profile, we will now configure wireless station and connect to ISP SSID (Service Set Identifier). The following steps will show how to configure wireless station in MikroTik Wireless Router and connect to ISP SSID.
- Click on WiFi Interfaces tab and you will find WLAN interface (by default: wlan1) here. It may be disabled at first time. So, if you find disabled, click mouse right button on it and then click on Enable option to enable WiFi interface.
- Double click on available and enabled WiFi Interface. Interface window will appear.
- Click on Wireless tab and choose station from Mode dropdown menu.
- Now click on Advanced Mode button from right button panel and choose your created security profile (WiFi Profile) from Security Profile drop down menu.
- From right button panel, click on Scan button. Scanner window will appear. Choose wireless interface from Interface dropdown menu and then click on Start button. Available APs will be listed. Click on desired ISP SSID (for this article: OMC) and then click on Connect button. Selected SSID will be shown in SSID input box.
- Make sure Default Authenticate checkbox is checked.
- Click Apply and OK button.


If the given password is correct, MikroTik WiFi Client will be connected to the selected SSID. At the same time the default gateway and DNS IP address will be assigned automatically. MikroTik Wireless Router will now be able to get internet over wireless WAN connection.
Step 4: LAN Configuration in MikroTik Wireless Router
After configuring wireless WAN connection, we will now configure LAN in MikroTik Wireless Router so that multiple LAN devices can be able to get internet through this wireless router. In LAN configuration, we will assign LAN gateway and enable NAT. The following steps will show how to assign LAN gateway and enable NAT in MikroTik Wireless Router.
- From Winbox, go to IP > Addresses menu item. Address List window will appear. You will find a dynamic IP address has already been assigned by ISP.
- Click on PLUS SIGN (+). New Address window will appear. Put LAN gateway IP (172.25.25.1/24) in Address input box and choose LAN interface from Interface dropdown menu. Click Apply and OK button.
- Now go to IP > Firewall menu item. Firewall window will appear. Click on NAT tab and then click on PLUS SIGN (+). New NAT Rule window will appear.
- Choose srcnat from Chain dropdown menu and put LAN IP Block (172.25.25.0/24) in Src. Address input box. Click on Action tab and choose masquerade from Action drop down menu. Click Apply and OK button.


Now assign LAN IP to any LAN PC. If everything is OK, hope LAN devices will be able to get internet over Wireless WAN connection.
For simplicity, I have configured static IP addresses on LAN interface. But you may configure DHCP Server, Hotspot or PPPoE Server on LAN interface. It is also possible to configure WiFi AP on wireless interface at the same time which I will discuss in my next article.
If you face any confusion to follow the above steps, watch the following video on WiFi Station Setup with MikroTik Wireless Router. I hope it will reduce your any confusion.
How to Configure WiFi Station in MikroTik Wireless Router has been discussed in this article. I hope you will now be able to configure wireless station mode in MikroTik Wireless Router. However, if you face any confusion to configure Wireless WAN Connection in MikroTik Wireless Router, feel free discuss in comment or contact me from Contact page. I will try my best to stay with you.