Hard Disk Partitioning in Windows 7, 8 & 10
Windows is the most popular operating system in the world. Any computer user cannot go a single day without windows operating system. Even, I am writing this article on a windows operating system and you are also reading this article on any windows operating system, I think. Windows provides a lot of features or utilities for its user so that they can maintain their operating system so easily. Disk Management is such a built-in powerful utility in windows operating system which helps to manage your hard disk drive dynamically. You can shrink a volume, format a volume, extend a volume, delete a volume or change a drive letter and paths of your disk drive with this Disk Management utility. So, if you are not familiar with this windows utility, keep reading the rest of this article where I will show you how to manage your hard disk drive dynamically with this Disk Management Utility.
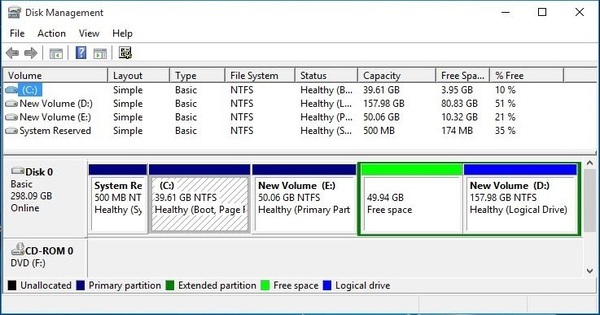
Disk Partitioning in Windows OS with Disk Management Utility
Generally, you make your hard disk partition at the time of windows installation. But sometimes you may need to make an extra disk partition while you are using windows operating system. In this situation, you can use Disk management utility for making an extra partition in your disk drive by following the below steps.
- Press (Windows key + R) key combination. Run window will appear now. Type diskmgmt.msc in Open input field and then hit enter key or click on OK button. Disk Management window will appear now on your screen. If you use Windows 8, Move your mouse cursor to bottom left corner and click mouse right button on start menu. Now choose Disk Management to open Disk Management window. You can also find Disk Management under Computer Management window. To open Computer Management window, move your mouse cursor on Computer icon located in your Desktop or in windows start menu and then click mouse right button on it. Now click on Manage option to open Computer Management window. Click on Disk Management link from left panel. You will now find Disk Management functionality into the right panel. However, if you face any confusion to open Disk Management window in your operating system, watch my below video tutorial carefully which will help you to open Disk Management window properly.
- Now move your mouse cursor on a drive from which you want to shrink desired volume to make a new partition/drive and click mouse right button on it and then choose Shrink Volume option.
- Shrink drive status window will appear after querying shrink space. Choose how many available space you want to shrink in MB from this window and then click Shrink button.
- Now your desired free space will appear with green color. Move your mouse cursor on this free space and click mouse right button and then choose New Simple Volume… option.
- New Simple Volume Wizard will appear. Click Next button from here.
- You can again choose your partition size from here or you can keep default. Now click Next button.
- Choose drive letter from this window and click Next button.
- From this window, you can choose disk format type (NTFS or FAT32) and volume label. After doing your desired choice click Next button.
- Finally a summery window will appear. You can go back to rewrite any option by clicking Back button or you can complete your hard disk partition by clicking Finish button. Click Finish to complete your task.
- A new disk will appear after formatting the disk. You can now keep any data into your newly created disk.
Simple and proper steps to make a disk partition in your windows operating system with Disk Management utility has been shown here. I hope, you are now able to make a disk partition if you follow the above steps properly. However, if you face any confusion to do the above steps properly, watch my below video carefully about How to make Hard Disk Partition on Windows 7, 8 & 10.
Hard disk partitioning in windows operating system with Disk Management utility has been explained step by step in this article. Also, a video tutorial has been uploaded to remove your any confusion. However, if face any problem to make disk partitioning in your windows operation system, feel free to discuss in comment or contact with me from Contact page. I will try my best to stay with you.
Why not a Cup of COFFEE if the solution?

Honorable,
Md. Abu Sayeed vai, your both article and tutorial are very effective, please we will be beneficial more if you continue your new article for us.
Thanks …………………………………………………… and more……………………………………………………………..