ISP Bandwidth Management with MikroTik PCQ
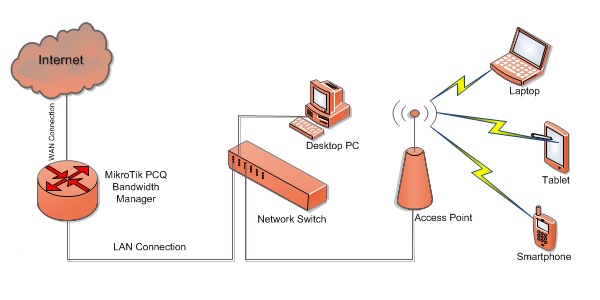
MikroTik is an excellent router for managing ISP or local ISP Bandwidth. For this, most of the ISPs are now using MikroTik router for managing their client bandwidth. There are various types of queue services in MikroTik router for managing internet bandwidth. Among them PCQ can specially be used for maintaining ISP or local ISP bandwidth. So, in this article I will show how to maintain ISP or local ISP Bandwidth with MikroTik PCQ service.
MikroTik PCQ Service
PCQ stands for Per Connection Queues. This service helps to maintain ISP or local ISP Bandwidth so easily. As a network administrator of any ISP company, you should manage various offered bandwidth packages like 512kbps connection, 1Mbps connection or 2Mbps connection for the clients. Managing these packages with MikroTik Simple Queues will be so hardy and time killing. But PCQ will be so helpful for managing these bandwidth packages because in PCQ service you will just create different PCQ profile according to your bandwidth packages and assign any PCQ profile to a network block. Then, every IP of this block will get equal bandwidth that you assigned in PCQ Profile. So, your MikroTik Queue configuration is just one time. You will map network block according to your offered bandwidth packages and then assign client IP according to their purchase bandwidth. The whole process will be shown in the rest of this article.
Managing ISP Bandwidth with MikroTik PCQ Service
PCQ is a simple but effective and hassle free method for managing your ISP bandwidth. Say, you have three offered packages for your ISP clients. These are 512kbps connection, 1Mbps connection and 2Mbps connection. So, your proposed plan would be like below.
- 512kbps clients will get 192.168.10.0/24 block IP.
- 1Mbps clients will get 192.168.11.0/24 block IP and
- 2Mbps clients will get 192.168.12.0/24 block IP.
Now if a client purchases 512kbps connection, you will just assign him/her a 192.168.10.0/24 block IP or if a client purchases 1Mbps connection, you will assign him/her a 192.168.11.0/24 block IP. If you configure PCQ in your MikroTik router properly, every client of these blocks will get your assigned bandwidth because in PCQ service every client gets equal bandwidth that will be assigned for the whole block.
Complete PCQ configuration with MikroTik router can be divided into two steps.
- MikroTik router basic configuration
- MikroTik PCQ configuration
Step 1: MikroTik Router Basic Configuration
Before going to start MikroTik PCQ configuration, first we need to complete MikroTik router basic configuration. MikroTik basic configuration includes assigning WAN IP, LAN gateway IP, default gateway IP, DNS IP and NAT configuration. These basic steps were explained in my another article about MikroTik router basic configuration using winbox. If you are a new MikroTik user, spend some times to study that article and complete MikroTik router basic configuration and then follow the rest of this article to complete MikroTik PCQ configuration.
Step 2: MikroTik PCQ Configuration
After completing MikroTik router basic configuration, we will now configure MikroTik PCQ service for managing client bandwidth. MikroTik PCQ configuration can be divided into two steps.
- Queue Types Configuration
- Simple Queue Configuration
Queue Types Configuration
First we will configure/create Queue Types for our offered packages. Here we will define Upload and Download speed for our offered packages. So, follow my below steps to complete Queue Types configuration.
- Login to your MikroTik Router and click on Queues menu. Now click on Queue Type tab and then click on PLUS SIGN (+) to add new Queue type. New Queue Type window will appear.
- In this window, type 512kbps_Download or as you like in Type Name input box and select pcq from the Kind drop-down menu. This pcq will decide to assign rated bandwidth for all the clients who have this queue type. Now type 512k in Rate input box and check the Dst. Address checkbox from the Classifier panel and then Click Apply and then OK button.
- Again click on PLUS SIGN (+) and type 512kbps _Upload in Type Name input box. Choose pcq from the Kind drop-down menu and type 512k in Rate input box and then check Src. Address from the Classifier panel and then click Apply and OK button.
- Do step 2 and step 3 for 1Mbps connection and 2Mbps connection. Just change the Rate value 1M and 2M accordingly for these connections.
PCQ Queue types configuration has been completed. Now we will configure Simple Queue for these PCQ Queue types.
Simple Queues Configuration for PCQ Queue Types
After creating PCQ Queue Types, we will now declare different IP blocks that will get these PCQ Queue types. Follow my below steps to complete Simple Queue configuration for the PCQ Queue Types those you created before.
- Click on Simple Queues tab and click PLUS SIGN (+) to add new simple queue. New Simple Queue window will appear now. In General tab, type 512kbps_Clients in Name input box or any text that you like and type 192.168.10.0/24 in Target input box. You can also define multiple IP blocks by clicking Add new value button located at right side of Target input box and typing new IP block.
- Click on Advanced tab and choose 512kbps_Upload and 512kbps_Download from Queue Type drop-down menu. As you have assigned 512kbps Upload and Download for Queue Type of this simple queue, all the IPs in this IP block will get 512kbps speed separately. Now click Apply and then OK button.
- Do step 1 and 2 for 1Mbps connection and 2Mbps connection. Just change Target address and Queue Type for these connections.
PCQ configuration in MikroTik Router for the proposed packages has been completed. Now assign your clients IP and check their bandwidth with free internet speed test tool. I hope you will get your desired result. However, if you face any problem to follow above steps, please watch the below video carefully about ISP or Local ISP Bandwidth Management with MikroTik PCQ.
ISP or local ISP Bandwidth Management with MikroTik PCQ has been described step by step in this article. Also a video tutorial has been uploaded to reduce any confusion on configuration. I hope you are now able to configure PCQ in your MikroTik router and able to maintain your client bandwidth without any hassles. However, if you face any problem to assign bandwidth to your ISP client with PCQ configuration, please discuss in comment or contact with me from Contact page. I will try my best to stay with you.
Why not a Cup of COFFEE if the solution?

After assigning the bandwidth as suggested, How will it affect each ip or the assigned bandwidth in the queue type affect each ip/user in the range of Ip address. Just like here- In General tab, type 512kbps_Clients in Name input box and type 192.168.10.0/24 . will this 512kbps affect each ip/user you assigned it in the simple queue. What version of mikrotik OS works best in terms of queueing.
Hi sapanda,
Thanks for your comments. You should follow all the steps mentioned in this article. Please follow my video tutorial also. In simple queue configuration, you must provide advanced tab information and there you must choose Queue Type for this simple queue and the Queue Type is the PCQ profile that you created before. The logical strategy in PCQ service is to provide equal bandwidth to each client who has this queue type. So, every ip of 192.168.10.0/24 will get equal IP and this is the rule of PCQ service.
All mikrotik router will work for bandwidth management.
Hi. You have shared something useful. However, I cannot find what I am looking for. I have 3 isp. The first one is a DSL which has no daily capping ( unlimited use). The second one is Fiber which is faster but has daily capping ( max of 800mb per day). The third one is sim-based LTE which is reloadable by gb. I have wanted all torrents, downloads,video streaming and other data-heavy usage. While basic surfing, gaming and social media on the other two. There were 3 desktop, a laptop and 5 smartphones connecting on our router. Please shed some light.
Hello sir;
i have a problem in my network i will share it with you if you can help me to solve the problem.
Here are my network specification for better getting of the problem.
-Small network contain of local Database and internet.
– 1 local and 1 public IP.
– 6 MB internet.
my problem is when ever i block internet of some users from Firewall< Filter Rule to just access the local network, this policy works but also there local speed Decrease.
and also when i use all the 6 MB Bandwidth, other users local Database speed Decrease.
create a simple queue for local database with unlimited bandwidth and then drag the rule to top position.Then it consume no public internet.
Md. Abu Sayeed, bhai ap sy ek sawal hai mere user boht data consume karte hai to is ka koi hal btae plz in mikrotik thanks and i am big fan of your articles sir thanks
Hello Sir,
I just followed all given steps for bandwidth control, but still all my clients/secrets able to access full internet without any limitations
Please help me more
Please also follow video or try to another version of MikroTik Router (upgrading routeros). It should work because I set these configuration on a ISP and it is working.