MikroTik Router Bandwidth Management
MikroTik is one of the most popular routers in computer networking. It is said that no office or ISP company cannot go a single day without MikroTik router. MikroTik router is also a popular router to any network administrator because MikroTik router is easily maintainable with graphical user interface software named winbox than other routers. A lot of services are available in MikroTik router to run a network smoothly. Among these services, Bandwidth Management Service is the most popular service in MikroTik Router. It is said that MikroTik Router is mostly used because of its Bandwidth Management service. As most of the offices or ISP companies are now using MikroTik router for their user bandwidth management, it will be so beneficial for you to know the proper bandwidth management system with MikroTik router. So, this article is designed to show you the proper and simple way to manage internet bandwidth of any office or ISP company with MikroTik router.
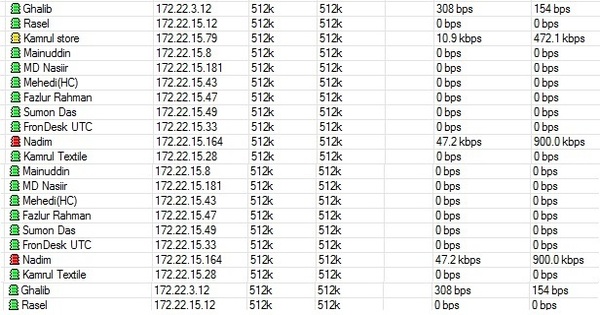
The module or service which is used to manage bandwidth in MikroTik Router is Queues. Maximum bandwidth can be controlled with Queues but it is not always possible to provide fixed bandwidth to the users because bandwidth is always shared. For example, you have assigned 1 Mbps bandwidth to a user. It means, the user will get maximum 1 Mbps upload and download speed if bandwidth is available otherwise he/she will get less than 1 Mbps speed. But he/she will never get grater than 1 Mbps upload or download speed although bandwidth is available more than 1 Mbps. A simple screenshot of a simple queues of a MikroTik router is given below.
MikroTik router basic configuration was shown in my previous article. In that article, I have configured a simple office network with MikroTik router. The office network diagram which was shown in my previous article is given below again because I will configure MikroTik simple queues for managing users bandwidth according to the basic configuration of my previous article.
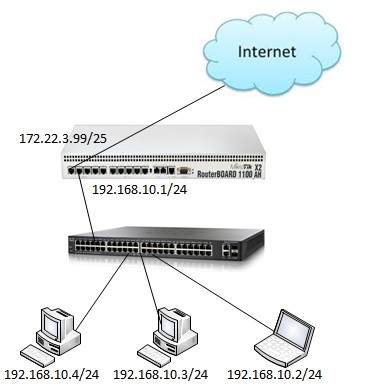
In this network diagram, there are there users who are connected to MikroTik router for accessing internet through a network switch. MikroTik router is working as a NATing devices in this network that means it is translating private IP address to public address for accessing internet. Basic configuration for this MikroTik router for working as a NATing devices was explained in my previous article. If you are a new MikroTik user, visit to my previous article about MikroTik router basic configuration using winbox and the keep reading the rest of this article to know how to manage user bandwidth with MikroTik router simple queues.
Bandwidth Management with MikroTik Simple Queue
There are various queue services in MikroTik router for managing user bandwidth. Among these, simple queue service is mostly used for managing an office internet bandwidth and PCQ service is used for managing ISP client bandwidth. As I have configured a simple office network in my previous article, today I will show you how to manage an office bandwidth with MikroTik simple queue service. If you have already configured the basic steps (WAN and LAN IP assign and NAT configuration) of your MikroTik router according to my last article (about MikroTik router basic configuration), follow my below steps to manage your user bandwidth with MikroTik simple queue service.
- Login to your MikroTik router using winbox and then click on Queues menu from left menu panel. Queue List window will appear but there will be no list because we have not added any list yet. So, click on add new button (PLUS Sign) to add a new list. New Simple Queue window will appear now. If you face any confusion to find the add new button, please watch my below video carefully which will show you proper guide to open New Simple Queue window successfully.
- In general tab of New Simple Queue window, type user name in Name input field and user IP address in Target Address input field. Now choose Target Upload and Target Download from Max limit drop-down list or type your desired upload and download speed. This is the maximum upload and download speed for your desired user.
- Now from Advanced tab, choose Limit At value for Target Upload and Target Download speed. If you set this value, MikroTik will try to provide at least this upload and download speed to the user when bandwidth will be congested. You can also choose Priority for any user. Normally, MikroTik bandwidth is assigned sequentially if they are in same priority. That means, the user who is top position of Queue list will get first priority to assign bandwidth and then the second positioned user and then the next positioned user. Priority can be selected 1 to 8. 1 is high priority and 8 is less priority. High priority user will get bandwidth first and then less priority user. Choose your desired priority for this user and click Apply and then OK to save this configuration.
- You have now assigned bandwidth on a user IP successfully. Do the above steps repeatedly for all your network users for assigning their bandwidth. Now check your assigned bandwidth to any user with free internet speed test tool. I hope, you will get your desired result from bandwidth test.
Proper steps to assign bandwidth to any user IP with MikroTik simple queue service has been show above. I hope, you are able to assign your user bandwidth by following above steps. However, if you face any problem to assign user bandwidth with above steps, please watch my below video tutorial about MikroTik Router Bandwidth Management with Simple Queues. I hope, it will guide your properly to assign a user bandwidth MikroTik router simple queue.
MikroTik Router Bandwidth Management with simple queue has been explained step by step in this article. A video tutorial has also been uploaded so that you can do the above steps successfully. However, if you face any difficulty, feel free to discuss in comment or contact with me from Contact page. I will try my best to stay with you.
Why not a Cup of COFFEE if the solution?

Thank you So Much to share experiences, I am a new computer Administrator, it’s my first time to use mikrotik router, now I want to limit bandwith only one port Ex: my LAN port, I have more than 40 PCs in my office and if I set bandwith limitation I must have more than 40 Queues line in my router.
How can I do only one queues line to all users
Thank you and best regards
Hi Dian Barry,
Thanks for visiting my website. See my article about ISP Bandwidth Management with MikroTik PCQ. I think, it will fulfill your requirement.
I really enjoy your presentation on mikrotik simple queue configuration.
But i want to ask; how many concurrent hotspots users can rb1100ahx2 support with just a few firewall rules and NAT.
Also could you please show us a demo on hotspot configuration on rb1100ahx2.
Regards.
Hi mitchel,
As far I know, there is no user limitation in MikroTik router. If your user is about 500, you can use rb1100ahx2 but you should always check CPU and Memory usage. If CPU is increased, it will be better to use MikroTik Cloud Core Router.
thanks a lot.
I actually have 400 concurrent users using rb1100ahx2 for a high school.
I am planning a hotspot deployment for the students and teachers as well.
Please what should be the max CPU utilization?
And could you please do a demo on the hotspot setup using radius server?
Big ups to you!
i like your teaching you are good.
Please, how do i set bandwidth for 20 users, using mikrotik rb 1100ah……
Thanks
Hi good day
just want to say your educational videos tutorials are awesome.
can you make more videos on how to protect
your network in mikrotik ‘s firewall
thanks alot.
Thank for you post, but i wanna ask how to limit for client with dhcp, not a hostpot.
thank.
Just use MikroTik Queue or you can use DHCP with Radius Server that will I post soon.
it was nice tutorial . but i need to configure my mikrotik in my office with pppoe server that user in my office can login by there name and password using dailup. but i am facing the login issue in mikrotik that only a one user can login to ppoe server and the user notzable to connect i am using mt-link swith between mikrotik and client side kindly guide me what shal i do to connect all my user in my office by there login name with dailup by mikrotik pppoe server.
Please follow my PPPoE server configuration article.