How to Separate MikroTik Hotspot and DHCP IP Pool
MikroTik default Hotspot Setup comes with a DHCP Server (which uses same IP Pool of Hotspot Server) to provide IP address and other network information to a connected device. Using this automatic IP address connected device can access Hotspot login page. After successfully login, a one to one NAT IP address is also assigned for the device and this process happens internally in Hotspot Server. User device cannot know this one to one NAT IP assigning. However, Hotspot Server actually occupies two IP address for a successfully logged in user. For this, sometimes Hotspot IP Pool gets congested and new user cannot be able to connect to Hotspot network and hence Hotspot network get hampered. To overcome this situation we can configure DHCP IP Pool and Hotspot IP Pool separately. If we do so, DHCP will provide IP address from its own IP pool and Hotspot will also assign one to NAT IP address from its own IP Pool. For using two different IP Pools, there will be no IP shortage and Hotspot network can run smoothly. To configure separate IP Pool for DHCP and Hotspot network, we need to apply some tricks and in this article I will discuss how to configure Hotspot and DHCP servers’ IP Pool separately using Winbox.
Configuring Separate IP Pool for Hotspot and DHCP Server
MikroTik Hotspot Server has some complex configuration and doing any mistake on default configuration can shutdown Hotspot network. So, we have to be careful before doing any new configuration. Following the below three steps we can easily separate Hotspot and DHCP Server IP Pool.
- Assigning a new gateway for Hotspot
- Creating a new IP Pool for Hotspot
- Assigning new IP Pool in Hotspot user profile
- Creating new NAT rule for the New IP Block.
Step 1: Assigning a new gateway on Hotspot Interface
MikroTik Hotspot default setup configures same gateway IP address for both DHCP Server and Hotspot Server. So, at first we have to set different gateway for Hotspot Server. The following steps will show how to assign different gateway IP for Hotspot Server.
- Login MikroTik Router with Winbox software using full permission user.
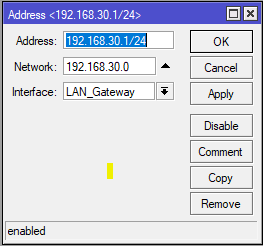
- Go to IP > Addresses menu item. Address List window will appear.
- Click on PLUS SIGN (+) to add a new gateway IP address. New Address window will appear.
- Put new gateway IP address (example: 192.168.30.1/24) in Address input field.
- Choose interface (example: ether2) on which Hotspot Server was installed from Interface dropdown menu.
- Click Apply and OK button.

Step 2: Creating a New IP Pool for Hotspot
After creating a new gateway, we will now create a new IP Pool for Hotspot. Hotspot one to one NAT IP will be assigned from this IP Pool. The following steps will show how to create a new IP Pool for Hotspot Server.
- Go to IP > Pool menu item. IP Pool window will appear.
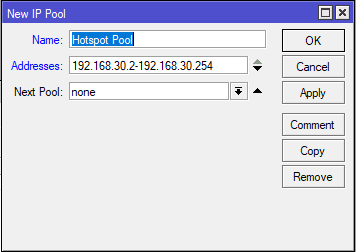
- Click on PLUS SIGN (+). New IP Pool window will appear.
- Put a Pool name (example: Hotspot Pool) in Name input field.
- Now put IP range (example: 192.168.30.2-192.168.30.254) in Addresses input field.
- Click Apply and OK button.

Step 3: Assigning Created IP Pool in Hotspot User Profile
After creating new IP Pool for Hotspot Server, we will now assign this pool in Hotspot user profile so that connected user can get one to one NAT IP from this IP Pool. The following steps will show how to assign IP Pool in Hotspot user profile.
- Go to IP > Hotspot menu item. Hotspot window will appear now.
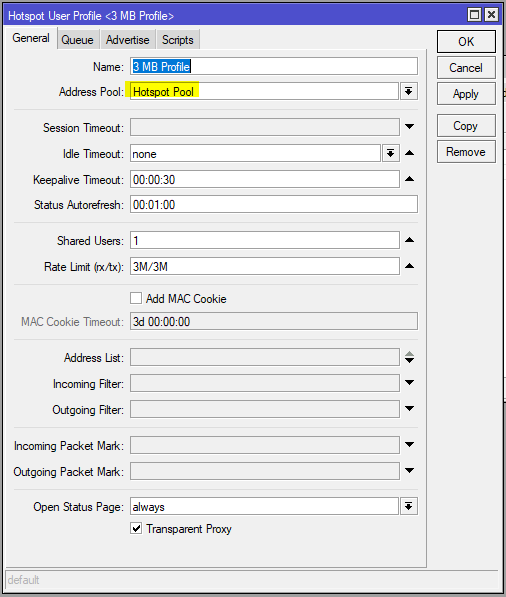
- Click on User Profiles tab and then click on a created user profile where you want to assign this new IP Pool. Hotspot User Profile edit window will appear.
- Under General tab, choose newly created IP Pool from Address Pool drop down menu.
- Click Apply and OK button.
- Do the above steps to all your remaining user profiles.

Now one to one NAT IP will be assigned from this IP Pool. But at this moment user will not get internet because we have not yet configured NAT for this IP Block. So, in the next section we will do NATing for this IP Block.
Step 4: Creating New NAT Rule for the New IP Block
At last stage we enable NATing for this new IP Block so that these IP addresses can be NATed and user can get internet access. The following steps will show how to create new NAT rule in MikroTik Firewall.
- Go to IP > Firewall menu item. Firewall window will appear.
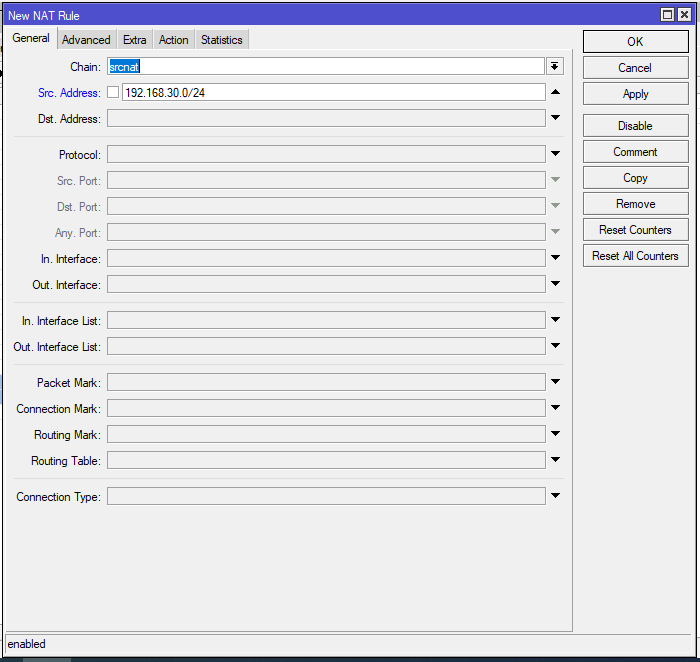
- Click on NAT tab and then click on PLUS SIGN (+). New NAT Rule window will appear.
- Under General tab, choose srcnat from Chain dropdown menu.
- Put new IP block (example: 192.168.30.0/24) in Src. Address input filed.
- Now click on Action tab and choose masquerade from Action dropdown menu.
- Click Apply and OK button.

Our Hotspot and DHCP Server IP block is now separated and we have plenty of IP addresses to assign new Hotspot user. If we wish we can setup more IP Blocks (following the above steps) for our Hotspot Server also.
How to separate Hotspot and DHCP server IP Block has been discussed in this article. I hope you will now be able to create new IP Block for your Hotspot Server. However, if you face any confusion, feel free to discuss in comment or contact me from Contact page. I will try my best to stay with you.
Why not a Cup of COFFEE if the solution?

