

MikroTik CAPsMAN (Controlled Access Point system Manager) is a centralized Access Point management application provided by MikroTik. MikroTik introduces CAPsMAN from RouterOS v6.11 with CAPsMAN v1 and from RouterOS v6.22rc7 CAPsMAN v2 is running. If you have multiple MikroTik CAPs (Controlled Access Point) in your organization, CAPsMAN provides an easy way to maintain client data as well as CAPs configuration centrally. In my previous article, I discussed how to configure MikroTik Wireless Router as an Access Point. In this article, I will discuss how to do configure MikroTik CAPsMAN basic configuration with a Controlled Access Point (CAP).
Network Diagram
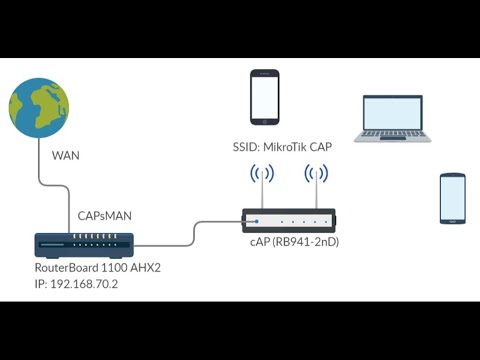
For a simple MikroTik CAPsMAN configuration, I am following the below network diagram.


In this network diagram, MikroTik RouterBOARD 1100 AHX2 is working as a CAPsMAN but it is not a wireless router because CAPsMAN does not require being a wireless router but require a powerful hardware that can control multiple CAPs and client data. Another MikroTik Wireless Router (RB941-2nd) is working as a CAP which will be controlled by the CAPsMAN. After configuring CAPsMAN, SSID (MikroTik CAP) will be shown by the CAP and client will be able to connect providing valid password.
MikroTik CAPsMAN Configuration with CAP Wireless Router
Now we will start basic CAPsMAN configuration. Complete CAPsMAN configuration with a CAP can be divided into the following steps.
- RouterOS basic configuration in CAPsMAN Router.
- DHCP Server setup in CAPsMAN Router.
- CAPsMAN basic configuration.
- CAP configuration in Wireless Router.
Step 1: RouterOS Basic Configuration in CAPsMAN Router
Before going to start CAPsMAN configuration we need to do basic RouterOS configuration so that CAPsMAN can get internet access and can act as data path for the CAPs client. The following steps will show how to configure the basic features in MikroTik CAPsMAN Router.
- Login to RouterOS using Winbox with full permission user.
- From left menu panel click on Bridge menu item. Bridge window will appear. Click PLUS SIGN (+) to create a new bridge interface. In New Interface window put a meaningful name (CapDataPath) in Name input field. Click Apply and OK button.
- Go to IP > Addresses menu item and click on PLUS SIGN (+). New Address window will appear. Put WAN IP (192.168.70.2/29) in Address input field and choose WAN interface (ether1) from Interface drop down menu and click Apply and OK button.
- Click on PLUS SIGN (+) again and put LAN gateway IP (10.10.70.1/24) in Address input field and choose created bridge interface (CapDataPath) from Interface drop down menu and click Apply and OK button.
- Go to IP > DNS menu item and put DNS server’s IP address (8.8.8.8) in Servers input field and then click Apply and OK button.
- Go to IP > Routes menu item and click on PLUS SIGN (+) and put WAN gateway (192.168.70.1) in Gateway input field and click Apply and OK button.
- Go to IP > Firewall menu item and click on NAT tab and then click on PLUS SIGN (+). New NAT Rule window will appear. In General tab, choose srcnat from Chain drop down menu. From Action tab, choose masquerade from Action dropdown menu. Click Apply and OK button.


RouterOS basic configuration has been completed. If everything is OK, you will now be able to get internet and be able to ping any public domain. In the next part, we will configure DHCP Server so that client IP and other network parameters can be assigned automatically.
Step 2: DHCP Server Setup in CAPsMAN Router
We will now setup DHCP Server on LAN network so that any connected wireless device can get IP and other network parameters automatically from this DHCP Server. The following steps will show how to setup DHCP Server in MikroTik RouterOS.
- Go to IP > DHCP Server menu item and click on DHCP tab.
- Click on DHCP Setup button. DHCP Setup window will appear.
- Choose bridge interface (CapDataPath) from DHCP Server Interface dropdown menu and click Next button.
- LAN network will automatically be assigned. So, nothing to do. Just click Next button.
- LAN gateway IP will automatically be assigned in Gateway for DHCP Network. So, click Next button.
- Whole LAN IP block except gateway will be assigned for Addresses to Give Out input filed. If you want, you can decrease DHCP IP range from here. Click Next button.
- Assigned DNS IP in RouterOS will be automatically assigned. If you wish, you can add another one. Click Next button.
- Default DHCP lease time 10 minutes will be assigned in Lease Time input field. If you wish, you can increase the lease time. Click Next button.
- Now DHCP setup will be completed and you will get a successful message.


Step 3: CAPsMAN Basic Configuration
A lot of parameters are available in CAPsMAN configuration for maintaining client data and controlling CAP property. In basic CAPsMAN setup, we will do the following steps to launch a CAP network initially.
- CAPs Configuration
- Provisioning Configuration and
- Enabling CAPs Manager
CAPs Configuration
In CAPs configuration, we will define some properties that will be assigned on provisioned CAP. The following steps will show how to define CAP properties to launch a CAP properly.
- Click on CAPsMAN menu item from Winbox. CAPsMAN window will appear.
- Click on Configurations tab and then click on PLUS SIGN (+). New CAPs Configuration window will appear.
- In Wireless tab, put a meaningful configuration name (CAPs Conf) in Name input field and choose ap from Mode dropdown menu and then provide a SSID (MikroTik CAP) that you want in SSID input field.
- Click on Datapath tab and choose the created bridge interface (CapDataPath) from Bridge dropdown menu.
- Click on Security tab and click on Authentication Type hidden field and click on WPS2PSK checkbox. Click on Encryption hidden field and click the aes ccm encryption method checkbox. Also choose aes ccm from Group Encryption dropdown menu. Click on Passphrase input field and provide a strong password.
- Click Apply and OK button.


Provisioning Configuration
After CAPs property configuration, we need to create CAPs provisioning rule. The following steps will show how to setup dynamic radio provisioning rule in CAPs Manager.
- Click on Provisioning tab and then click PLUS SIGN (+). New CAPs Provisioning window will appear.
- Choose create dynamic enabled option from Action dropdown menu.
- Chose created CAPs configuration (CAPs Conf) from Master Configuration drop down menu.
- Click Apply and OK button.


Enabling CAPs Manager
Now we will enable CAPs Manager so that it can provision any CAP connected to it and control the provisioned CAP according to the configuration. The following steps will show how to enable CAPs Manager from CAPs Window.
- Click on CAP Interface tab and then click on Manager button. CAPs Manager window will appear.
- Click on Enable checkbox.
- Click Apply and OK button.


CAPsMAN basic configuration is now complete. CAPsMAN is now ready to provision any CAP connected to its network. CAP is mainly discovered by MAC address.
Step 4: CAP Configuration in Wireless Router
After configuring CAPsMAN, we also need to configure CAP in Wireless Router so that CAP can be able to connect to a CAPsMAN. The following steps will show how to configure CAP in a CAP capable MikroTik Wireless Router (RB941-2nD).
- Login to CAP Wireless Router with Winbox and click on Wireless menu item from left menu bar. Wireless Table window will appear.
- From Interface tab, click on CAP button. CAP window will appear.
- Click on Enabled checkbox.
- Choose wireless interface (wlan1) from Interfaces dropdown menu.
- Choose an Ethernet interface (ether1) from Discover Interfaces dropdown menu. Connection between CAPsMAN and CAP will be established through this interface and client data will also be transmitted through this interface.
- Click Apply and OK button.


The CAP configuration in Wireless Router has been completed. Now CAP is ready get configuration from CAPsMAN. Connect CAP Router to CAPsMAN Router either directly or a switch that is connected to the CAPsMAN Router. Make sure that you have connected the discovery interface in CAP Router.
After connecting, the CAP will be provisioned by CAPsMAN and all settings will be assigned and you will find that the given SSID is available. If the CAP is provisioned, the wireless interface will look like the following image.


Now connect any wireless client device. If everything is OK, the client device will be able to connect and get internet access.
This is a simple and basic level CAPsMAN configuration. If you have multiple CAPs in a floor or in a building, the CAPs configuration will be different because there will be frequency overlapping and CAPsMAN performance will be poor. In the next article, I will discuss how to configure CAPsMAN advance configuration to overcome frequency overlapping.
If you face any confusion to follow the above configuration properly, watch the following video on MikroTik CAPsMAN Basic Configuration. I hope it will reduce your any confusion.
MikroTik CAPsMAN basic configuration has been discussed in this article. I hope you will now be able to start CAPsMAN configuration. However, if you face any confusion, feel free to discuss in comment or contact me from Contact page. I will try my best to stay with you.