

FreeRADIUS is a high performance RADIUS suite that provides authentication, authorization and accounting facility for a large number of network devices including MikroTik Router. Although MikroTik has user manager RADIUS service to provide authentication, authorization and accounting facility but it is not free for customization and not suitable for medium to large organization. On the other hand, freeRADIUS is free for customization according to your organization requirements. But freeRADIUS has to be customized by you. In my previous article, I discussed how to install and configure freeRADIUS on CentOS 7 Linux distribution. In this article, I will show how to connect MikroTik Router with freeRADIUS Server and authenticate MikroTik login with freeRADIUS users.
Network Diagram
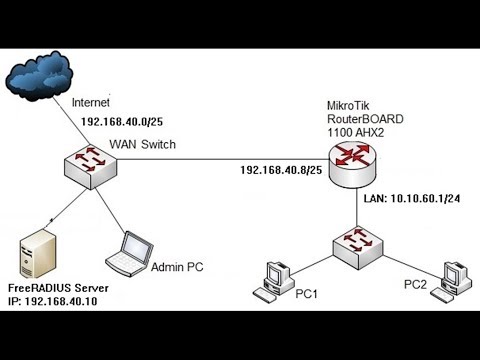
For this article configuration, I am following a network diagram like below image.


In this network, MikroTik Router’s (RouterBOARD 1100 AHX2) WAN interface (ether1) is connected to internet through WAN distribution switch having IP address 192.168.40.8/25. MikroTik Router also has a LAN network having IP network 10.10.60.0/24. The freeRADIUS Server, installed on CentOS 7 Linux Server, is also connected to internet through WAN switch having IP address 192.168.40.10. So, MikroTik Router can see freeRADIUS Server through WAN interface and WAN switch.
In this article, we will configure MikroTik Radius and MikroTik users so that MikroTik Router can request for login user authentication and authorization from freeRADIUS Server. We will also configure freeRADIUS client and user so that freeRADIUS can accept MikroTik authentication request and can authenticate users from its user database with proper authorization.
So, design your MikroTik and freeRADIUS network according to the above network diagram and follow below section to configure your network.
MikroTik Router with FreeRADIUS Server
We will now start to configure MikroTik Radius with freeRADIUS Server for authentication and authorization MikroTik login user from freeRADIUS Server. Complete MikroTik radius configuration with freeRADIUS can be divided into two parts.
- MikroTik Router Radius Configuration
- FreeRADIUS Client and User Configuration
Part 1: MikroTik Router RADIUS Configuration
In this part, we will do MikroTik Router basic configuration, MikroTik Radius configuration and login RADIUS configuration so that login user can be authenticated from freeRADIUS Server. The following steps will show how to configure these topics in your MikroTik Router.
Step 1: MikroTik Router Basic Configuration
The following steps will show how to do basic configuration in your MikroTik Router.
- Login to your MikroTik Router using Winbox with full permission user.
- Go to IP > Addresses menu item. Address List window will appear. Click on PLUS SIGN (+). New Address window will appear.
- Put RouterOS WAN IP {192.168.40.8/25) in Address input field and choose WAN interface (ether1) from Interface dropdown menu and then click Apply and OK button. Click on PLUS SIGN (+) again and put LAN gateway IP (10.10.60.1/24) in Address input field and choose LAN interface (ether2) from Interface dropdown menu and then click Apply and OK button.
- Now go to IP > DNS and Put your DNS server IP (Public DNS IP: 8.8.8.8 or 8.8.4.4) in Servers input field and then click Apply and OK button.
- Go to IP > Routes and click on PLUS SIGN (+). New Route window will appear. Click on Gateway input box and put your internet gateway IP (192.168.40.1) in Gateway input field and then click on Apply and OK button.
- Go to IP > Firewall and click on NAT tab. Now click on PLUS SIGN (+). New NAT Rule window will appear. Under General tab, choose srcnat from Chain dropdown menu. Under Action tab, choose masquerade from Action dropdown menu. Click on Apply and OK button.
MikroTik Router basic configuration has been completed. Now your MikroTik is able to get internet as well as freeRADIUS Server. Ping your DNS server and freeRADIUS server from Winbox CLI.If everything is OK, you will be success. Now we will configure MikroTik Radius to communicate with freeRADIUS Server.
Step 2: MikroTik RADIUS Configuration
The following steps will show how to configure MikroTik Radius to communicate with freeRADIUS Server.
- Click on Radius menu item from Winbox menu bar. Radius window will appear.
- Click on PLUS SIGN (+). New Radius Server window will appear.
- Click on login checkbox from Service panel.
- Put freeRADIUS server IP address (192.168.40.10) in Address input field.
- Put Shared secret (such as: SystemZone) in Secret input field. This secret must be same in freeRADIUS client configuration.
- Click Apply and OK button.


Radius configuration in MikroTik Router has been completed. Now we will enable login user authentication with freeRADIUS Server in our MikroTik Router.
Step 3: Enabling Login User Authentication and Authorization from freeRADIUS Server
The following steps will show how to enable login user authentication and authorization from freeRADIUS Server.
- Go to System > Users menu item from Winbox.
- Click on AAA button. Login Authentication and Accounting window will appear.
- Click on Use RADIUS checkbox.
- Click Apply and OK button.


MikroTik Router is now ready to send login user authentication and authorization request to freeRADIUS Server. We will now configure freeRADIUS client and user so that it allows MikroTik Router authentication request and authenticate and authorize MikroTik login user from user database.
Part 2: FreeRADIUS Client and User Configuration
Our configured MikroTik Router is a client device of freeRADIUS server. So, we will first configure freeRADIUS client so that it can accept MikroTik Router’s authentication request and then we will create user who will be authenticated and authorized to login in MikroTik Router from freeRADIUS user database. How to install and configure freeRADIUS server was discussed in my previous article. So, if you are new in freeRADIUS server, spend some time to complete freeRADIUS installation and basic configuration and then follow the below steps to configure freeRADIUS client and user.
- Login to your freeRADIUS server with root user and ensure that your working directory is /etc/radddb.
[root@freeradius raddb]# cd /etc/raddb
[root@freeradius raddb]# ls
- Open client.conf file with vim editor(vim client.conf) and enter the following entry at the bottom of the clients.conf file.
client mikrotik-router {
ipaddr = 192.168.40.8
secret = SystemZone
nas_type = other
}
- Define bob as a FreeRADIUS user who will be able to login to MikroTik Router. Open users file with vim editor (vim users) and add the following lines at the top of the users file. Make sure that the second line is indented by a single tab character.
“bob” Cleartext-Password := “password”
MikroTik-Group := “write”You can add many users as you need following this step properly.
- Reload the freeRADIUS server with the restart command.
[root@freeradius ~]# systemctl restart radiusd

FreeRADIUS client and user configuration has been completed. Now open Winbox and login with freeRADIUS user (bob). If everything is OK, you will be able to login in your MikroTik Router with freeRADIUS user credentials.
MySQL (MariaDB) Database is one of the best users and clients sources for freeRADIUS Server. In the next article, I will show how to configure MikroTik Radius with freeRADIUS and MySQL Server.
If you face any confusion to follow above steps properly, watch the below video about MikroTik Radius configuration with freeRADIUS. I hope it will reduce your any confusion.
How to configure MikroTik RADIUS with freeRADIUS application has been discussed in this article. I hope, you will now be able to configure your MikroTik Radius with freeRADIUS server successfully following the above steps properly. However, if you face any confusion to configure MikroTik Router with freeRADIUS server, feel free to discuss in comment or contact with me from Contact page. I will try my best to stay with you.