MikroTik Site to Site SSTP VPN Setup with RouterOS Client
VPN (Virtual Private Network) technology provides a secure and encrypted tunnel across a public network. So, a private network user can send and receive data to any remote private network through VPN tunnel as if his/her network device was directly connected to that private network.
Secure Socket Tunneling Protocol (SSTP) transports PPP tunnel over TLS channel. SSTP uses TLS channel over TCP port 443. So, SSTP VPN can virtually pass through all firewalls and proxy servers. Because of using TLS channel, encrypted data passes over SSTP Tunnel. So, there is no chance to steal data by a middle man attacker and data can send and receive across public network safely. MikroTik SSTP Server can be applied in two methods.
- Connecting from remote workstation/client: In this method, SSTP VPN client software can communicate with MikroTik SSTP VPN Server over Secure VPN tunnel whenever required and can access remote private network as if it was directly connected to that remote private network.
- Site to Site SSTP VPN: This method is also known as VPN between routers. In this method, an SSTP client supported router always establishes a SSTP VPN tunnel with MikroTik SSTP VPN Server. So, private networks of these two routers can communicate with each other as if they were directly connected to the same router.
The goal of this article is to create a VPN tunnel between two MikroTik RouterOS over secure SSTP VPN Tunnel across public network. In my previous article I discussed how to configure MikroTik SSTP VPN Server for connecting a remote Windows 10 Client. In this article I will discuss how to create site to site SSTP VPN between two MikroTik RouterOS.
Network Diagram
To configure a site to site SSTP VPN Tunnel between two MikroTik RouterOS, we are following a network diagram like the below network figure.
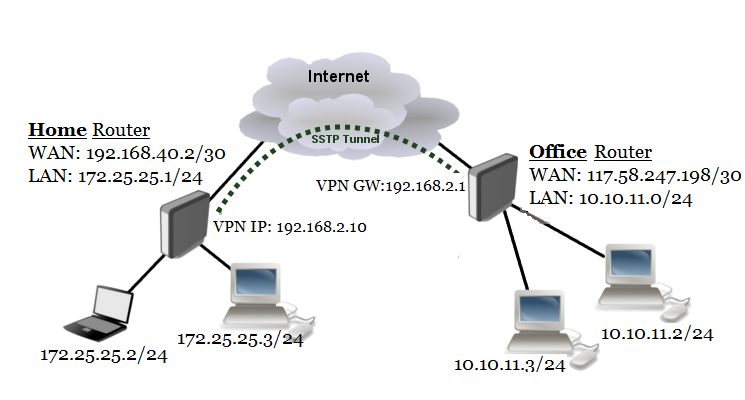
In this network diagram, there are two MikroTik Routers (Office Router and Home Router). Office Router has WAN IP 117.58.247.198/30 which is a public IP and LAN IP block 10.10.110/24. Home Router has WAN IP 192.168.40.2/30 which is under a NAT network. So, Home Router does not require having public IP. It has also a LAN IP Block 172.25.25.0/24.
We will configure SSTP VPN in Office Router and SSTP Client in Home Router. After configuring SSTP VPN, VPN Gateway in Office Router will be 192.168.2.1 and Home Router will get 192.168.2.10 and a Secure SSTP Tunnel will be established and Office Router and Home Router can access each other network over this SSTP Tunnel.
Site to Site MikroTik SSTP VPN Setup
We will now start SSTP Server and SSTP Client configuration between two MikroTik RouterOS. Complete SSTP configuration can be divided into two parts.
- Part 1: SSTP Server Configuration in Office RouterOS
- Part 2: SSTP Client Configuration in Home RouterOS
Part 1: SSTP Server Configuration in Office RouterOS
According to the network diagram, Office Router is our SSTP VPN Server. So, we will enable and configure SSTP VPN Server in Office MikroTik RouterOS. It is assumed that MikroTik WAN and LAN networks have been configured and are working without any issue.
Complete MikroTik SSTP Server configuration in Office RouterOS can be divided into the following three steps.
- Step 1: Creating TLS Certificate for SSTP Server
- Step 2: Enabling and Configuring SSTP Server
- Step 3: Creating SSTP Users
Step 1: Creating TLS Certificate for SSTP Server
SSTP Server configuration requires TLS certificate because SSTP VPN uses TLS certificate for secure communication. MikroTik RouterOS v6 gives ability to create, store and manage certificates in certificate store. So, we will create required SSTP Server certificate from MikroTik RouterOS. SSTP Server requires two types of certificates:
- CA (Certification Authority) Certificate and
- Server Certificate
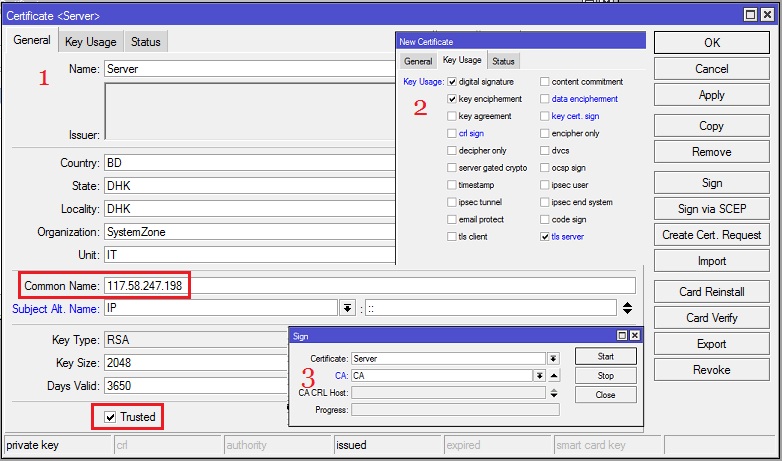
- Click on PLUS SIGN (+) again. New Certificate window will appear.
- Put your server certificate name (for example: Server) in Name input field.
- Put the WAN IP Address (example: 117.58.247.198) of MikroTik Router in Common Name input field.
- If you have put any optional field in CA certificate, put them here also.
- Click on Key Usage tab and uncheck all checkboxes except digital signature, key encipherment and tls server checkboxes.
- Click on Apply button and then click on Sign button. Sign window will appear now.
- Your newly created Server certificate template will appear in certificate dropdown menu. Select newly created certificate template if it is not selected.
- Also select CA certificate from CA dropdown menu.
- Click on Sign button. Your Signed certificate will be created within few seconds.
- Click on OK button to close New Certificate window.
- If newly created server certificate does not show T flag or Trusted property shows no, double click on your server certificate and click on Trusted checkbox located at the bottom of General tab and then click on Apply and OK button.
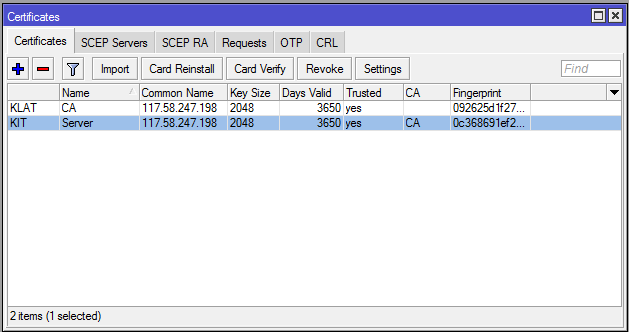
We have successfully created required CA and Server Certificates. After creating CA and Server certificates, the Certificates will look the following image.
Step 2: SSTP Server Configuration in MikroTik Router
After creating CA and Server Certificates, we are now eligible to enable and configure SSTP Server in MikroTik Router. The following steps will show how to enable and configure SSTP Server in MikroTik Router.
- Click on PPP menu item from Winbox and then click on Interface tab.
- Click on SSTP Server button. SSTP Server window will appear.
- Click on Enabled checkbox to enable SSTP Server.
- Make sure TCP Port 443 is assigned in Port input field.
- From Authentication, uncheck all checkboxes except mschap2 checkbox.
- From Certificate dropdown menu, choose server certificate (Server) that we created before.
- From TLS Version drop down menu, choose only-1.2 option. TLS Version any can also be selected.
- Now click on Force AES and PFS checkboxes.
- Now click on Apply and OK button.
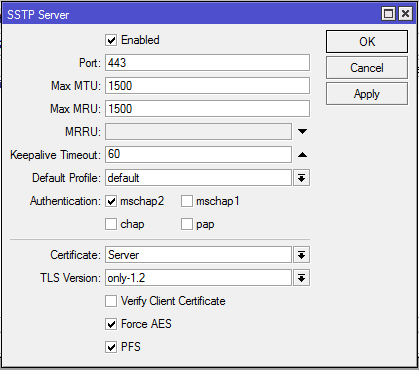
SSTP Server is now running in MikroTik Router. As MikroTik SSTP VPN is limited to use username and password for successful VPN connection, we will now create PPP users who will be able to connect to MikroTik SSTP Server and get IP information.
Step 3: Creating SSTP Users
MikroTik SSTP uses username and password to validate legal connection. So, we have to create username and password to allow any user. The following steps will show how to create SSTP users in MikroTik RouterOS.
- From PPP window, click on Secrets tab and then click on PLUS SIGN (+). New PPP Secret window will appear.
- Put username (For example: sayeed) in Name input field and put password in Password input field.
- Choose sstp from Service dropdown menu.
- Put VPN Gateway IP (192.168.2.1) in Local Address input field. This Gateway IP does not require assigning on any interface because virtual interface will be created where this Gateway IP will be assigned automatically.
- Put the IP address (192.168.2.10) that will be assigned in Home Router in Remote Address input field. This address will be assigned automatically. So, no need to assign on any interface.
- Put static route (172.25.25.0/24 192.168.2.10 1) that will be assigned in Office Router so that Office Router can reach to Home Router network in Routes input field. If you don’t assign Routes here, you have to put Routes statically in routing table to reach Home Router network. Multiple routes can be added by comma separated.
- Click on Apply and OK button.
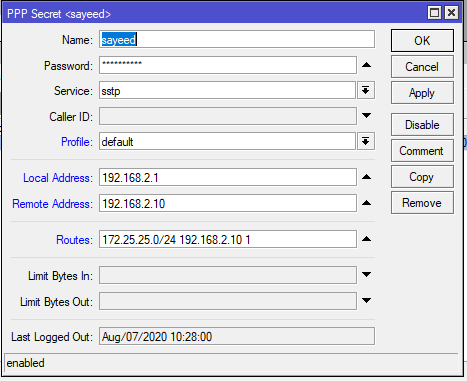
Multiple users can be created similarly if you have multiple Client RouterOS.
SSTP Server and user configuration in Office Router has been completed. Now we will configure SSTP Client in Home Router.
Part 2: SSTP VPN RouterOS Client Configuration
Home Router will act as a SSTP Client. So, we will create SSTP client in Home Router. The following steps will show how to configure SSTP Client in Home Router.
- From Winbox, click on Interfaces menu item. Interfaces window will appear.
- Click on PLUS SIGN (+) drop down menu and click on SSTP Client option. New Interface window will appear.
- In General tab, you can put a meaningful name in Name input field. I am keeping the default one.
- Click on Dial Out tab and put Office Router WAN IP (117.58.247.198) in Connect To input field.
- By default port 443 will be assigned in Port input field. So, nothing to do here.
- Server certification verification is enabled by default in RouterOS SSTP Client. So, click on Verify Server Address from Certificate check box for hostname verification.
- Click on PFS (Perfect Forward Secrecy) checkbox that will make sure private encryption key is being generated for each session. As we have chosen PFS in SSTP Server Configuration, we have to enable PFS in SSTP Client Configuration also.
- Put username (sayeed) that you created in SSTP User in Name input field and put password in Password input field.
- Uncheck all checkboxes except mschap2 from Allow protocol panel.
- Click Apply and OK button.

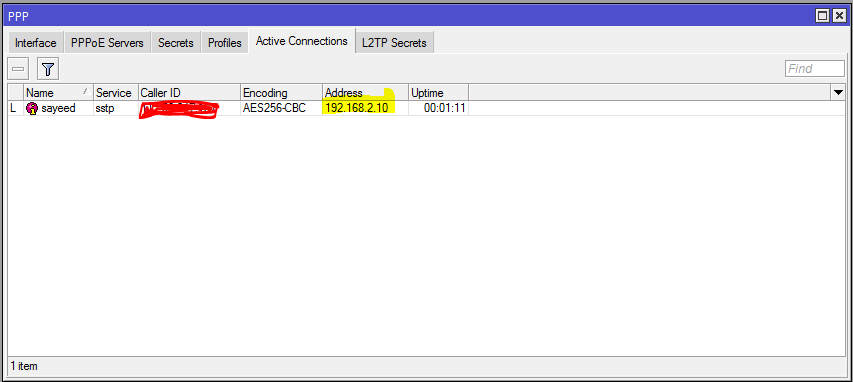
If everything is OK, SSTP Tunnel will be established and Home RouterOS will now be able to access Office Router network successfully. Office Router will also be able to access Home Router network because dynamically a route will be added in Office Router’s routing table. You will find the connected users from PPP > Active Connection tab. You will also find that a virtual interface has been created dynamically and your assigned IP address has assigned automatically.
If you face any confusion to follow the above steps properly, watch the following video about SSTP VPN configuration between RouterOS. I hope it will reduce your any confusion.
MikroTik Site to Site SSTP VPN Configuration has been discussed in this article. I hope you will now be able to established SSTP Tunnel between two RouterOS. However, if you face any confusion to configure SSTP VPN in MikroTik Router, feel free to discuss in comment or contact me from Contact page. I will try my best to stay with you.
Why not a Cup of COFFEE if the solution?

