Red Hat/CentOS Network Configuration
Red Hat/CentOS network configuration or IP configuration is an important task to a Linux system administrator. After completing RedHat 7/ CentOS 7 fresh installation, you have to first configure your system network so that it can communicate to other network devices. In my previous article, I discussed how to install CentOS 7 core packages successfully on your physical machine. If you are a new CentOS 7 user and yet you have not installed CentOS on your machine, feel free to study my previous article CentOS7 core installation and install CentOS 7 core packages according to that article. After completing installation, it is time to configure your system network. In this article, I will show you how to configure your system network so that your CentOS server can communicate to other network devices.

Red Hat/CentOS IP Configuration
IP address can be configured dynamically or statically in Red Hat 7/CentOS 7. As Red Hat/CentOS Linux is mainly used for server environment, it is always better to assign static IP address. We know that everything is file in Linux operating system. So, we will now edit the network adaptor file to assign IP address in CentOS7. Network adaptor file is located in /etc/sysconfig/network-scripts/ directory. So, go to this file location using cd command and view available files with ls command according to below example.
[root@localhost ~]# cd /etc/sysconfig/network-scripts/
[root@localhost network-scripts]# ls

With ls command you will find a lot if network files are available there like below image.
The network script file that we will edit is ifcfg-ens*** or ifcft-eth0. This variation is mainly found according to your device. From the above image you can see, my network file is ifcfg-ens33. So, open your network script file with vi editor according to below example.
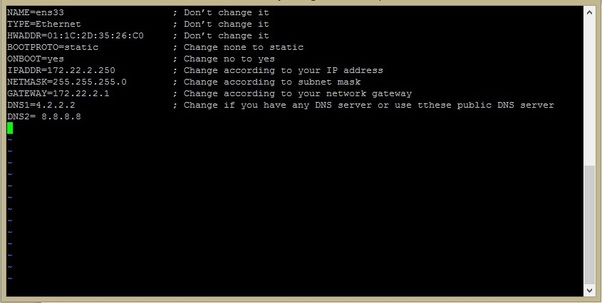
You can see a lot of lines are written in this file before. Delete all the lines (Place cursor at the first character of any line by pressing UP and Down arrow key and then press ‘d’ twice to delete that line) except NAME, TYPE, HWADDR, BOOTPROTO and ONBOOT lines. Now we will set values for these properties as well as we will add some new properties. These new properties are IPADDR (IP Address), NETMASK (Subnet mask), GATEWAY (Network gateway) and DNS (Domain Name System). I hope, you have enough idea about these terms. So, collect your network IP information and put that IP information in your network adapter file according to below example.
NAME=ens33 ; Don’t change it
TYPE=Ethernet ; Don’t change it
HWADDR=01:1C:2D:35:26:C0 ; Don’t change it
BOOTPROTO=static ; Change none to static
ONBOOT=yes ; Change no to yes
IPADDR=172.22.2.250 ; Change according to your IP address
NETMASK=255.255.255.0 ; Change according to subnet mask
GATEWAY=172.22.2.1 ; Change according to your network gateway
DNS1=4.2.2.2 ; Change if you have any DNS server or use these public DNS server
DNS2= 8.8.8.8
Now save and quit your file (Type :wq and hit enter). As we are using Red Hat/CentOS core system, we don’t need Network Manager Service because it works only graphical user interface (GUI) mode. So, stop Network Manager Service and disable this service to prevent auto start at boot time with below commands.
[root@localhost network-scripts]# systemctl stop NetworkManager.service
[root@localhost network-scripts]# systemctl disable NetworkManager.service
We will now start network service as well as we will enable this service so that it can start automatically at boot time. Do below two commands to achieve this purpose.
[root@ localhost network-scripts]# systemctl restart network.service
[root@ localhost network-scripts]# systemctl enable network.service
Your system is now ready to communicate to other network devices if your network information is correct. Now ping any network device such as your DNS server. If everything is OK, you will get response with ping command like below.
[root@ localhost network-scripts]# ping 8.8.8.8
64 bytes from 8.8.8.8: icmp_seq=1 ttl=50 time=57.7 ms
64 bytes from 8.8.8.8: icmp_seq=2 ttl=50 time=57.9 ms
64 bytes from 8.8.8.8: icmp_seq=3 ttl=50 time=57.8 ms
64 bytes from 8.8.8.8: icmp_seq=4 ttl=50 time=58.3 ms
If you face any problem to do above steps successfully, watch below video carefully about REHL 7/CentOS 7 network configuration. I hope, it will help you to do every steps successfully.
Network Management in Red Hat/CentOS Linux core system has been discussed in this article. I hope, you are now able to setup your Red Hat/CentOS system’s network. However, if you face any difficulty to configure network in Red Hat/CentOS Linux, feel free to discuss in comment or contact with me from Contact page. I will try my best to stay with you.
Why not a Cup of COFFEE if the solution?

