Ubuntu Server 20.04 Installation with LVM
Linux is a free and open source operating system developed by Linus Torvalds on September 17, 1991. It is mainly used as server environment. A lot of Linux distributions are present today. Among them, Ubuntu is one of the best stable Linux distributions. Ubuntu has both Desktop and Server distribution. Ubuntu Server is a high performance and stable enterprise Linux distribution and it can be easily used in production. Ubuntu Server has both community-support and well documentation. So, IT guys can use Ubuntu Server without any hassle and it is also a popular alternative of CentOS Linux. The current version of Ubuntu Server is Ubuntu Server 20.04.2 LTS. In this article, we will see how to install current version of Ubuntu Server with LVM partition.
System Requirements for Ubuntu Server 20.04.2
Ubuntu Server is a CLI mode operating system. So, it is so lightweight and can be installed on any physical server if it has minimum 1GHz CPU, 1GB RAM, 2.5GB disk space and 64-bit CPU architecture. But system requirement is usually varied based on the services those are going to be handled by the Ubuntu Server.
11 Easy Steps to Install Ubuntu Server 20.04.2
Ubuntu Server can easily be installed on your server machine following the below 11 steps:
- Downloading Ubuntu Server 20.04.2 ISO file and making bootable drive
- Beginning Ubuntu Server 20.04.2 installation
- Choosing language
- Keyboard Configuration
- Network Connection Setup
- Configuring Proxy
- Configuring Ubuntu Archive Mirror
- Storage Configuration with LVM
- Profile Setup
- SSH Setup
- Finalizing Ubuntu Server Installation
Step 1: Downloading Ubuntu Server 20.04.2 ISO File and Making Bootable Drive
Before going to start Ubuntu Server installation, we have to collect Ubuntu ISO file and then burn this ISO to a bootable media. The following steps will show how to download Ubuntu Server 20.04 ISO file and how to burn the ISO file to a bootable media.
- Go to Ubuntu official site [ubuntu.com] and click on Download menu item and then click on Get Ubuntu Server button.
- Now click on Option 2 – Manual server installation button and then click on Download Ubuntu Server 20.04.2 LTS button. Download will start and withing few minutes (depending on download speed) download will be finished.
- After downloading ISO file, burn the ISO image in a DVD or in a USB flash drive with any burning software such as Nero[nero.com] or Power ISO [poweriso.com] and then start installation according to the below steps. If you use virtual machine, no need to burn the ISO file to any media because the ISO file can be used directly to install Ubuntu Server.
Step 2: Beginning Ubuntu Server Installation
After downloading Ubuntu Server ISO file and making bootable drive, we are now eligible to start Ubuntu Server installation. The following steps will show the initial procedures to start Ubuntu Server installation.
- Press power button of server machine and go to boot option menu according to machine vendor. Choose boot from CD/DVD ROM if you use DVD or choose USB Flash Drive if you use Pen drive as bootable media from boot menu. If you use VM, locate the ISO file as the CD/DVD media.
- After loading BIOS, Ubuntu Server boot screen will appear.
- After checking a lot of system requirements, a window will appear to choose language of Ubuntu Server installation.
Step 3: Choosing Language
Choose the language that will be used during installation and then hit Enter key. If you wish to keep English as your server language, just hit Enter key because by default English will have selected.

Step 4: Keyboard Configuration
After selecting language, it will ask to select keyboard layout. Choose your keyboard layout and then select Done option by pressing Up and Down arrow or Tab key and then hit Enter key.

Step 5: Network Connection Setup
After selecting keyboard layout, the Ubuntu Server will ask to setup network connection. If the network interface is connected to any DHCP server, a dynamic IP address and other network information will be assigned automatically because DHCP client is enabled by default.
Dynamic address is not suitable for any server operating system. So, it is always better to assign static IP address. Although we can assign static IP address at this moment, we will assign static IP address after completing installation with netplan network management tool. So, select Continue without network option and hit Enter key.

Step 6: Configuring Proxy
If you have any proxy address, provide the address in Proxy address input field. In this article, we will do nothing in proxy configuration. So, select Done option and hit Enter key.

Step 7: Configuring Ubuntu Archive Mirror
If you have local Ubuntu archive mirror address, put it in Mirror address input field. By default the system will use Ubuntu archive mirror. I will keep the default Ubuntu archive mirror. So, select Done option and hit Enter key.

Step 8: Storage Configuration with LVM
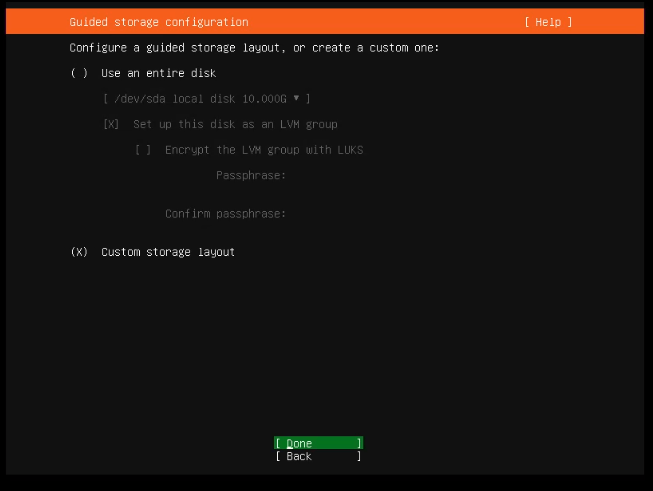
This is the most important part in Ubuntu Server installation. There are two methods to configure storage in Ubuntu Server.
- Guided storage configuration: System will create storage partition as required requirements. This method is useful for the new Ubuntu Server user.
- Custom storage layout: User has to define the storage partition here. It is the best method for Ubuntu Server because we want to customize storage layout as our requirements.
As we want to do LVM partition, we have to use custom storage layout. So, go to Custom storage layout option and press Space key to select it. Now select Done option and hit Enter key.
Storage configuration window will now appear. Here, we will find FILE SYSTEM SUMMERY, AVAILABLE DEVICES and USED DEVICES sections. In AVAILABLE DEVICES section, we will find our devices. In the following image, we can see our available device is /dev/sda and its storage size is 10GB.

Now we will do LVM partition on this disk drive. In Linux system, we need to create minimum (/boot) boot, swap and (/) root partition. But we will do more two partitions also – (/home) and (/var) because these two partitions are frequently used in Enterprise Linux System.
Among these partitions, /boot and swap should be out of LVM. So, at first we will do these two partitions before creating LVM.
Creating Boot Partition
- Select the available device (for example: /dev/sda) by pressing Up and Down arrow key and then hit Enter key. A popup option will appear.
- Select Add GPT Partition option and hit Enter key. Now options will appear to manage a GPT Partition.
- From Adding GPT Partition to /dev/sda section, Put size (for example: 500M) for the boot partition in Size input box.
- Choose partition format (for example: ext4) from Format drop down menu.
- Choose /boot from Mount drop down menu.
- Now select Create option and hit Enter key.

Boot partition will now be created and will be available in FILE SYSTEM SUMMERY section of Storage Configuration window.
Creating Swap Partition
We will now create swap partition following the below steps.
- Select the storage device by pressing up and down arrow key again and the hit Enter key.
- Select Add GPT Partition option and hit Enter key. Now options will appear to create a new GPT Partition.
- From Adding GPT Partition to /dev/sda section, Put size (for example: 1G) for the swap partition in Size input box.
- Choose swap from the Format drop down menu.
- Now select Create option and hit Enter key.

Swap partition will now be created and will be available in FILE SYSTEM SUMMERY section of Storage Configuration window.
Now we will create LVM partition because rest of our partitions will keep under LVM. So, at first, we have to make unformated storage before creating LVM partition.
- Select the storage device by pressing up and down arrow key again and then hit the Enter key.
- Select Add GPT Partition option and hit Enter key. Now options will appear to create a new GPT Partition.
- From Adding GPT Partition to /dev/sda section, Put size (for example: 8G) for the LVM partition in Size input box.
- Choose leave unformatted from Format drop down menu.
- Now select Create option and hit Enter key.

Now Create volume group (LVM) option will be enabled and we will be able to do LVM partition. To create LVM partition, at first, we have to create Volume Group (VG).
Creating LVM Volume Group (VG)
- From AVAILABLE DEVICES section, select Create volume group (LVM) option and hit Enter key. Create LVM volume group option will appear.
- By default the system will provide (vg0) for the volume group name. Change it from Name input field or keep the default one if you wish.
- Now select partition option from Devices section and press Space key to enable it.
- Select Create option and hit Enter key.

Volume group (vg0) will now be available in AVAILABLE DEVICES section. We will now be able to create LVM partition from here.
Creating LVM Root (/) Partition
- Select the created volume group (vg0) by pressing up and down arrow key again and the hit Enter key.
- Select Create Logical Volume option and hit Enter key. Now options will appear to create new logical volume.
- From Adding logical volume to vg0section, put the volume name (for example: lv-root) in Name input field.
- Put size (for example: 4G) for the root partition in Size input box.
- Choose partition format (for example: xfs) from Format dropdown menu.
- Now select Create option and hit Enter key.

Root (/) partition will now be created and will be available in FILE SYSTEM SUMMERY section of Storage Configuration window.
Similarly, create /home and /var LVM partition from volume group vg0. After creating Home and Var partition, the FILE SYSTEM SUMMERY will look the following image.

Now select the Done option and hit Enter key. The system will now ask to confirm the destructive action because after creating and formatting partition, no previous data can be found in this storage device.
Select Continue and hit Enter key to confirm the action.

Step 9: Profile Setup
The installer will now ask to provide profile information where we have to provide username, password and other personal information like the following image.

After providing profile setup information, select the Done option and hit Enter key. It will ask whether we want to install OpenSSH server or not. Obviously we want to install ssh server because we want to access Ubuntu Server from remote but keep in mind, never open ssh port for the public. It should be restricted from specific IP address with Firewall Rule.
Step 10: SSH Setup
In the last step, the installer will ask whether it will install SSH server or not. As we wish to install SSH server, select the Install OpenSSH Server option and press Space key to enable it. Select Done option and hit Enter key to start installation.

Step 11: Finalizing Ubuntu Server Installation
The system will now start installing Ubuntu kernel and other required packages and within few minutes, the Ubuntu Server installation will be completed. We can see installation log while installing the Ubuntu Server.

After installing Ubuntu Server kernel and required packages, it will ask to reboot the system. After rebooting the Ubuntu Server will be available for operation.

After rebooting the system, Ubuntu Server will provide Command Prompt and ask to login with the provided user credentials. By default root user is disabled in Ubuntu Server 20.04.2 LTS. So, we have to login with the normal user and do any administrative operation with sudo command.

We have installed Ubuntu Server 20.04.2 LTS on our physical server and we have also logged in to Ubuntu Server with user credentials. In the next article, we will see how to configure network in Ubuntu server with netplan network management tool.
How to install Ubuntu Server with LVM has been discussed in this article. I hope, you will now be able to install Ubuntu Server without any hassle. However, if you face any confusion to install Ubuntu Server, feel free to discuss in comment or contact me from Contact page. I will try my best to stay with you.
Why not a Cup of COFFEE if the solution?
