CentOS 8 Networking Configuration Using Cockpit Web Console
The first task after completing CentOS 8 fresh installation is to configure its networking so that it can be accessed from other network devices. In my previous article, I discussed how to install CentOS 8 Graphical User Interface (GNOME Desktop) with step by step screenshots. If you are a new CentOS 8 user and have not yet installed CentOS 8 on your server machine, feel free to follow that article and install CentOS 8 GNOME Desktop according to the article. After completing fresh CentOS 8 installation, it is time to configure its networking. So, in this article, I will show how to easily configure CentOS 8 networking with its built-in networking tool.
How to Configure Networking in CentOS 8 Operating System
CentOS is usually used as server operating system. So, it is always better to assign IP address statically in CentOS Server. There are four methods to assign IP address statically in CentOS 8 Server.
- Assigning static IP address using NMTUI tool.
- Assigning static IP address using Cockpit Web Console
- Assigning static IP address using GNOME Desktop GUI and
- Assigning static IP address by editing network configuration file
Among these four methods, I will now discuss how to assign static IP address in CentOS 8 Server using Cockpit Web Console which is a new and so easy networking configuration method in CentOS 8 Server.
CentOS 8 Networking Configuration Using Cockpit Web Console
Cockpit is a web based server administration tool and it is installed by default in CentOS 8 Server. A firewall rule is also created to access cockpit from any other machine’s web browser. So, no need to be worried about cockpit package installation in CentOS 8. The only thing that we need to do is starting cockpit manually because it is not started automatically after fresh CentOS 8 installation. So, to start cockpit daemon, issue the following command.
To start cockpit on startup, issue the following command.
If you need to stop the cockpit daemon, issue the following command from CLI.
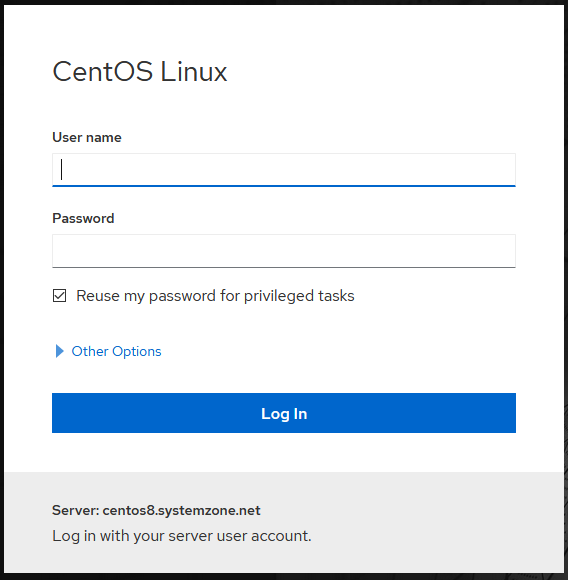
Now the cockpit web based administration tool is up and running. To open cockpit web console, start Firefox web browser and type localhost:9090 in URL bar. Here, we are using port 9090 because cockpit runs on TCP port 9090. If everything is OK, we will now find the following login screen to access the cockpit web console.

Now login to cockpit web console with root user credential. After successful login, we will find thecockpit web based administration panel.
By default Image Builder menu may be displayed but we will do nothing in Image Builder menu. All system configuration options are under Host menu. So, click on Host menu and you will find all the options those we can be configured with cockpit web console.
As we will assign static IP address for our CentOS 8 Linux, click on Networking menu from left menu bar. Networking summery page will be displayed. Basic Firewall configuration and Network Interface configuration will be possible with the Networking configuration page in Cockpit Web Console.
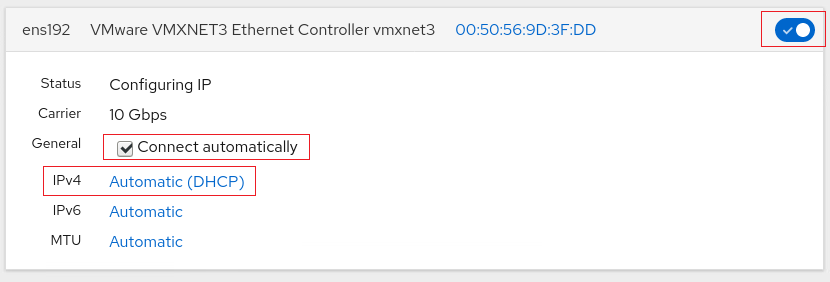
All our active interfaces will be displayed in Interfaces panel. Click on your desired interface where you want to assign static IP address. Default Interface summery will look like the following image.

If you find your interface disabled, toggle the switch button located at top right corner to make it active. Also make sure Connect automatically checkbox is selected otherwise the interface will keep disabled after booting.
As we want to assign static IPv4 on the current interface, click on the IPv4 link. IPv4 Settings window will appear.
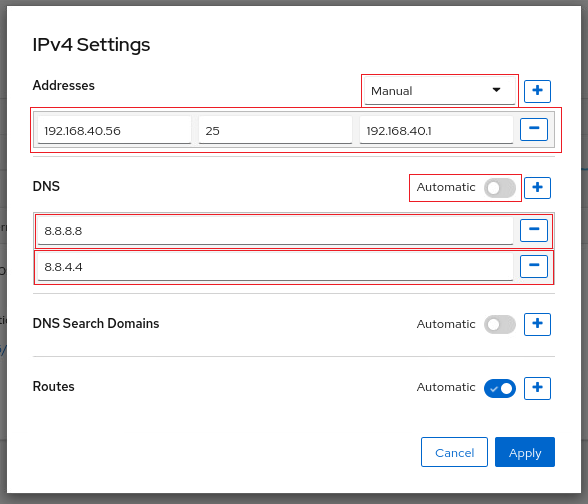
Select manual option from Addresses drop down menu. It will now ask to assign static IP address, Netmask and default Gateway.
Put your desired server IP address in the first input field, Netmask in the second input field and gateway in the third input field like the following image.

By default automatic DNS will keep enabled. So, disable dynamic DNS IP assigning by clicking switch button and then click on PLUS SIGN (+) and put your desired DNS IP address. Multiple DNS IPs can be assigned by clicking PLUS SIGN and putting a new DNS server IP address.
Now click Apply button to apply these settings.
Static IP address on your desired CentOS 8’s interface will now be assigned and if everything is OK, CentOS 8 Server will now be able to get internet access and the server can also be found from other network devices.
After assigning static IP address, the cockpit web console of CentOS 8 Server can also be accessible from other computer’s web browser by this URL – https://ip-address:9090.
How to configure CentOS 8 networking with Cockpit Web Console has been discussed in this article. I hope, you will now able to configure CentOS 8 networking with the Cockpit tool successfully. However, if you face any confusion, feel free to discuss in comment or contact me from Contact page. I will try my best to stay with you.
Why not a Cup of COFFEE if the solution?

