How to Import SSL Certificate in MikroTik RouterOS
SSL/TLS Certificate is used to make secure communication between server and clients. MikroTik RouterOS has a lot of services such OVPN, SSTP VPN, HTTPS, Hotspot and so on those use SSL/TLS certificate. It is possible to create self-signed certificate in MikroTik RouterOS but self-signed certificate faces untrusted CA warning. So, it is always better to use trusted CA either freemium or premium.
In my previous article, I discussed how to get a free SSL/TLS certificate from Zero SSL but Zero SSL offers only three free SSL certificate which has 90 days validity. Within 90 days, you must renew the certificate again to reuse. On the other hand, you can buy SSL certificate from SSL certificate provider especially from Namecheap which will provide you SSL certificate at very cheap rate although I have no relation with them but I have experience to use their SSL certificate.
However, how you manage SSL certificate, finally you have to import the SSL certificate to MikroTik RouterOS. So, in this article I will show how to import SSL certificate in MikroTik RouterOS.
Importing SSL Certificate in MikroTik RouterOS
Importing SSL Certificate in MikroTik RouterOS is not so difficult. Following below three steps, you can easily import SSL Certificate in MikroTik RouterOS and can use for any RouterOS Service.
- Uploading SSL Certificate in Files Directory
- Importing SSL Certificate in RouterOS Certificate Store
- Using SSL Certificate for RouterOS Services
Step 1: Uploading SSL Certificate to Files Directory
MikroTik RouterOS keeps all files in Files directory where we can upload files either FTP Client or by Drag and Dropping any file in Files Window through Winbox. In this article, we will use Winbox to upload Certificate files in RouterOS because it is the easiest way to upload file in RouterOS.
An SSL Certificate has usually two files. One is certificate file (.crt) and another is private key file (.key). If you purchase SSL certificate from any service provider, the service provider will provide you the certificate file (including ca_bundle.crt) after signing and the private key file will have in your hand while generating your own CSR file. Again, if you get Free SSL Certificate from Zero SSL and use custom CSR file, you will have private key file in your hand and the certificate file (both ca_bundle and server certificate file) will be provided from the Zero SSL. But if use auto generated CSR file, they will provide all the files together.
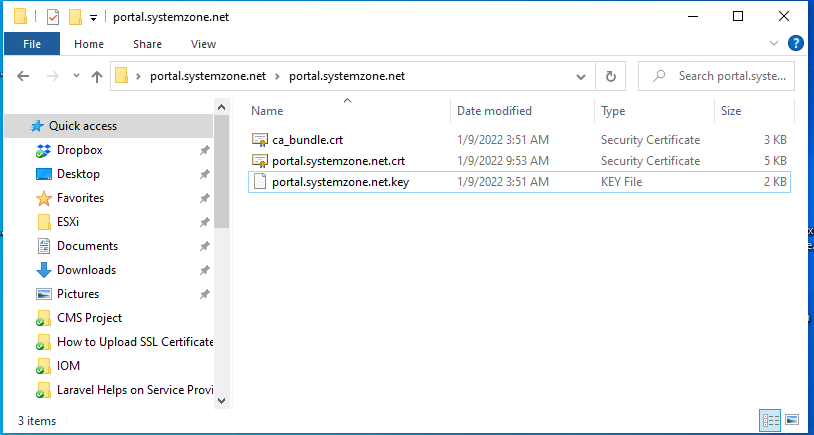
It is always better to rename your certificate file and private key file name according to your domain or subdomain name. I got an SSL certificate from Zero SSL which I renamed according to my subdomain name shown in the below image.

Now we will upload these private key and certificate files in RouterOS through Winbox. So, follow the following steps to upload SSL Certificates in Files directory of RouterOS.
- Open Winbox and Login to MikroTik RouterOS with full permission user.
- From Winbox, click on Files menu. File List window will appear.
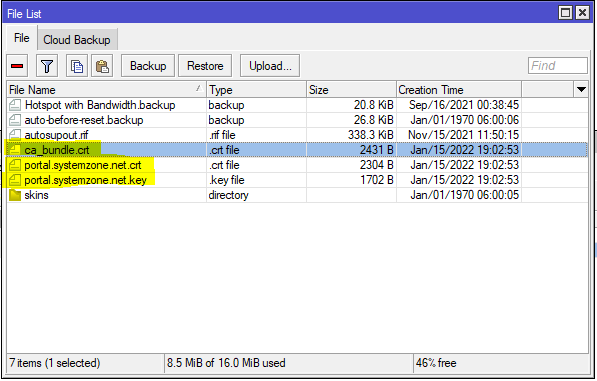
- Now drag and drop all the files in File List window.
After uploading files, all the files will be found in the File List window.

Step 2: Importing SSL Certificate in RouterOS Certificate Store
After uploading SSL Certificates in File List window, we will now import those files in RouterOS Certificate Store so that RouterOS Services can use the SSL Certificate. To import SSL Certificate in RouterOS Certificate Store, follow the following steps.
- From Winbox, go to System > Certificates menu item. Certificates window will appear now.
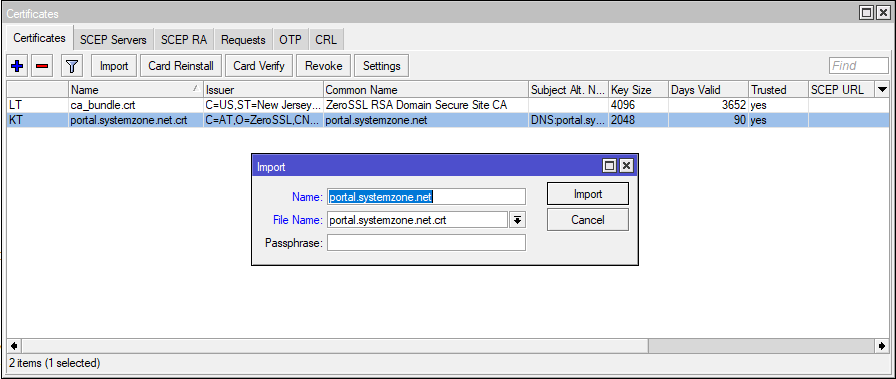
- Click on Import button. Import window will appear.
- Put ca_bundle name what you want in Name input field.
- Choose the ca_bundle file from File Name dropdown menu.
- Now click Import button.
- Similarly import both the certificate file and private key file.
After importing private key and certificate files, your RouterOS Certificates window will look like the following image.

Step 3: Using Imported SSL Certificate for RouterOS Service
We have successfully imported SSL Certificates in RouterOS. We will now use this SSL Certificate for one of the RouterOS Services named HTTPS. Follow the following steps to use SSL Certificate for HTTPS Server.
- From Winbox, go IP > Services menu item. IP Service List window will appear now.
- Enable www-ssl service and then double click on it. IP Service (www-ssl) window will appear.
- From Certificate dropdown menu, choose the imported certificate (not ca_bundle) file.
- Click Apply and OK button.
You will now be able to access HTTPS Service of RouterOS securely. Similarly, you can use this imported certificate for any RouterOS Service where SSL Certificate is required.
How to upload and import SSL Certificate in MikroTik RouterOS has been discussed in this article. I hope you will now be able to upload and import SSL Certificate in MikroTik RouterOS without any hassle. However, if you face any confusion to use SSL Certificate in MikroTik RouterOS, feel free to discuss in comment or contact me from Contact page. I will try my best to stay with you.
Why not a Cup of COFFEE if the solution?

