Ubuntu Web Server Configuration with phpMyAdmin (LAMP Stack)
Ubuntu Server is one of the most popular open source operating systems that can be used in production without any hassle. In my previous article, I discussed how to install Ubuntu Server with LVM partition. I also discussed how to assign static IP address on Ubuntu Server interface with Netplan network management tool. Ubuntu web server is a popular service because web developers usually use Ubuntu Server for their development project. Besides development project, Ubuntu web server can also be used in production without any hassle.
Ubuntu web server is mainly based on apache2, PHP and MariaDB or MySQL. It is usually known as LAMP (Linux, Apache2, MySQL or MariaDB and PHP) Stack. Ubuntu web server by default uses phpMyAdmin to maintain Database graphically.
It is so easy to install web server in Ubuntu Server because Ubuntu Server provides phpMyAdmin package that installs Apache2 and latest PHP version as its dependency. But phpMyAdmin does not install Database Server. So, we have to install Database Server (either MariaDB or MySQL) before installing web server with phpMyAdmin package.
MariaDB is one of the most popular open source database servers. So, we will install and configure MariaDB Server in this article.
MariaDB Installation and Configuration in Ubuntu Server 20.04
MariaDB package is available in Ubuntu repository. So, we can easily install MariaDB Server in Ubuntu Server. But before going to install any package, we should always make system up to date. So, run the following commands to update your Ubuntu Server.
sayeed@ubuntu:~$ sudo apt upgrade
The above commands will make your system up to date. If you do not want to update your system, ignore the above commands and issue the following command for installing MariaDB package.
The above command will install MariaDB database server and once the installation is completed, the MariaDB service will start automatically. To verify that the database server is running, type the following command.
The command will show that the MariaDB service is active and running but if you find that the MariaDB is not running, issue the following command to start the MariaDB Server.
If your server gets rebooted in any case, the MariaDB service will not be stated automatically. So, run the following command to start MariaDB service automatically if any system reboot is occurred.
For new MariaDB installation, the next step is to run the included security script. This script changes some of the less secure default options for things like remote root logins and sample users. Run the following security script to secure MariaDB installation.
The above script will take you through a series of prompts where you can make some changes to your MariaDB installation’s security options. The first prompt will ask you to enter the current database root password. Since you have not set one up yet, press ENTER to indicate “none”.
SERVERS IN PRODUCTION USE! PLEASE READ EACH STEP CAREFULLY!
In order to log into MariaDB to secure it, we’ll need the current
password for the root user. If you’ve just installed MariaDB, and
you haven’t set the root password yet, the password will be blank,
so you should just press enter here.
Enter current password for root (enter for none):
The next prompt asks you whether you’d like to set up a database root password. On Ubuntu, the root account for MariaDB is tied closely to automated system maintenance, so we should not change the configured authentication methods for that account. Doing so would make it possible for a package update to break the database system by removing access to the administrative account. Type n and then press ENTER.
Setting the root password ensures that nobody can log into the MariaDB
root user without the proper authorisation.
Set root password? [Y/n] n
From there, you can press Y and then ENTER to accept the defaults for all the subsequent questions. This will remove some anonymous users and the test database, disable remote root logins, and load these new rules so that MariaDB immediately implements the changes you have made.
By default, a MariaDB installation has an anonymous user, allowing anyone to log into MariaDB without having to have a user account created for them. This is intended only for testing, and to make the installation go a bit smoother. You should remove them before moving into a production environment.
Remove anonymous users? [Y/n] Y
… Success!
Normally, root should only be allowed to connect from ‘localhost’. This ensures that someone cannot guess at the root password from the network.
Disallow root login remotely? [Y/n] Y
… Success!
By default, MariaDB comes with a database named ‘test’ that anyone can access. This is also intended only for testing, and should be removed before moving into a production environment.
Remove test database and access to it? [Y/n] Y
– Dropping test database…
… Success!
– Removing privileges on test database…
… Success!
Reloading the privilege tables will ensure that all changes made so far will take effect immediately.
Reload privilege tables now? [Y/n] Y
… Success!
Cleaning up…
All done! If you’ve completed all of the above steps, your MariaDB installation should now be secure.
Thanks for using MariaDB!
With that, you’ve finished MariaDB’s initial security configuration. The next step is an optional one, though you should follow it if you prefer to authenticate to your MariaDB server with a password.
On Ubuntu systems (running MariaDB 10.3.29 database server), the root MariaDB user is set to authenticate using the unix_socket plugin by default rather than with a password. This allows for some greater security and usability in many cases, but it can also complicate things when you need to allow an external program (such as phpMyAdmin) administrative rights.
Because the server uses the root account for tasks like log rotation and starting and stopping the server, it is best not to change the root account’s authentication details. Changing credentials in the /etc/mysql/debian.cnf configuration file may work initially, but package updates could potentially overwrite those changes. Instead of modifying the root account, the package maintainers recommend creating a separate administrative account for password-based access.
So, we will create a new account called admin with the same capabilities as the root account, but configured for password authentication. Open up the MariaDB prompt from your terminal, running the following command.
Welcome to the MariaDB monitor. Commands end with ; or \g.
Your MariaDB connection id is 56
Server version: 10.3.29-MariaDB-0ubuntu0.20.04.1 Ubuntu 20.04
Copyright (c) 2000, 2018, Oracle, MariaDB Corporation Ab and others. Type ‘help;’ or ‘\h’ for help. Type ‘\c’ to clear the current input statement.
MariaDB [(none)]>
Now create a new user with root privileges and password-based access with database command. Be sure to change the username and password to match your preferences.
Query OK, 0 rows affected (0.001 sec)
MariaDB [(none)]> GRANT ALL ON *.* TO ‘admin’@’localhost’ IDENTIFIED BY ‘Passkey@900’ WITH GRANT OPTION;
Query OK, 0 rows affected (0.001 sec)
Flush the privileges to ensure that they are saved and available in the current session.
Query OK, 0 rows affected (0.001 sec)
Exit the MariaDB shell, issuing exit command.
Bye
Now login with the new username and password and check the user privileges.
Welcome to the MariaDB monitor. Commands end with ; or \g.
Your MariaDB connection id is 57
Server version: 10.3.29-MariaDB-0ubuntu0.20.04.1 Ubuntu 20.04
Copyright (c) 2000, 2018, Oracle, MariaDB Corporation Ab and others.
Type ‘help;’ or ‘\h’ for help. Type ‘\c’ to clear the current input statement.
MariaDB [(none)]> show databases;
+——————–+
| Database |
+——————–+
| information_schema |
| mysql |
| performance_schema |
+——————–+
3 rows in set (0.001 sec)
MariaDB database server is now ready. So, we can now go ahead to install and configure web server by installing phpMyAdmin package.
Installing phpMyAdmin on Ubuntu Server
phpMyAdmin is used to maintain MariaDB database server graphically. phpMyAdmin package requires web server and server programming language. So it installs apache2 and latest PHP version as its dependency.
Ubuntu Server offers phpMyAdmin package installation from its repository. So, run the following command to install phpMyAdmin package.
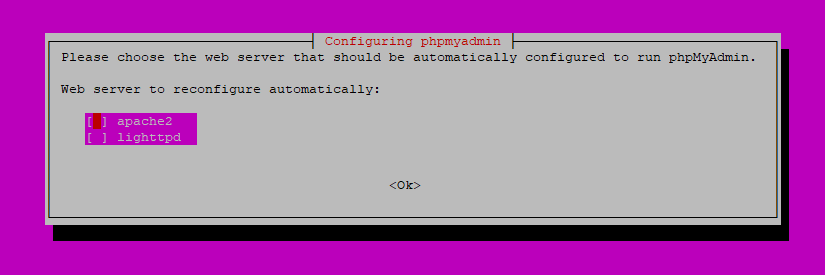
While installing phpMyAdmin package, it will ask to choose the web server (whether apache2 or lighttpd) that will be installed. Choose apache2 (pressing space key) and select OK (by pressing Tab key) and then hit ENTER key.

Now it will ask whether we want to install database or not for phpMyAdmin. As we have installed MariaDB database server, choose No (pressing right arrow) and hit ENTER key.

phpMyAdmin package with apache2 web server and latest PHP will be installed within few moments. You can verify apache2 installation by viewing apache2 status with the following command.
If everything is OK, you will find that the apache web server is active and running. You can also verify PHP installation with the following command.
PHP 7.4.3 (cli) (built: Jul 5 2021 15:13:35) ( NTS )
Copyright (c) The PHP Group
Zend Engine v3.4.0, Copyright (c) Zend Technologies
with Zend OPcache v7.4.3, Copyright (c), by Zend Technologies
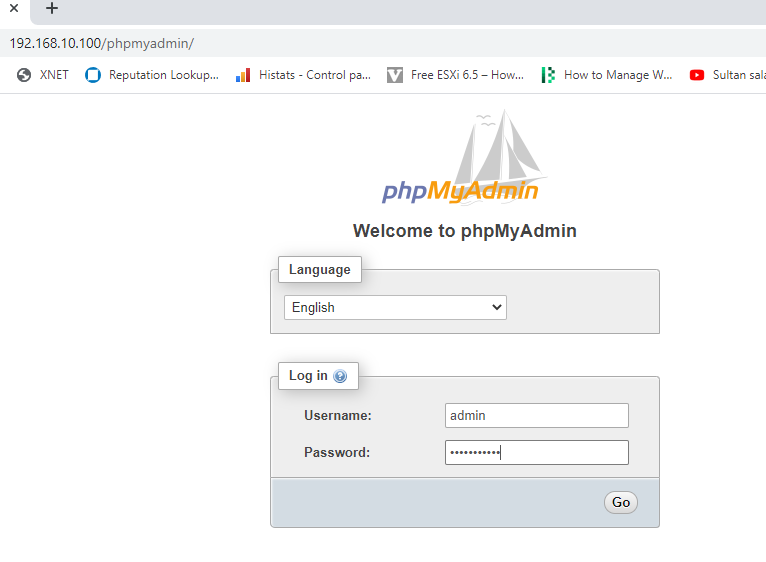
Web server with phpMyAdmin is now ready. Open any web browser and type http://ip_address/phpmyadmin. It will show the phMyAdmin Login page like the below image.

Put username and password that you have provided for MariaDB database server and click on Go button. You will now find phpMyAdmin GUI to manage MariaDB Server graphically. You can reset password if needed, create users, create/destroy databases and tables and so on.
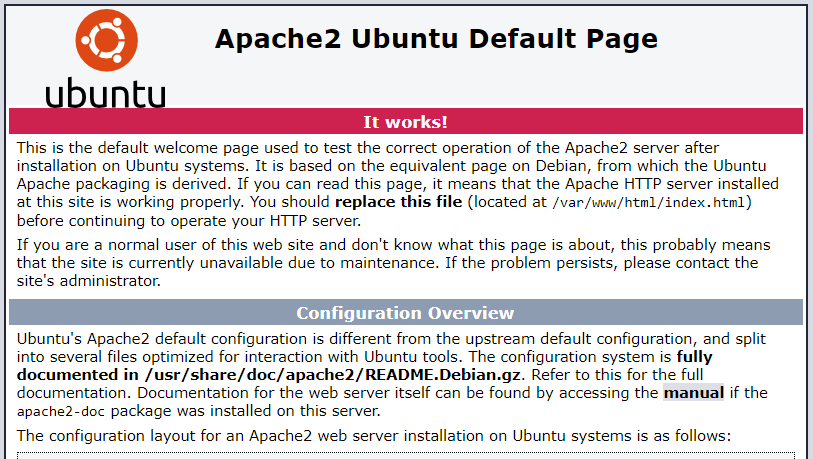
The default document root of apache2 web server is /var/www/html. So, keep any index (.html or .php) file there and browse Ubuntu Server IP Address (http://server_ip_address) from any browser. You will find the contents of this file will be displayed now.
If you don’t want to write any index file just right now, simply type your Ubuntu Server IP in browser. Then, a default apache2 content file will be appeared which proves Ubuntu Web Server is ready for your development or production project.

How to install web server with phpMyAdmin in Ubuntu Server has been discussed in this article. I hope, you will now be able to install Ubuntu web server without any hassle. However, if you face any confusion, feel free to discuss in comment or contact me from Contact page. I will try my best to stay with you.
Why not a Cup of COFFEE if the solution?

