Web Server Configuration in Linux with Apache, MariaDB and PHP
Web Server is one of the most important and most used servers today. Without web server internet cannot imagine. Even, the article you are reading is also served by a web server. So, having web server configuration knowledge is beneficial for you, I think. A web server is responsible to serve HTTP (Hypertext Transfer Protocol) contents such as text, image, audio, video etc. to its clients. A lot of web servers are present today such as Apache, IIS, Nginx and so on. Among these, apache web server has leading position by usage. Apache is an open-source and multi-platform web server application. To serve advanced web contents, a database server (MariaDB) and a coding interpreter (PHP) are also need along with apache web server. In Linux operating system, Apache, MariaDB and PHP are jointly known as LAMP (Linux, Apache, MariaDB and PHP). In this article, we will know how to install and configure web server with Apache, MariaDB and PHP in Linux (Red Hat or CentOS) operating system.
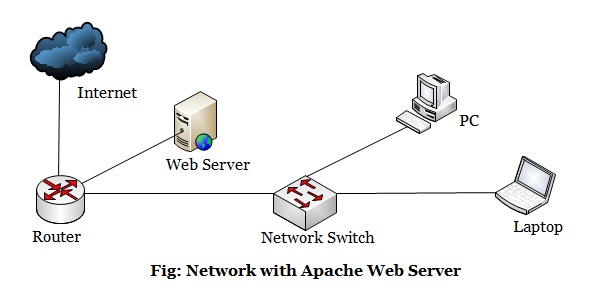
Prerequisites
We will install and configure web server in CentOS Linux (another distribution of Red Hat Enterprise Linux). So, before going to start our web server installation and configuration you have to have the following systems up and ready.
- CentOS 7 installed in your physical or virtual server machine.
- Network configured in your CentOS Linux so that it can communicate with internet to install packages.
If you are a new Linux user and have not enough knowledge about the above topics, feel free to spend some time to study my previous article about how to install CentOS 7 and how to configure network in your Linux system and then complete the above topics to start web server configuration with Apache, MariaDB and PHP.
Web Server Configuration in RedHat/CentOS 7 Linux
Now we will start our web server configuration with Apache, MariaDB and PHP. Complete web server installation and configuration can be divided into below four parts.
- Part 1: Apache web server installation
- Part 2: MariaDB database server installation
- Part 3: PHP interpreter installation
- Part 4: phpMyAdmin Installation
Part 1: Apache Web Server Installtion
Apache is an open-source and multi-platform web server application. Apache has a full range of web server features including CGI, SSL and virtual domains. In CentOS Linux, the Apache HTTP Server package is httpd (HTTP Daemon). So, we will now install httpd package that will turn on Apache HTTP Server in CentOS Linux.
To install Apache HTTP Server, enter the following command from your CentOS 7 terminal.
The httpd package will be installed within a few second. After installing apache httpd package, we have to start the Apache service with the following command.
Apache service is now active and running and waiting for the incoming web server (http) requests. The daemon will now answer any incoming http request.
But if your server gets rebooted in any case, the httpd daemon will not be stated automatically. So, run the following command to start apache service automatically if any system restart is occurred.
You can check your web server status at any time with the following command.
HTTP and HTTPS (Secure HTTP) normally runs on 80 and 443 port respectively. So, we have to allow Apache server default port 80 and 443 through firewall if we want to get web server from remote system.
Run the following firewall commands to allow http service through your firewall.
[root@webserver ~]# firewall-cmd –permanent –zone=public –add-service=https
[root@webserver ~]# firewall-cmd –reload
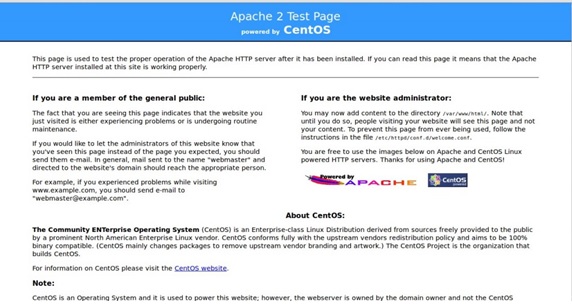
Now we will test apache web server. Open your web browser and navigate to http://localhost/ or http://server-ip-address/. If everything is OK, you will get apache test page like below image.
Part 2: MariaDB Database Server Installation
Almost every web application uses Database Server to store data. So, we will install MariaDB Database Server for our web server. MariaDB is a most popular and open source database server made by the original developers of MySQL notably Wikipedia, WordPress and Google developers.
To install MariaDB database server in your CentOS Linux, enter the following command from your terminal.
MariaDB package will be installed within few seconds. Now start the MariaDB service and make to start automatically on every reboot with the following command.
[root@webserver~]# systemctl start mariadb
[root@webserver~]# systemctl enable mariadb
You can check your MariaDB status at any time with the following command.
Setup MySQL root Password
By default, MariaDB does not set root user password. But to secure mariadb, we have to setup root user password. To set root user password, run the following command from your terminal and follow the instructions.
[root@webserver~]# mysql_secure_installation
NOTE: RUNNING ALL PARTS OF THIS SCRIPT IS RECOMMENDED FOR ALL MySQL
SERVERS IN PRODUCTION USE! PLEASE READ EACH STEP CAREFULLY!
In order to log into MySQL to secure it, we’ll need the current
password for the root user. If you’ve just installed MySQL, and
you haven’t set the root password yet, the password will be blank,
so you should just press enter here.
Enter current password for root (enter for none): ## Press Enter ##
OK, successfully used password, moving on…
Setting the root password ensures that nobody can log into the MySQL
root user without the proper authorisation.
Set root password? [Y/n] ## Press Enter ##
New password: ## Enter new password ##
Re-enter new password: ## Re-enter new password ##
Password updated successfully!
Reloading privilege tables..
… Success!
By default, a MySQL installation has an anonymous user, allowing anyone
to log into MySQL without having to have a user account created for
them. This is intended only for testing, and to make the installation
go a bit smoother. You should remove them before moving into a
production environment.
Remove anonymous users? [Y/n] ## Press Enter ##
… Success!
Normally, root should only be allowed to connect from ‘localhost’. This
ensures that someone cannot guess at the root password from the network.
Disallow root login remotely? [Y/n] ## Press Enter ##
… Success!
By default, MySQL comes with a database named ‘test’ that anyone can
access. This is also intended only for testing, and should be removed
before moving into a production environment.
Remove test database and access to it? [Y/n] ## Press Enter ##
– Dropping test database…
… Success!
– Removing privileges on test database…
… Success!
Reloading the privilege tables will ensure that all changes made so far
will take effect immediately.
Reload privilege tables now? [Y/n] ## Press Enter ##
… Success!
Cleaning up…
All done! If you’ve completed all of the above steps, your MySQL
installation should now be secure.
Thanks for using MySQL!
Root user password has been set and your MariaDB database is secure now.
Part 3: PHP installation
Most of the web applications use PHP (hypertext preprocessor) as the server side scripting language. So, we will install PHP interpreter for our web server.
To install PHP in your CentOS Linux, enter the following command in your terminal.
[root@webserver~]# yum install php* -y
[root@webserver~]# yum install php-mysql -y
Now install some common PHP modules that are required by CMS Systems like WordPress, Joomla and Drupal.
Test PHP installation
To test PHP installation, we will create a simple php file (testphp.php) in Apache document root folder (by default /var/www/html).
[root@webserver~]# vi /var/www/html/testphp.php
Add the following php code in this file.
phpinfo();
Now restart httpd service.
[root@webserver~]# systemctl restart httpd
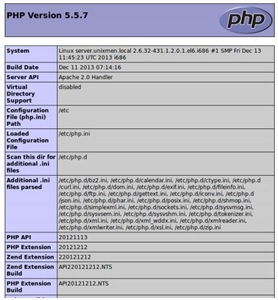
Now open the phptest.php file in your browser following the http://ip-address/testphp.php or http://domain-name/testphp.php url. It will display all the details about php such as version, build date and commands etc.
Part 4: phpMyAdmin Installation
phpMyAdmin is a free open source web interface tool that is used to manage MariaDB databases. So, we will now install phpMyAdmin to manage our MariaDB databses. By default phpMyAdmin is not found in CentOS official repositories. So, we have to install it using EPEL repository.To install EPEL repository, first download EPEL package with wget command and then install it in your CentOS system according to the following command.
[root@webserver~]# yum install wget -y
[root@webserver~]# wget http://rpms.famillecollet.com/enterprise/remi-release-7.rpm
[root@webserver~]# wget https://dl.fedoraproject.org/pub/epel/epel-release-latest-7.noarch.rpm
[root@webserver~]# rpm -Uvh remi-release-7.rpm epel-release-latest-7.noarch.rpm
EPEL repository is now ready. So, install phpMyAdmin with the following command.
[root@webserver~]# yum install phpmyadmin –y
phpMyAdmin Configuration
To get phpMyAdmin web interface, we have to edit the phpmyadmin.conf file. So, open phpmyadmin.conf file with text editor.
Now find and comment the whole <Directory> section as shown below.
[…]
Alias /phpMyAdmin /usr/share/phpMyAdmin
Alias /phpmyadmin /usr/share/phpMyAdmin
#<Directory /usr/share/phpMyAdmin/>
# <IfModule mod_authz_core.c>
# # Apache 2.4
# Require local
# </IfModule>
# <IfModule !mod_authz_core.c>
# # Apache 2.2
# Order Deny,Allow
# Deny from All
# Allow from 127.0.0.1
# Allow from ::1
# </IfModule>
#</Directory>
[…]
Now add below lines in this file.
Options none
AllowOverride Limit
Require all granted
</Directory>
Now restart the Apache service.
Now you can access the phpMyAdmin console by navigating to http://server-ip-address/phpmyadmin/ from your browser.
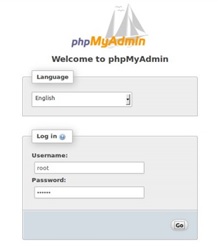
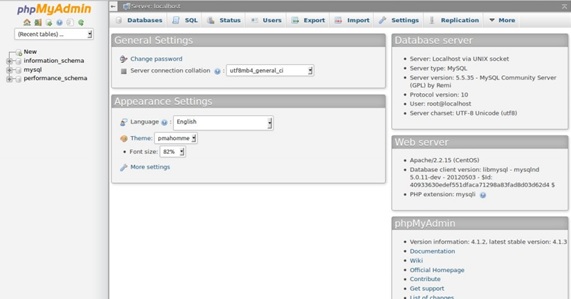
Enter your MariaDB username and password which you have given in mysql_secure_installation. Now you will be redirected to the phpmyadmin dashboard page and will able to manage your MariaDB databases from phpMyAdmin web interface.
Web Server Configuration in Linux with Apache, MariaDB and PHP has been discussed in this article. I hope you are now able to setup your Web Server in Linux operating system. However, if you face any confusion about Web Server Configuration in Linux operating system, feel free to discuss in comment or contact with me from Contact Page. I will try my best to stay with you.
Why not a Cup of COFFEE if the solution?

