CAPsMAN Channel Planning with Non-Overlapping Frequency
MikroTik CAPsMAN is an excellent application for managing multiple CAPs (Controlled Access Point) in a Wireless Network. But multiple APs create frequency overlapping issue if channels are not configured properly. Channel overlapping is required for smooth connection while roaming but there should not be frequency overlapping because frequency overlapping makes wireless performance so poor. In my previous article, I discussed MikroTik CAPsMAN basic configuration with default channel configuration. In this article, I will discuss how to configure CAPsMAN channel to avoid frequency overlapping.
Non Overlapping Channels
One of my previous articles on WiFi Frequency Band and Channel Width showed the available non overlapping channels in 2.4 GHz Band. There are five non overlapping channel sets on 20MHz channel width in 2.4 GHz frequency but globally 1, 6 and 11 channel set is usually used. The middle frequency of these channels is given in the following table:
| Channel Number | Middle Frequency |
| 1 | 2412 |
| 6 | 2437 |
| 11 | 2462 |
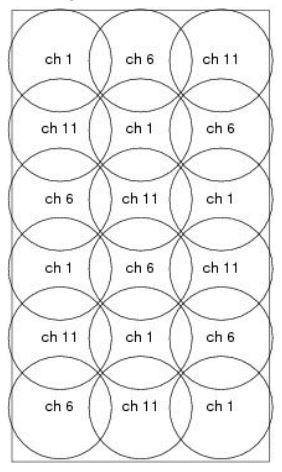
In a multi WiFi AP network, the coverage of WiFi AP must be overlap for smooth connection but frequency overlapping must be avoided. So, we have to plan properly for designing a multi WiFi AP network. A possible multi WiFi AP network where there will be no frequency overlapping can be as the following image.

Following the above image we will configure CAPsMAN channels so that different CAPs can operate on different frequencies to establish a frequency overlapping free WiFi network.
Network Diagram
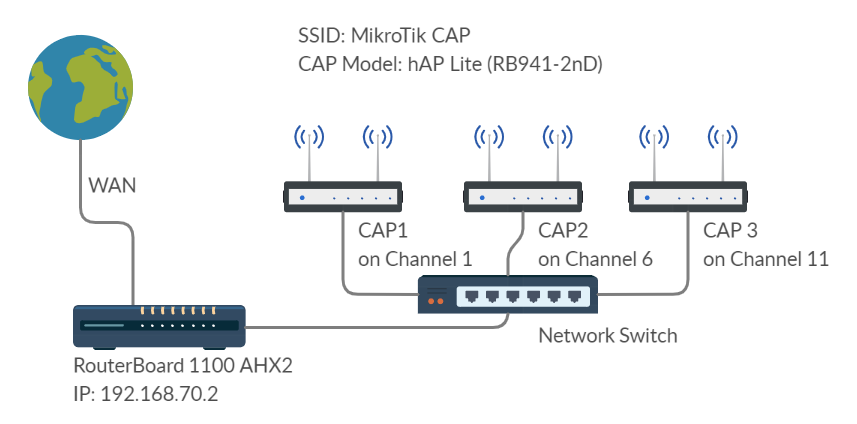
To establish a frequency overlapping free network with MikroTik CAPsMAN we are following the below network diagram.

In this network diagram, the CAPsMAN Router (RouterBOARD 1100 AHX2) is controlling three CAPs which are operating on channel 1 (CAP1), channel 6 (CAP2) and channel 11 (CAP3). As the CAPs are on a floor, we must assign different non-overlapping frequency channel so that no CAP affect other performance.
In this article, we will see how to configure multiple channels in CAPsMAN and how to assign the configured channel on different CAPs.
CAPsMAN Channel Configuration
In my previous article, I discussed CAPsMAN basic configuration with a single CAP where I didn’t configure any channel. Follow that article to apply basic configuration and then follow this article because in this article I will only show how to configure multiple channels in CAPsMAN and then apply these channels on different CAPs.
The following steps will show how to configure multiple channels in MikroTik CAPsMAN.
- Login to CAPsMAN Router with Winbox.
- Click on CAPsMAN menu item. CAPsMAN window will appear.
- Click on Channel tab and then click on PLUS SIGN (+). New CAPs Channel window will appear.
- Put a meaningful name (Example: channel1) in Name input field.
- Put channel 1 middle frequency (2412) in Frequency input field.
- Choose channel width (20MHz) from Control Channel Width dropdown menu.
- Choose frequency band (2ghz-b/g/n) from Band dropdown menu.
- Disable channel extension by choosing disabled option from Extension Channel dropdown menu.
- Click Apply and OK button.
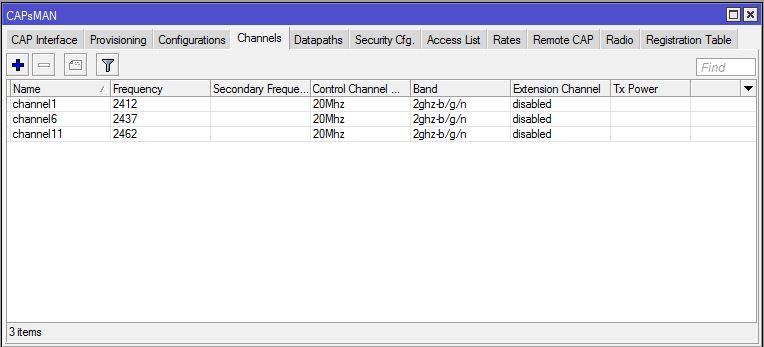
- Similarly create channel6 for 2437 MHz frequency and channel11 for 2462 MHz frequency. Your channel list will look like the following image.

Applying Created Channel on Different CAPs
After creating channel groups we will apply these channels on different CAPs so that different CAPs can operate on different frequencies and frequency overlapping can be avoided. The following steps will show how to assign different channels on different CAPs.
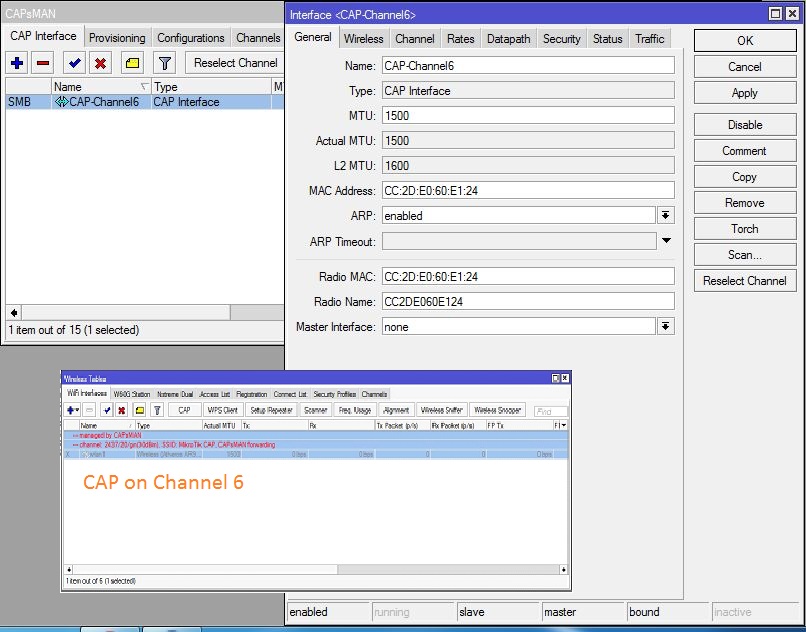
- Click on CAP Interface tab where you will find all the provisioned CAPs.
- Double click on a desired CAP interface. CAP property window will appear and you will find that all properties are read only. But we need to edit channel property. So, click on Copy button. A new instance will appear that is editable,
- In General tab put a meaningful in Name input field.
- Click on Channel tab and choose your desired channel from Channel dropdown menu.
- Click Apply and OK button.
- Now you will find that your dynamic provisioned CAP interface will be removed and new interface will be created. So, it may require disabling and then enabling CAP property of your CAP Wireless Router.

Do the above steps for all remaining CAPs. Assign channel carefully so that there have no frequency overlapping.
Planning to avoid frequency overlapping in CAPsMAN wireless network has been discussed in this article. I hope you will now be able to do proper planning for your CAPsMAN network where there will have no frequency overlapping. However, if you face any confusion to follow the above steps, feel free to discuss in comment or contact me from Contact page. I will try my best to stay with you.
Why not a Cup of COFFEE if the solution?

