PPPoE Server Configuration in MikroTik RouterOS 7
MikroTik PPPoE is a client-server protocol and mostly used at the end ISP configuration where MikroTik RouterOS acts as a PPPoE Server and user’s WiFi Router acts as PPPoE client. MikroTik PPPoE Server can be used with MikroTik simple queue management. So, it helps to manage user’s bandwidth easily.
People who are trying to do internet business should learn MikroTik PPPoE Server. Configuring PPPoE Server in MikroTik RouterOS 7 is so easy. If you have knowledge on basic RouterOS 7 configuration, you can configure MikroTik PPPoE Server so easily following my next steps.
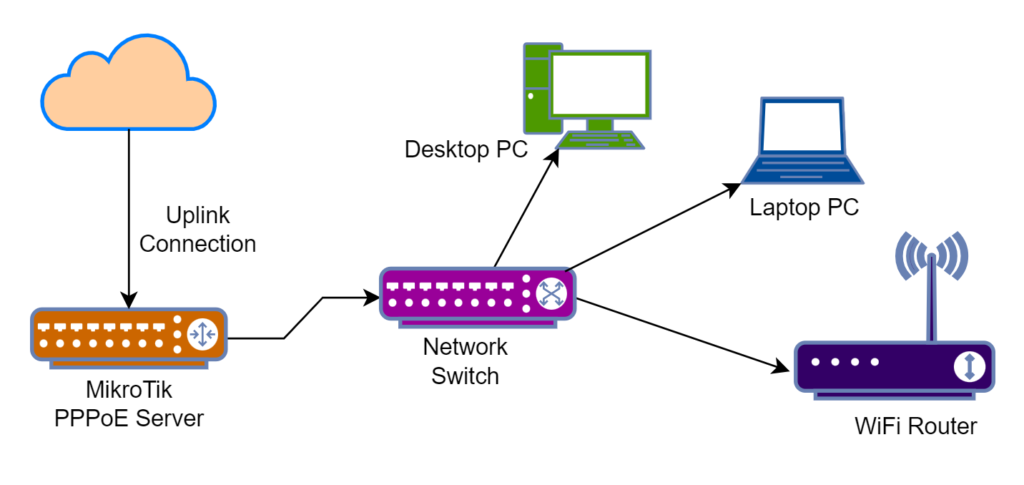
4 Steps to Configure PPPoE Server in MikroTik RouterOS 7
We can easily configure PPPoE Server in MikroTik RouterOS 7 following bellow 4 steps.
- PPPoE Server Configuration
- IP Pool Configuration
- PPP Profile Configuration and
- PPP Secrets (username and password) configuration
Step 1 – PPPoE Server Configuration in MikroTik RouterOS 7
To configure PPPoE Server in MikroTik RouterOS 7, do the following steps.
- Login to MikroTik Router using Winbox with full permission credentials.
- Now click on PPPoE Servers tab and then PLUS Sign (+). New PPPoE Service window will appear. Put PPPoE server name (like GalaxyRAD) in Service Name input box.
- Choose LAN interface where PPPoE server will be created from Interface drop-down menu. If you create bridge interface, the bridge interface will be available in this list. So, choose the bridge interface if you want to create PPPoE server on bridge interface.
- Click on One Session Per Host Checkbox If you don’t want to allow multiple host/devices with the same username and password. Obviously, you want it.
- At the bottom of this window, you can see, there are 4 authentication methods. Here only select PAP, and unselect all others. Now click Apply and OK.
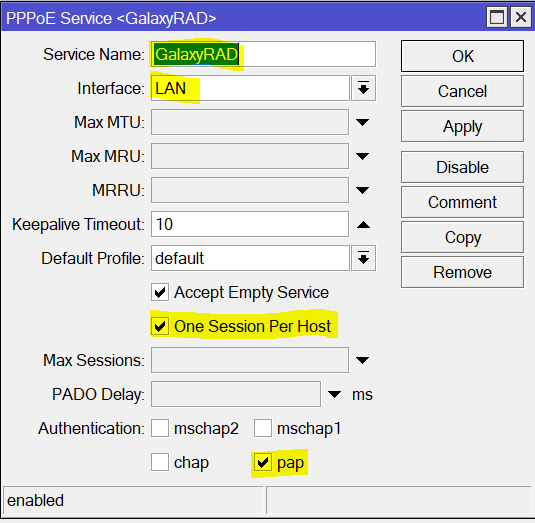
PPPoE Server is now ready. PPPoE Server requires IP address to connect clients. So, we will now create IP Pool from where PPPoE Server will assign IP address to clients.
Step 2 – IP Pool Configuration
PPPoE Server provides an IP address to the authenticated client. The IP is provided from the predefined IP pool. So, we have to declare the IP pool. To create IP Pool for PPPoE Clients, do the following steps.
- From Winbox, go to IP > Pool menu and click on PLUS SIGN (+). New IP Pool window will appear now.
- Put the name of the pool in Name input field (like 1Mbps_Pool) and assign the address range in Addresses input field (like 192.168.30.2-192.168.30.254). Note that, the address range excludes the first IP because it will be used as a Gateway address.
- Click Apply and OK button.
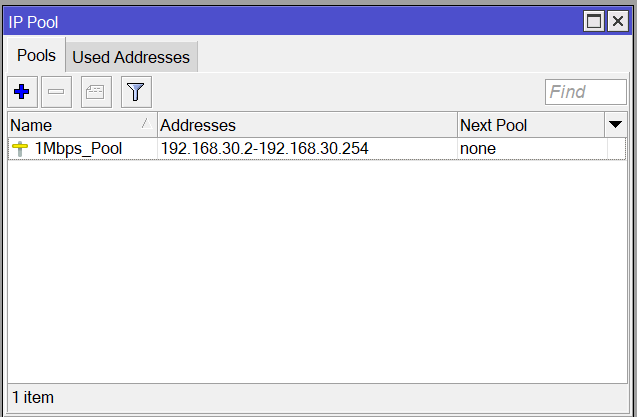
An IP Pool has been created. Similarly, you can create as many IP Pools as you require. We will now create user Profile which is used to maintain user authorization.
Step 3 – PPP Profile Configuration
PPPoE Server uses PPP Profile to maintain user authorization. So, we have to create PPP profile and assign user authorization. To create PPPoE profile, do the following steps.
- From Winbox, click on PPP menu item and then click on Profiles tab. You will see already two default profiles are created by MikroTik RouterOS. We will do nothing these default profiles. We will create another new profile here. So, click on PLUS Sign (+). New PPP Profile window will appear now.
- In New PPP Profile window, put your profile name in Name input field (like 1Mbps_Connection). Now put gateway address in Local Address input field (like 192.168.30.1) and choose created IP Pool (1Mbps_Pool) from Remote Address drop-down menu. Note that Local Address is the gateway address of this IP block which not included in 1Mbps_Pool.
- Now click Apply and OK button.
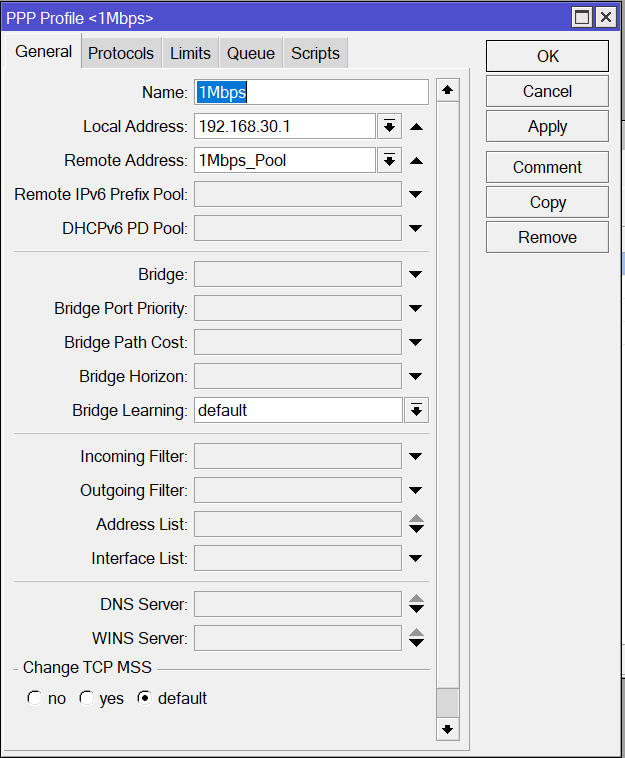
We have successfully created a PPP profile for PPPoE Server. Similarly, we can create multiple profiles to assign different user authorization. Now we need to create PPP Secret (username and password) that will be used to authenticate PPPoE client.
Step 4 – PPP Secret Configuration for PPPoE Server
PPP secret is used to authenticate PPPoE clients. ISP owner will provide the created secret (username and password) to the clients to authenticate their devices. To create PPP Secret, do the following steps.
- From Winbox, click on PPP menu item and then click on Secrets tab.
- Click on PLUS SIGN (+). New PPP Secret window will appear.
- Put the username of any client in the Name input field and password in Password input field. Note that, username and password are necessary when any client will be connected from his workstation (PC, Laptop, Router, WiFi Router and so on). Also, it is case-sensitive. So, be careful to assign these fields.
- Now choose service pppoe from Service drop-down menu and choose authorization profile for this user from Profile drop-down menu.
- Optionally, you can bind any device with this username and password by providing MAC address. For this, put MAC address of any device in Caller ID input box. If you put MAC address of any device in Caller ID, only this device can be connected with this secret (username and password).
- Now click Apply and OK button.
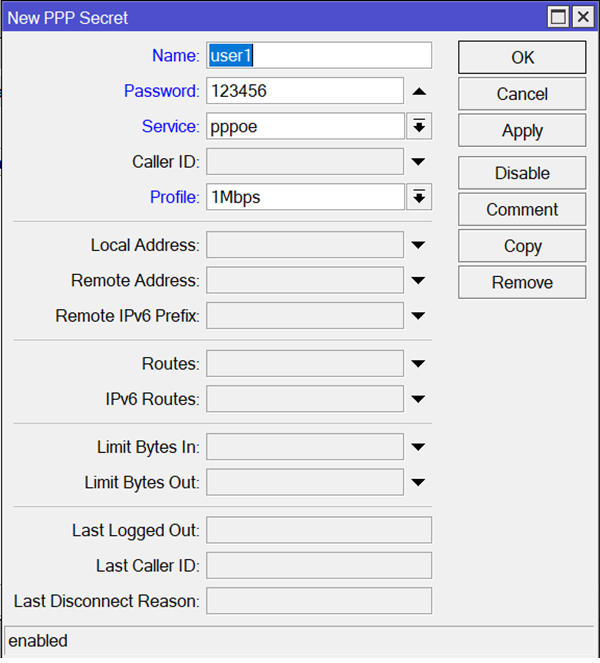
We have created a secret (username and password) for a user. Similarly, we can create as many secrets as we need following the above steps.
Required steps to configure PPPoE Server in MikroTik RouterOS 7 has been completed. We can now connect any PPPoE Client supported device such as PC, Laptop, Router, WiFi Router and so on using these created PPP Secrets.
MikroTik PPPoE Server provides the basic requirement to connect a PPPoE client but to run a smart ISP network with PPPoE Server, we also require RADIUS based Billing System because MikroTik PPPoE Server supports PPPoE user authentication and authorization from RADIUS Server.
GalaxyRAD is a RADIUS based ISP Billing Software that can be used to run a PPPoE Server based ISP network smoothly and smartly. Besides user authentication, authorization and accounting, it provides online payment gateway integration. So, your ISP network will be an automated system where user can pay their bill over online payment gateway and there is no need to collect payment manually.
If you find any difficulty to follow the above steps, follow the below video about MikroTik PPPoE Server configuration in RouterOS 7. Hope it will help you more.
How to configure MikroTik PPPoE Server in RouterOS 7 has been discussed in this article. I hope you will now be able to configure PPPoE Server in MikroTik RouterOS 7. However, if you face any issue to configure MikroTik PPPoE Server in RouterOS 7, feel free to discuss in comment or contact me from Contact page. I will try my best to stay with you.
Why not a Cup of COFFEE if the solution?

